Download
1 / 10
100 likes | 183 Vues
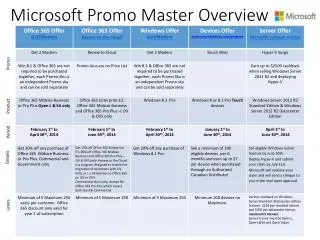
Master Planner Overview. Start an email Campaign. Go to MasterPlanner section of OneTouch Select the Branded Document Section. Select Brand. Select an email template to customize from the 2 available on the page. Click on the desired thumbnail image to begin. Email Contact List.

E N D
Master Planner Overview Start an email Campaign
Go to MasterPlanner section of OneTouchSelect the Branded Document Section
Select an email template to customize from the 2 available on the page. Click on the desired thumbnail image to begin.
Email Contact List Keep it simple – use the Recipient FirstName, LastName and Email Address and Save As a .CSV file from Excel BEFORE starting to build your Email.
Include your Logo? If your want to include your company logo have it available for upload from your computer BEFORE starting to build an HTML Email
Email Creation Start building your HTML Email – Fill in the open fields with the necessary information. Choosing “Custom” under Select Version, will give you open Headline and Body fields for your message.
Email Creation Select Images where appropriate (multiple pages of images to choose from)
Preview Email Note – HTML Products do not have thumbnails.To see a Preview click the HTML PREVIEW button.
Load the Email Database Upload and Map your .CSV file database of Names and Email Addresses After uploading and mapping data fields click “Map Changes” and proceed to checkout to submit the order Emails are FREE via MasterPlanner