Download
1 / 14
160 likes | 845 Vues
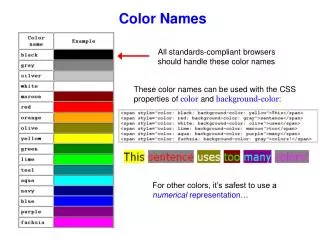
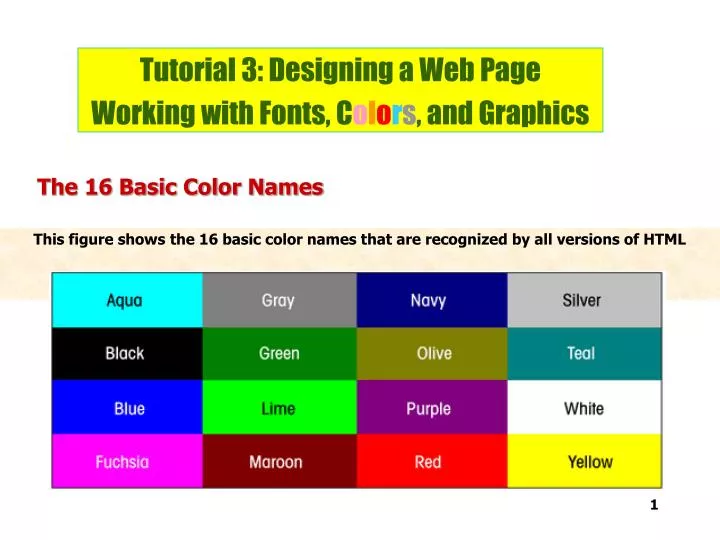
The 16 Basic Color Names. Tutorial 3: Designing a Web Page Working with Fonts, C o l o r s , and Graphics. This figure shows the 16 basic color names that are recognized by all versions of HTML. Partial List of Extended Color Names.

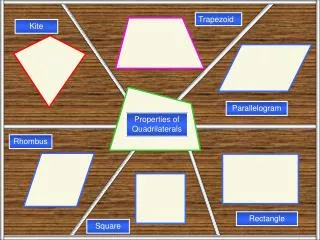
E N D
The 16 Basic Color Names Tutorial 3: Designing a Web Page Working with Fonts, Colors, and Graphics This figure shows the 16 basic color names that are recognized by all versions of HTML
Partial List of Extended Color Names This figure shows a partial list of these additional color names. The extended color name list allows you to create color schemes with greater color variation. A more complete list is provided in Appendix A, "Extended Color Names." Web site for color designations: (See the ITOM 2308 Web Site for this hyperlink.)
Color Names, RGB Triplets, and Hexadecimal Values The color yellow has the RGB triplet (255,255,0) and is represented by the hexadecimal string FFFF00. This figure shows the RGB triplets and hexadecimal equivalents for the 16 basic color names presented earlier.
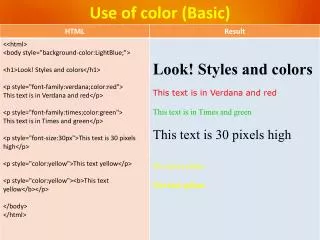
HTML Code for using Color in a Web Page • In most cases, the default browser scheme involves: • black text on a white or gray background • hypertext links highlighted in purple and blue • To use different colors than these, modify the attributes of the page, defined within the <body> tag. • The <body> tag can be used to indicate the colors on a Web page. • The syntax for controlling a page’s color scheme through the <body> tag is: <BODY BGCOLOR="color" TEXT="color" LINK="color" VLINK="color" ALINK="color"> • bgcolorattribute sets the background color • the value of color will be either one of the accepted color names or the color’s hexadecimal value • if you use the hexadecimal value, you must preface the hexadecimal string with the pound symbol (#) and enclose the string in double or single quotation marks i.e. <body bgcolor="#FFC088"> • textattribute controls text color • linkattribute defines the color of hypertext links • vlink attribute defines the color of links that have been visited by the user • alink attribute determines the color of an active hyperlink (the color of the link as it is clicked by the user)
active hyperlink color previously visited hyperlink color text color hyperlink color background color HTML Code for using Color in a Web Page Continued
Using the <font> Tag • The <FONT> tag allows you to specify the color, the size, and the font to be used for text on a Web page. • The syntax for the<FONT> tag is: <FONT SIZE="size" COLOR="color" FACE="face"> text </FONT> • sizeattribute allows you to specify the font size of the text • color attribute allows you to change the color of individual characters or words • face attribute specifies a particular font for a section of text Example <FONT> tag with modified properties:
Fonts: • The face attribute allows you to specify a list of potential font names. • the browser tries to use the first font in the list; if it fails, it will try the second font, and so on. • A generic font name should be listed last for the browser to fall back on. • for example to display the word "Arcadium" in a sans-serif, enter the following HTML tag: <FONT FACE=Arial, Helvetica, "sans-serif"> Arcadium</font>
Inserting a Background Image • The background attribute allows an image file for the background of a Web page. • The syntax for inserting a background image is: <BODY BACKGROUND="graphicsfilename"> • graphicsfilename is the location and filename of the graphic file you want to use for the background of the Web page. • for example, to use an image named "bricks.gif" as a background image, you would use the tag: <BODY BACKGROUND="brick.gif"> The Process of Tiling the Background Image This figure shows that when a browser retrieves your image file, it repeatedly inserts the image into the background, in a process called tiling, until the entire display window is filled up.
Entering Clouds.jpg as the Background setting the image file for the page’s background results in the background below Finding the right background image is a process of trial and error. You won’t know for certain whether a background image works well until you actually view it in a browser.
Controlling Image Placement and Size • The align attribute can control the alignment of an image with the <img> tag. • The syntax for the align attribute is shown in the following example: • <IMG SRC="SMUFountain.jpg" ALIGN="RIGHT" WIDTH=250 HEIGHT=200> • alignment(RIGHT, in this case) indicates how you want the graphic aligned in relation to the surrounding text Alignment Options See Page 3.28 for details about Alignment Options. Using the ALTAttribute • The ALT attribute specifies text to display in place of an inline image. • The syntax for specifying alternate text is: • <IMG SRC="graphics.gif" ALT="alternate text">
Controlling Vertical and Horizontal Space • To increase the horizontal and vertical space around an image use the hspace and vspace attributes. • The syntax is: <imgsrc="graphics.gif" vspace="value" hspace="value"> • hspace (horizontal space) attribute indicates the amount of space to the left and right of the image. • vspace (vertical space) attribute controls the amount of space above and below the image Controlling Image Size • Height and width attributes instruct the browser to display an image at a specific size. • The height and width attributes can be used to increase or decrease the size of the image on a Web page. • The syntax for setting the height and width attributes is: • <imgsrc="graphics.gif" height="value" width="value"> • value is the height and width of the image either in pixels or as a percentage of the page’s height and width
Specifying Alternative Text for an Inline Image Alternate image text is important because it allows users who have nongraphical browsers to know the content of your graphics. Alternate image text also appears as a placeholder for the graphic while the page is loading. This can be particularly important for users accessing your page through a slow dial up connection. specifying alternative text for an inline image
General Tips for Working with Color and Images • The primary purpose of a Web page is to convey information. • If an image adds visual interest to the Web page, include it. • Be aware that overusing graphics can make a Web page difficult to read and cumbersome to display. Using the BORDER Attribute • The BORDER attribute specifies the size of the border surrounding an inline image. • The syntax for setting the border width is: • <IMG SRC="graphics.gif" BORDER="value"> • value is the width of the border in pixels • An inline image that does not contain hyperlinks to other documents will, by default, not have a border. • If the image does contain hyperlinks, some browsers create a two-pixel-wide border. • If you do not want to show a border (and you can see one around the image), then use:<IMG SRC="graphics.gif" BORDER=0> • Here’s a way to change the default color of the border by using the style attribute: • <img SRC="SMUFountain.jpg" ALIGN=RIGHT HEIGHT=200 WIDTH=250 style="border : 5px solid #800000;"> • In this example, the border for graphics image will be maroon (#800000) and 5 pixels wide
Using the <BR> Tag and CLEAR Attribute • Use the <BR> tag to create a line break and force the following image or text to appear on its own line. • The CLEAR attribute is often used within the <BR> tag to create the effect of starting a paragraph below the inline image. • The clear attribute starts the next line at the first point at which the page margin is clear of text or images. for example, using <BR CLEAR="LEFT"> starts the next line when the left page margin is clear