Download

1 / 78
780 likes | 932 Vues
Authored by Rich Simerson 01-Mar-2004 Updated 01-Apr-2010 Modified by Lt Colonel Fred Blundell TX-129 Fort Worth Senior Squadron For Local Training Rev 5.0 03-Jar-2014.

E N D
Authored by Rich Simerson 01-Mar-2004Updated 01-Apr-2010Modified by Lt Colonel Fred BlundellTX-129 Fort Worth Senior Squadron For Local Training Rev 5.0 03-Jar-2014
This Training Slide Show is a project undertaken by Lt Colonel Fred Blundell of the TX-129 Fort Worth Senior Squadron, Fort Worth, TX for local use to assist those CAP Members interested in advancing their skills. The information contained herein is for CAP Member’s personal use and is not intended to replace or be a substitute for any of the CAP National Training Programs. Users should review the presentation’s Revision Number at the end of each file name to ensure that they have the most current publication.
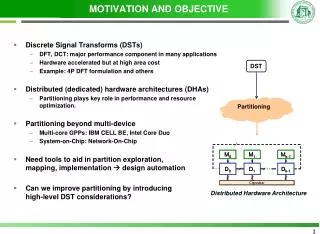
Objective and Plan • Execute five visual search patterns with G1000 avionics • Route, Parallel Track, Creeping Line, Expanding Square and Sector • Three G1000 methods for each pattern • Use (F)AA (I)ndustry (T)raining (S)tandards • Describe • Explain • Practice • Perform • Manage/Decide
Current Aircraft Mix Gippsland GA-8 Cessna 206 Cessna 182 Cessna 172
GX55 Versus G1000 GPS Search Patterns(included in software) GX55 G1000 SAR software G1000 non-SAR software Parallel line - with CAP Grid #s Parallel line - No CAP Grid #s Creeping Line Creeping Line (Parallel Line) Expanding Square Expanding Square Sector Search Route Search Route Search Route Search
G1000 Overview The G1000 (even with SAR software) lacks a grid database Flying by reference to real time Lat/Long is not recommended (loss of SA) 3 methods for Parallel Line, Creeping Line and Expanding Square. Method 1 - GARMIN SAR software Method 2& 2a - User waypoints & OBS/bar data Method 3 - Referencing Lat/Long gridline display and/or MFD data bar parameters
Assumptions MP & MO have good working knowledge of the C182T G1000 software MP is proficient in use of autopilot MO has some knowledge of Garmin SAR software
Basic Philosophy MO leads the work and the MP flies the plane Choice of method depends on: Availability of GARMIN SAR software G1000 Proficiency (flt plans, OBS, user waypoints) Crew Experience Autopilot proficiency Winds Familiarity with search area Urgency/tempo Terrain
G1000 Initial Setup Many user options can be changed Assume previous crew made changes Restore to factory settings, delete all flight plans and user waypoints Avoid the “what's it doing?” & “why does it look like that?” syndrome
All Methods – G1000 Core Skills The MP and MO should master the following core skills in order to fly the search patterns: Entering user waypoints by lat/long, by using reference waypoints (radial and distance) and by using “joystick” with map panning feature Entering and activating a flight plan using multiple waypoints Autopilot flying in NAV & HDG mode and seamless transitions in and out of autopilot (KAP140) and CWS operations (GFC700) Activating various legs of flight plan Using the OBS & course selector
All Methods – Tips Hand plot the pattern - record waypoint names, lat/longs and offsets (radial and distance), desired tracks to be flown Haste makes waste – verify the lat/long and offsets before saving Waypoints can’t be edited once they they are in a flight plan Write down the lat/long of any important ground targets before leaving the aircraft since they may be deleted by the next crew Build flight plans by selecting them from the RECENT waypoint window Practice, practice, practice… use ground power and/or GARMIN PC trainer
Flying with the KAP140 and GFC700 Autopilots KAP140 A/P is operationally limited to 80 - 160 KIAS, the GFC700 is limited to 70 - 165 KIAS Monitor airspeed as power changes are made The autopilot will command pitch to maintain the set altitude regardless of airspeed impact, it will fly the aircraft into a stall if power is not managed accordingly Autopilot turns are made at standard rate, turns may need to be made manually: KAP140 - disengage then reengage the A/P when re-established on the next segment of the search pattern GFC700 - the CWS button can be used to make the turns
Flying with the KAP140 Autopilot Altitude will not automatically ARM and capture after disengagement Captures the VS at the moment the A/P engaged The altitude must be ARMed for the A/P to capture the altitude in VS mode Press ALT to capture current altitude after A/P engagement use VS mode to maneuver the aircraft back to the search pattern altitude or use UP DN keys to adjust ALT in 20ft increments
Turns 90 Kts, standard rate = 1nm per 180 degrees 90 kts 30 degrees = ½ nm per 180 degrees Add wind and 1 nm track spacing requires hand flying
Turns with the KAP140 The general sequence for autopilot operations for faster than standard rate turns is as follows. It is assumed that the A/P is in NAV mode tracking a GPS course line in OBS mode: KAP140 autopilot 1) Synchronize the HDG bug 2) Select HDG mode on A/P 3) Activate next leg of flight plan (OBS mode is automatically cancelled) 4) Press OBS soft key 5) Change course using CRS knob to direction of next leg 6) Disconnect the A/P 7) Turn to intercept the next leg (magenta line) 8) Engage A/P 9) Press ALT to capture current altitude 10) ARM NAV mode 11) Adjust altitude (UP or DN keys 20ft increments as req’d)
Turns with the GFC 700 GFC700 Autopilot 1. Synchronize the HDG bug 2. Select HDG mode on A/P 3. Activate next leg of flight plan (OBS mode is automatically cancelled) 4. Press OBS soft key 5. Change course using CRS knob to direction of next leg 6. Hold CWS button and make the turn to intercept the next course line 7. Synchronize the HDG bug on the intercept heading 8. Release CWS button 9. Select NAV mode on A/P 10. Hold CWS button and maneuver the aircraft to the desired search altitude, then release CWS button
Flying theGrid Line Display Set up the gridline display as summarized in the MFD Setup One minute gridlines will be displayed at the 5NM map range. Note that the grid lines will not display if the MFD soft key DCLTR is set to 2 or higher Requires a higher level of situational awareness Other options to improve display clarity: Using large font for the lat/long Turn off TOPO display – improves contrast
Route Search Using flight plan with parallel track option Enter and activate a flight plan for the route using a combination of Airports, VORs, NDBs and user waypoints as appropriate. Within FPL select the Parallel track option from the Menu and input the direction (LEFT or RIGHT) and Distance (offset) from the flight plan course line and activate. Note that the minimum offset allowed is 1.0 NM. Fly the track in A/P NAV mode Note: parallel track will not work with if there is a turn >120 deg in the flight plan or if the parallel tracks overlap
Route Search(Continued) Using Flight Plan And MFD Data Bar Enter and activate a flight plan for the route using a combination of Airports, VORs, NDBs and user waypoints as appropriate. Note the true course for each leg of the flight plan Fly the required parallel track offset by using the MFD data bar for cross track information (XTK) relative to the flight plan route Fly the parallel track in A/P HDG mode, use the current track bug on the PFD HSI to assist maintaining the parallel track 27
Parallel Line (Grid)Search Method 1 GARMIN SAR Software Input user waypoint for grid entry point by Lat/Long Select Search and Rescue from the Active Flight Plan page Select Parallel Line Search and add appropriate parameters, note that only 0.1 NM increments can be used for leg spacing A flight plan will be automatically generated and activated from aircrafts present position
Parallel Line (Grid)Search Method 1 • When within 5 NM of the entry waypoint the MP then either hand flies or uses HDG or OBS NAV mode to establish the aircraft position and heading to intercept the entry waypoint on the correct ground track (TRK), search speed (GS) & altitude. The grid track lines should be flown in A/P HDG or NAV mode
Parallel Line (Grid)Search Method 1 If the winds are light or turns can be made into the wind the Parallel line parameters could be adjusted to start and end 1 NM outside the grid and the entire pattern can be flown in A/P NAV mode without the need to use CWS for turns Turns with the wind - sequence to each subsequent track line using the FPL window in the PFD. To activate the next leg of the grid, press the FMS knob to highlight the cursor then turn the large FMS knob to highlight the appropriate waypoint, press MENU and press <enter>/<enter> to activate the leg. Then set the OBS to the track line true course 32
Parallel Line (Grid) Search Method 2 User Waypoints, Flight Plan And OBS Input user waypoints for grid entry point by Lat/Long and the grid end points along the entry edge of the grid by reference waypoint, true radials and distance (NM) from the grid entry waypoint. (The G1000 only accepts distance offsets in multiples of 0.1 NM) Enter a flight plan from the departure airport to the user waypoints in order & activate the flight plan. When ~5 NM from the entry waypoint, activate the OBS mode, rotate the course line to 360 or 180 degrees true (N-S tracks or 270 or 090 degrees true E-W tracks). Fly in A/P HDG or NAV mode
Parallel Line (Grid)Search Method 2 • Sequence to each subsequent track line using the FPL window in the PFD. Select the next waypoint & activate the leg. Then set the OBS to the track line true course • Turns will usually need to be hand flown in order not to overshoot the next track line. Disconnect the A/P outside the grid (KAP140) or hold the CWS button (GFC700). • Repeat until the grid is complete.
Parallel Line (Grid)Search Method 2a Single User Waypoint & XTK And OBS Input user waypoint at grid entry point by Lat/Long Enter a flight plan from the departure airport to the user waypoint or load a “direct to” When ~5 NM from the entry waypoint, activate the OBS mode, rotate the course line to the direction of the first track Fly the track in A/P HDG mode. This first track will establish the “base line” for subsequent parallell tracks At the end of the first track, DIS=7.5 NM, input a user waypoint “on the fly” using the panning arrow to mark the end of the grid
Parallel Line (Grid)Search Method 2a • Turn to establish a new track in the opposite direction at a distance XTK= track spacing (e.g. 1 nm for the second track and 2 nm for the third track etc.) • Fly each track in A/P HDG mode adjusting HDG to achieve the desired true track while maintaining desired XTK from the base line • Turns will usually need to be hand flown in order not to overshoot the next track line. • Repeat until the grid is complete.
Parallel Line (Grid) SearchMethod 2a Note user waypoint added “on the fly” marking end of grid
Parallel Line (Grid)Search Method 3 MFD Gridline Display Input user waypoint for grid entry point by Lat/Long Turn on the gridline display (5NM map range) East/West tracks - activate the OBS mode, rotate the course line to 090, monitor DIS from course line North/South tracks - activate the OBS mode, rotate the course line to 360, monitor DIS from course line Fly tracks in A/P HDG mode
Creeping LineSearchMethod 1 GARMIN SAR Software Construct a flight plan to beginning point of search to end point of search Determine true desired track (DTK) between beginning point and end point of search from flight plan window on MFD as you enter the flight plan Input a second user waypoint by reference to the starting waypoint +90 degrees relative to the course line at a distance equal to the offset Select Search and Rescue from the Active Flight Plan page
Creeping LineSearchMethod 1 GARMIN SAR Software Select Parallel Line Search and add appropriate parameters, The waypoint input should be the second user waypoint , the initial desired track should be set to the course line – 90 degrees and the initial turn set to RIGHT A flight plan will be automatically generated and activated from aircrafts present position When ~5 NM from the entry waypoint the MP then either hand flies or uses HDG or NAV mode to establish the aircraft position and heading to intercept the first user waypoint. The grid track lines should be flown in A/P HDG or NAV mode 47
Creeping Line SearchMethod 1 User WPT