Download
1 / 35
380 likes | 685 Vues
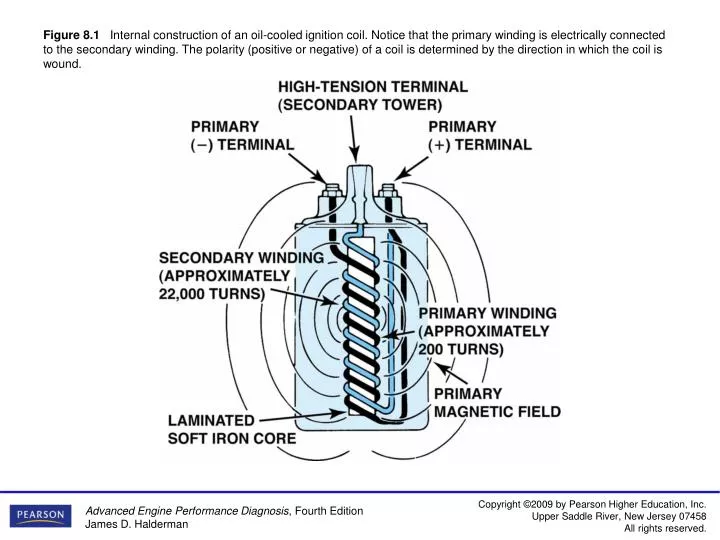
Figure 8.1 Internal construction of an oil-cooled ignition coil. Notice that the primary winding is electrically connected to the secondary winding. The polarity (positive or negative) of a coil is determined by the direction in which the coil is wound.

E N D
Figure 8.1Internal construction of an oil-cooled ignition coil. Notice that the primary winding is electrically connected to the secondary winding. The polarity (positive or negative) of a coil is determined by the direction in which the coil is wound.
Figure 8.3Cutaway of a General Motors Type II distributorless ignition coil. Note that the primary windings are inside of the secondary windings.
Figure 8.4 Typical primary and secondary electronic ignition using a ballast resistor and a distributor. To protect the ignition coil from overheating at lower engine speeds, many electronic ignitions do not use a ballast resistor but use electronic circuits within the module.
Figure 8.5A tapped-(married) type ignition coil where the primary winding is tapped (connected) to the secondary winding.
Figure 8.6Operation of a typical pulse generator (pickup coil). At the bottom is a line drawing of a typical scope pattern of the output voltage of a pickup coil. The module receives this voltage from the pickup coil and opens the ground circuit to the ignition coil when the voltage starts down from its peak (just as the reluctor teeth start moving away from the pickup coil).
Figure 8.7The varying voltage signal from the pickup coil triggers the ignition module. The ignition module grounds and ungrounds the primary winding of the ignition coil, creating a high-voltage spark.
Figure 8.8Hall-effect switches use metallic shutters to shunt magnetic lines of force away from a silicon chip and related circuits. All Hall-effect switches produce a square wave output for every accurate triggering.
Figure 8.9Shutter blade of a rotor as it passes between the sensing silicon chip and the permanent magnet.
Figure 8.10Some Hall-effect sensors look like magnetic sensors. This Hall-effect camshaft reference sensor and crankshaft position sensor have an electronic circuit built in that creates a 0- to 5-volt signal as shown at the bottom. These Hall-effect sensors have three wires: a power supply (8 volts) from the computer (controller); a signal (0 to 5 volts); and a signal ground.
Figure 8.11A magnetic sensor uses a permanent magnet surrounded by a coil of wire. The notches of the crankshaft (or camshaft) create a variable magnetic field strength around the coil. When a metallic section is close to the sensor, the magnetic field is stronger because metal is a better conductor of magnetic lines of force than air.
Figure 8.13bCylinder I slit signals the computer the piston position for cylinder I. The I-degree slits provide accurate engine speed information to the computer.
Figure 8.14aAn optical distributor on a Nissan 3.0 L V-6 shown with the light shield removed.
Figure 8.14bA light shield being installed before the rotor is attached.
Figure 8.16A typical General Motors HEI coil installed in the distributor cap. When the coil or distributor cap is replaced, check that the ground clip is transferred from the old distributor cap to the new. Without proper grounding, coil damage is likely. There are two designs of HEI coils. One uses red and white wire as shown, and the other design, which has reversed polarity, uses red and yellow wire for the coil primary.
Figure 8.18Wiring diagram of a typical Ford electronic ignition.
Figure 8.19Schematic of a Ford TFI-IV ignition system.The SPOUT connector is unplugged when ignition timing is being set.
Figure 8.20A Chrysler electronic ignition distributor. This unit is equipped with a vacuum advance mechanism that advances the ignition timing under light engine load conditions.
Figure 8.21A waste-spark system fires one cylinder while its piston is on the compression stroke and into paired or companion cylinders while it is on the exhaust stroke. In a typical engine, it requires only about 2 to 3 kV to fire the cylinder on the exhaust strokes. The remaining coil energy is available to fire the spark plug under compression (typically about 8 to 12 kV).
Figure 8.22The left-hand rule states that if a coil is grasped with the left hand, the fingers will point in the direction of current flow and the thumb will point toward the north pole.
Figure 8.23Typical Ford EDIS 4-cylinder ignition system. The crankshaft sensor, called a variable-reluctance sensor (VRS), sends crankshaft position and speed information to the EDIS module. A modified signal is sent to the computer as a profile ignition pickup (PIP) signal. The PIP is used by the computer to calculate ignition timing, and the computer sends a signal back to the EDIS module as to when to fire the spark plug. This return signal is called the spark angle word (SAW) signal.
Figure 8.24Typical wiring diagram of a V-6 distributorless (direct fire) ignition system.
Figure 8.26A typical coil-on-plug (COP) ignition system on a V-8 with a separate coil for each cylinder.
Figure 8.27Individual coils with modules shown on the General Motors 4.2-L inline 6-cylinder light-truck engine. Note the aluminum cooling fins (heat sink) on top of each assembly.
Figure 8.28A DC voltage is applied across the spark plug gap after the plug fires and the circuit can determine if the correct air–fuel ratio was present in the cylinder and if knock occurred.
Figure 8.29Ignition timing marks are found on the harmonic balancers that are equipped with distributor ignition.
Figure 8.30The initial timing is where the spark plug fires at idle speed. The computer then advances the timing based on engine speed and other factors.
Figure 8.31A typical waveform from a knock sensor during a spark knock event. This signal is sent to the computer which in turn retards the ignition timing. This timing retard is accomplished by an output command from the computer to either a spark advance control unit or directly to the ignition module.
Figure 8.33The heat range of a spark plug is determined by the distance the heat has to flow from the tip to the cylinder head.