Download
1 / 2
20 likes | 149 Vues
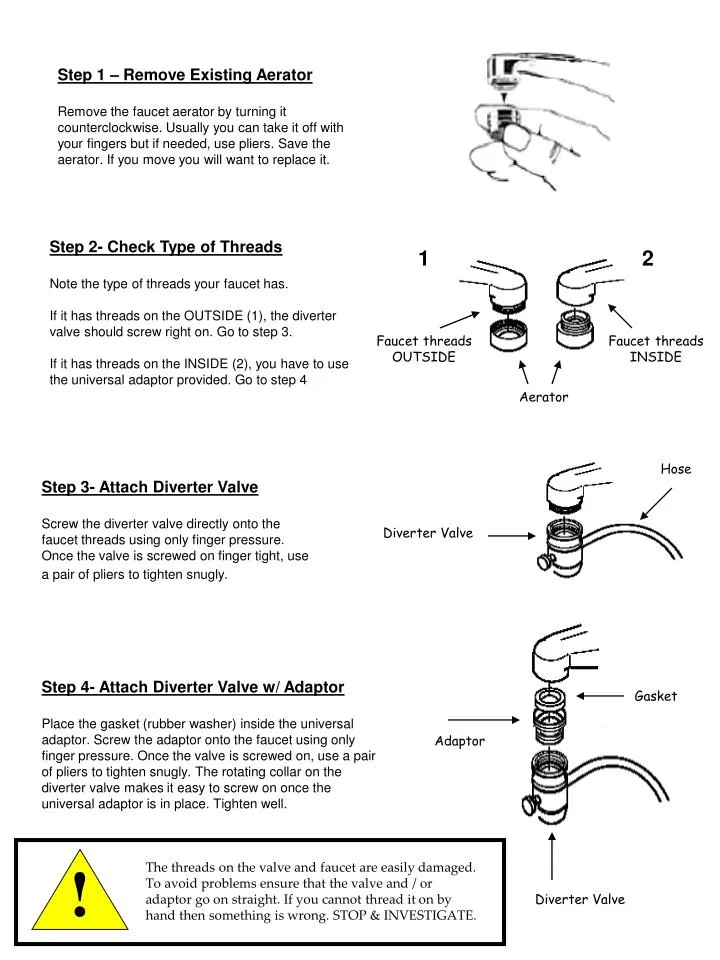
!. Step 1 – Remove Existing Aerator Remove the faucet aerator by turning it counterclockwise. Usually you can take it off with your fingers but if needed, use pliers. Save the aerator. If you move you will want to replace it. Step 2- Check Type of Threads

E N D
! Step 1 – Remove Existing Aerator Remove the faucet aerator by turning it counterclockwise. Usually you can take it off with your fingers but if needed, use pliers. Save the aerator. If you move you will want to replace it. Step 2- Check Type of Threads Note the type of threads your faucet has. If it has threads on the OUTSIDE (1), the diverter valve should screw right on. Go to step 3. If it has threads on the INSIDE (2), you have to use the universal adaptor provided. Go to step 4 1 2 Faucet threads OUTSIDE Faucet threads INSIDE Aerator Hose Step 3- Attach Diverter Valve Screw the diverter valve directly onto the faucet threads using only finger pressure. Once the valve is screwed on finger tight, use a pair of pliers to tighten snugly. Diverter Valve Step 4- Attach Diverter Valve w/ Adaptor Place the gasket (rubber washer) inside the universal adaptor. Screw the adaptor onto the faucet using only finger pressure. Once the valve is screwed on, use a pair of pliers to tighten snugly. The rotating collar on the diverter valve makes it easy to screw on once the universal adaptor is in place. Tighten well. Gasket Adaptor The threads on the valve and faucet are easily damaged. To avoid problems ensure that the valve and / or adaptor go on straight. If you cannot thread it on by hand then something is wrong. STOP & INVESTIGATE. Diverter Valve
Important Tips: • If you have a non-threaded faucet, you will need to purchase a special adaptor from your local hardware store or call us at 1.866.4.MY.WASH • If your diverter pin becomes hard to pull and/or push, the diverter mechanism has built up with calcium, lime or magnesium deposits. Please follow the maintenance steps below. • 1. Unscrew diverter from faucet aerator and place a few drops of vinegar into diverter mechanism; pull pin a few times, rinse thoroughly and dry. (Any household vinegar will work.) • 2. Screw diverter back onto faucet


![The CENVAT Credit Rules, 2004. [ Notification no. 23/2004-C.E. (NT) dated 10.09.2004]](https://cdn3.slideserve.com/5711726/the-cenvat-credit-rules-2004-notification-no-23-2004-c-e-nt-dated-10-09-2004-dt.jpg)