Download
1 / 14
140 likes | 265 Vues
Solar Oven by Cho Ei Seona Seol. We prepared following items One sheet of cardboard to make the lid One small roll of aluminum foil. One can of flat-black spray paint white glue One Reynolds Oven Cooking Bag

E N D
Solar Ovenby Cho Ei Seona Seol
We prepared following items • One sheet of cardboard to make the lid • One small roll of aluminum foil. • One can of flat-black spray paint • white glue • One Reynolds Oven Cooking Bag • Two cardboard boxes • Inner box (18*18*16)inches • Outer box (22*22*20)inches
The outer box which is larger at least half inch (1.5cm) or more all around for an airspace between the two boxes for insulation • Aluminum foil lining inside the outer box to retain heat
Aluminum linings inside the outer box for reflecting the sunlight to get maximum sunlight and heat
Cardboard as a drip pan • Aluminum foil is glued to the cardboard • The drip is spray painted black. • It serves two purposes: painted black to retain heat to heat up the cooking pot, and to hold the pot.
Crumbled newspaper inside the outer box to cushion the inner box
Inner box is inserted into outer box • Cut the excess flaps • Glue aluminum foils on the inner box flaps which are now glued to the outer box
Make a lid by folding the four corners of a flat board. • Cut three sides of the lid. • The opening should be the size of the inner box. • Glue the inner side of the lid with aluminum foil. (this will be the primary reflector)
Glue the oven cooking bag on the inner part of the lid to cover the opening. • Now the solar oven is completed and ready to use.
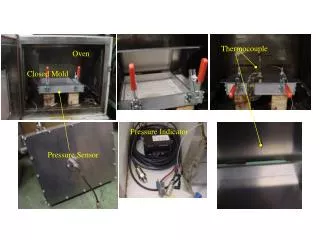
Place a digital thermometer • (range: -65ºF to 450ºF) • Then measured the initial water temperature. (71ºF) • Close the lid and kept the oven in the sun making sure the sunlight from reflector reflects directly into the oven. • The temperature reaches to 91ºF after 5 minutes.
The temperature reached to 122ºF five minutes later. (ten minutes after initial reading.) • 136ºF three minutes later after the last reading. (13 minutes after initial reading.)
Five minutes later.. 162ºF … (18 minutes after initial reading.) (We also noticed the water started producing steams) • Five more minutes 173ºF .. (23 minutes after initial reading.)
Twenty five minutes after the initial reading… 174ºF… (The temperature only went up 1ºF in two minutes) • Five more minutes later… (30 minutes after the initial reading) Now the temperature read 175ºF
The maximum temperature we could obtain in this solar oven is 175ºF. • We can improve the efficiency by • adding more reflectors • Making it more air-tight by sealing all the corners • Use more efficient materials such as aluminum reflectors, glass oven window, etc,. Questions???