Download
1 / 15
150 likes | 256 Vues
Click “Personal Homepage” on the vpf-web “Financial Applications” main page. Check for informational messages, then click “Oracle Login via PIN” button. Enter Harvard ID and PIN password, then click “Authenticate” button. Click on “HRVD^PCard^Reviewer” privilege.

E N D
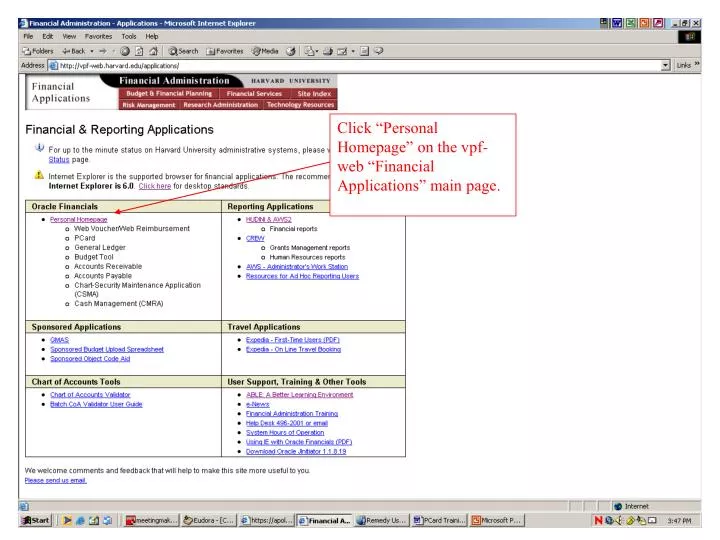
Click “Personal Homepage” on the vpf-web “Financial Applications” main page.
Check for informational messages, then click “Oracle Login via PIN” button.
Enter Harvard ID and PIN password, then click “Authenticate” button.
Select card or group to review. Yours will be EASSEAS/PcardholderClick “Set as Default” button to retain setting.
Select from “Show” drop down if you want to filter transactions.
Select from different “Sort By” options if you wish, then click the “Review” button to see transactions to be swept.
Click “Edit” button to review a transaction. “Rev” indicates that a transaction has already been reviewed.
To review a transaction: • Add a business purpose • Change default GL coding (coding given at time of Pcard application) if necessary • Click “Mark as Reviewed...” button. To discard changes, click “Return to List...” button.
Click on “Previously Used GL Codes” to populate selected GL coding lines above. If you wish, add explanatory text to “GL Code Alias” field(s), and click “Update…” You can split-code transactions by clicking the “Copy” button(s).
To view chart-of-accounts descriptions, click button next to “Root” segment.
To generate a weekly sweep report, go to the “Main Review” screen, select desired date from “Sweep Date” drop down, and click the “Report” button (not shown here).
If you have transactions to be swept on a given week, print out that week’s sweep report, attach corresponding original receipts and file in your department for audit purposes. Note that the charge above has been reviewed, since the last name of the reviewer appears in the “Reviewer” column. If there is no last name next to the amount of a transaction on a report, you will need to return to the main reviewer page, review the unreviewed transaction, and then generate and print an updated report. The business purpose, vendor, GL coding and amount of charge all appear on the report.