Download
1 / 41
410 likes | 468 Vues
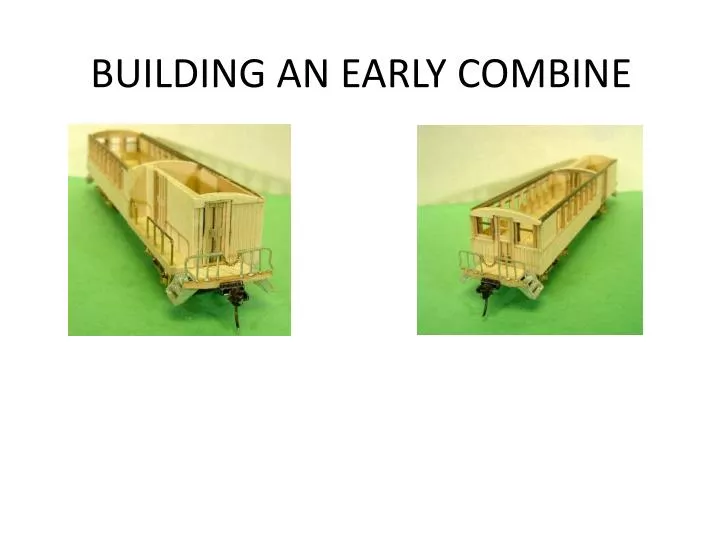
BUILDING AN EARLY COMBINE. Presented by BOB VAN CLEEF of the North River Railway. WORLD’S FIRST AUTOTRAIN.

E N D
BUILDING AN EARLY COMBINE Presented by BOB VAN CLEEF of the North River Railway
WORLD’S FIRST AUTOTRAIN If you consider that the horse in 1855 was regarded as transportation much as the automobile is today, that would make this the first “auto-train” in use. Back then towns were built about twenty miles apart, a good day’s ride by horseback. A traveler with the use of this car could travel a hundred miles or more and still have access to his favorite mode of transportation.
Railroad Museum of Pennsylvania This car now located in Pennsylvania was built at the Cumberland Valley Railroad shops in 1855. It is the oldest passenger car preserved in the United States.
A FUN MODEL TO BUILD Model Railroading is fun and this unique model proves it. This freelance model generally follows the outline of the Cumberland Valley car. It was “imagineered” as a car built later, say in 1885 and as standard gauge. Modern updates would have included a clerestory roof, modern couplers and air brakes.
CAR BUILT IN SECTIONS The end platforms Roof (and ends) The Clerestory windows Various Doors The sides Car ends
CONSTRUCTION OF PLATFORM The platform assembly includes the truck bolster, platform, steps, handrails and couplers.
Doing a bit of Testing Sometimes, when scratch building a car, it can be helpful to throw something together to determine how all the parts will fit. This assembly was used to develop the car ends.
A SIMPLE HOLDING FIXTURE This is a simple fixture used to hold the bolster and couplers in place while gluing. Lubricating the fixture with a THIN layer of petroleum jelly will help prevent glued parts from sticking.
BOLSTER AND COUPLER Install (2) long floor beams first Dummy sill positions end of beams. These will be replaced by the actual beams later Install (2) short beams next Install spacers between beams. Install coupler pocket spacer at top center. Drill hole for truck “kingpin.”
ADD PLATFORM • Lightly sand the top flat • Add the Platform first. • Hold the sill against the platform and beams but do not glue at this time. • Notch the beam to fit the coupler pocket.
FORMING THE END SILL • Notch end sill for coupler. • Contour the shape of sill. • Another simple jig will be used to drill the end beams for the hand rails. • Do not install the hand rails just yet.
DRILL HOLES IN SILL Holes are drilled quickly and reliably by using a brass template like this. It may take a few extra minutes to make, but once made it can be used repeatedly for other cars. Use a bit of brass stock, drill the pattern, then file one side to the desired angle.
ADD TRUCK BEARING Use a small piece of brass as a bearing plate for the truck. Drill hole for truck screw. Glue in place. Glue coupler in place.
ADD STEPS Steps are added as shown.
FINISHING PLATFORM ASSEMBLY Close-up of finished platform assembly.
MAKING A PASSENGER CAR ROOF The roof shown here is typical on almost all passenger cars of this era. We will make this from (5) separate sections plus (2) sub-assemblies and some trim. Roof end Top part of roof side roofs Clerestory panel trim pieces
ANOTHER VIEW OF THE ROOF END • Once complete, this section will be shortened to about half this length. • The extra length makes it much easier to hold and shape.
BEGINNING of CONSTRUCTION It is all right if the joints show at this stage as they will be covered by a tissue paper roof. • The Clerestory roof is from Northeastern Scale Lumber. • Be careful not to damage the edges while handling this stripwood
USE A ROOF TEMPLATE Use templates to shape upper and lower roof sections. One template will be needed for all the cars you want to build. Do NOT try to use the trim pieces as they are much harder to use to get a good blend.
NOTCH THE UPPER LIP Begin by removing the upper lip of roof . Use template to determine how far back notch extends. Later, this section will be cut at or slightly beyond this notch.
ROUND LOWER ROOF Round the lower roof corner using the template for the proper contour.
EXTEND UPPER EDGE • Select stripwood of proper thickness for trim strip. • Form lower curve using template. • Glue in place making sure there are no gaps and bottom edge of roof and trim are even. • Round top of roof making sure width of trim strip is even.
FINISHED ROOF END It is best to work on both sides of an end at the same time. Work slowly and carefully to gradually shape the roof to the template. The width of the trim is the key to making a good shape. Once the trim is right the rest will follow naturally.
UPPER AND LOWER MIDDLE ROOF Cut the roof into (4) pieces Discard the lower center section of roof. • Make a horizontal cut and save the upper roof. • Be sure to preserve the lip of the upper roof. • Cut the remaining section into three segments. • The cut should be at or just inside the surface for the clerestory windows.
JOINING the ROOF SECTIONS A multi-purpose fixture will be used to join the roof segments. The two outer rails will help align the lower roofs for gluing and there are two rails on the opposite side for the upper roof. Also visible is (1) of two other jigs for making the clerestory windows.
GLUE LOWER ROOF SECTIONS Working one side at a time, glue a lower roof section to an end. The fixture will hold the lower edge in proper alignment but care must be taken to get the proper rotation for the two sections to line up.
GLUE UPPER ROOF SECTION Likewise, the upper roof section can be glued.
BUILDING the CAR SIDES Car side Using this fixture Build this sample car side • Sides will be built in (2) layers using stripwood shapes. • The fixture will make it easy to hold parts in place during assembly. • It will also insure uniform size of sides.
CONSTRUCTION SCHEMATIC Begin by trimming the COACH SIDING as shown. Add upper portion to form windows of base layer. --------------------------- Trim and glue scribed siding above and below the chair rail as required. Finish by adding window molding and fascia as shown.
INSIDE OF CAR WALL This view shows the inside of the car’s wall. The parts around windows lie flat in the holding fixture. The generic fixture can be used for any car side of this type.
SIDE AFTER ASSEMBLY • The only parts of the base layer that are visible are the window frames and the chair rail. • All the parts in line with the windows are trimmed to the same length. • This same holding fixture was used on all of the car sides in the Drover Combine and as well as for several other cars.
WINDOWS AND DOORS • Making doors, windows and other parts in batches is Faster. • Parts are More Accurate. • Pick best for use where details show. • Use extras for other projects or leave lying around as “scrap”.
Clerestory Windows • The holding fixture used to build the clerestories is part of the one used to glue the roof sections together. • Window strips can be made any length for various cars. • Note the marks used to help space the windows.
INSTALLING WINDOWS BEFORE view shows clerestory area before panels are installed. Panels installed with trim added.
Label Woodworking Trucks Label has some nice looking trucks to go with an early passenger coach. Unfortunately this type of truck can cause intermittent shorts. Note how close the wheel rim is to the side frame. Luckily it is not too difficult to re-heat the solder and/or gently bend the side frame ever so slightly. Use cardstock shim for spacing.
THE SIDE HANDRAILS • These side rails were assembled from brass wire. • Drill holder first then install vertical stanchions first. • Hold against a flat surface and solder horizontal railings. • File to round and shape. • Remove from holder and install on model
PLATFORM INSTALLED Here is the completed end.
END OF COACH SECTION Side view of coach before painting
COMBINE AFTER A BIT OF PAINT This is the result to this point. Car has been weighted to five ounces and ready for test runs. Details will be added later. The fun part of building freelance
For More Information… Labelle Woodworking https://www.labellemodels.com/ LaBelle Woodworking Company is one of the oldest companies still offering wooden model railroad kits. Northeastern Scale Lumber http://www.northeasternscalelumber.com/ COMPLETE SCALE HARDWOODS FOR Model Railroaders Railroad Museum of Pennsylvania http://www.rrmuseumpa.org/ more than 100 historic locomotives and railroad cars on display. Walthers.com http://www.walthers.com/ Largest single supplier for model railroading.
THE END This presentation has been brought to you by the North River Railway Bob Van Cleef 46 Broadway Coventry, CT 06238 http://www.northriverrailway.net