Download
1 / 24
250 likes | 476 Vues
Project Power Supply. J.T. Hwang Paul Dykstra. Presentation Overview. Discuss Specifications Discuss Circuit design Discuss Individual Parts of circuit and some design issues Discuss Problems experienced Discuss Results Conclusions. Project Specifications. Input range of 100-240Vrms

E N D
Project Power Supply J.T. Hwang Paul Dykstra
Presentation Overview • Discuss Specifications • Discuss Circuit design • Discuss Individual Parts of circuit and some design issues • Discuss Problems experienced • Discuss Results • Conclusions
Project Specifications • Input range of 100-240Vrms • Outputs of +5,-5,+12,-12,+24 volts • Total power of 100W (20W per output) • Ripple +/-%1 • Try and implement a feedback control to keep outputs constant
Design considerations • Want to use power electronics • Want to isolate input from output • Want to isolate outputs from each other • Want to keep ripple low
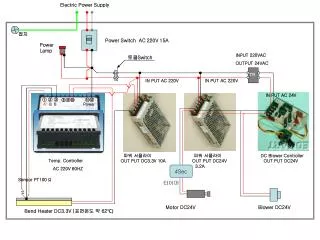
Breakdown of ckt. operation • 60Hz transformer with turns ration of 120:25.2 Vrms • Full bridge rectifier • Flyback converter • Gate drive circuit • Control circuit
Rectifier • 60Hz transformer steps voltage down from 120 to 25.2 Vrms (170:35.2V peak) • Full bridge fully rectifies signal • Capacitor makes output look like ideal voltage source
Description of flyback • When FET is on, current goes through primary • When FET is off, current flows through secondary’s, giving desired ouptputs. • Current can only flow one way on each side due to switch design
Load Resistor Values • P=V^2/R • For 5V output, Rload=25/20=1.25ohms • For 12V output, Rload=144/20=7.2 • For 24V output, Rload =576/20=28.8 ohms
Capacitor Values • C=I*dt/dv • We wanted ripple below 1% • Switching at 200kHz (5us), with duty ratio of ½, and dt=D*T • I=P/V • Minimum C values are found at 1000uF for 5V, 173uF for 12V, and 4.3uF for 24V
When L is to small, current can swing from Ipeak to 0, which is discontinuous mode and is shown below Avoiding Discontinuous Mode If L is big enough, current will look like below, this is what we want
Finding Lcrit • Lcrit=V*dt/di • di is maximum swing of current on primary side, which will be largest for 240Vrms (inductor sees 70.7Vdc) input at 1.4A, • dt is D*T=5us*.333 for 240V input • Lcrit >/=83uH • We designed to have much less swing, and used inductor value of about 1.8mH to get rid of a lot of ripple
Gate drive of FET • Variable duty and frequency allow for different switching capabilities. • Snubber gives smooth transitions in the switching action • 35V comes from rectified signal • 12V zener used for voltage regulator
Duty Ratios • For a flyback converter, Vout=Vin*(D1/1-D1) where D1 is the duty of the FET • For 100V input: D1=.6 • For 120V input: D1=.5 • For 240V input: D1=1/3
Feedback control circuit • Voltages are compared to see if duty need to be adjusted • Output=10(Vref+Vout • The output gets fed into the duty of the PWM • This circuit was built, and tested, but we couldn’t get it to function correctly in our converter
Parts Used • Bridge Rectifier used 4 MUR 820’s (200V, 8A) • Output Diodes were MBR1045’s 45V, 10A) • FET used was IRF740 (400V, 27A)
Problems with cores • Originally tried toroid core. • This core was designed for lower frequencies than what we were switching at, and had too many losses because of low permeability. • Switched to “pot” core. • Higher permeability of pot cores solved our problems and gave better outputs.
Wire information • Current density used was 500A/cm^2 • Magnetic wire of 3 different gauges was used • 5V and primary used 18 gauge (rated for 4.2A) • 12V outputs used 20 gauge (rated for 2.06A) • 24V outputs used 22 gauge (rated for 1.6A)
Pot Core specs • Inductance factor=8.1uH • 15 turns (primary) gives 1.82mH • 5V: 3 turns • 12V: 7 turns gives 15.6V • 24V: 12 turns gives 26.8V • Minimum of 2V to use voltage regulators
Other Problems Experienced • Our circuit was drawing excessive amounts of current, causing strange behavior and FET getting extremely hot. Why? • Insulation on Magnetic wires was wearing off, causing some “leakage” flux and current, which accounted for this
Ripple considerations • Needed to minimize ESR of capacitors to lower ripple • Added L-C filters to further minimize ripple • Below shows this adjusted circuit at output
Conclusions • We were able to use a flyback to design this project power supply • We experienced trouble with certain types of inductor cores • Overall, we were reasonably successful at getting good efficiency and low output ripple