Download
1 / 25
590 likes | 1.06k Vues
Introduction to HTML Lists, Images, and Links. Before We Begin. Save another file in Notepad Open your HTML, then do File>Save As Make sure your saving in the same place ‘Save As Type’ should be ‘All Files’ In ‘File name’, use the same name but put ‘2’ at the end then ‘.html’

E N D
Before We Begin • Save another file in Notepad • Open your HTML, then do File>Save As • Make sure your saving in the same place • ‘Save As Type’ should be ‘All Files’ • In ‘File name’, use the same name but put ‘2’ at the end then ‘.html’ • Click the Save button • Remove everything between the <BODY> and </BODY> tags • Change the title appropriately
Lists • Lists are used to group related pieces of info together • Makes it clear they are related • Makes it easier to read • Can be ordered (numbered) or unordered (bulleted)
Unordered List • Creates a bulleted list • Uses one set of <UL></UL> tags enclosing one or more sets of <LI></LI> tags • Like this: <UL> <LI>Item1</LI> <LI>Item2</LI> </UL>
Unordered List Example • Put this in the Body of your HTML: <h1>Some facts about lists</h1> <ul> <li>They group things</li> <li>Some have bullets </li> <li>Some have numbers</li> </ul> 1
Ordered List • Creates a numbered list • Uses one set of <OL></OL> tags enclosing one or more sets of <LI></LI> tags • Like this: <OL> <LI>Item1</LI> <LI>Item2</LI> </OL>
Ordered List • Can also use letters or roman numerals by using the ‘Type’ attribute on the <OL> tag • Like this <OL TYPE=?> • ?=a - lower case letters • ?=A - upper case letters • ?=i - lower case roman numerals • ?=I - upper case roman numerals
Ordered List Example • Put this after the unordered list: <h1>Steps to add a list</h1> <ol> <li>Type the OL or UL tag</li> <li>Type the list items </li> <li>Type the correct end tag</li> </ol> • Next, try out the ‘type’ options 2
Images • Used to make your web page more interesting (among other things) • Use caution when adding images • Download times • Not all people may be able to see them
Images • Can be any graphic file • Pictures • Drawings • Buttons • Etc., etc. • Can be still or animated (moving) • Multiple types: jpg, gif, png, etc.
Images • Using images requires the browser to find a file containing the image • You must provide the filename and possibly the file’s location (path) • If you don’t provide a location, the image file must be in the same folder as the HTML source file
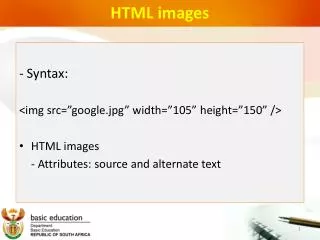
Images • Displayed using the IMG tag • The IMG tag uses the SRC (source) attribute to tell it the name (always) and location (if necessary) of the image file • Like this: <IMG SRC=“image1.jpg”>
Images • IMG tag also uses the ALT (alternative) attribute to show text if the picture can’t display • Like this: <IMG SRC=“image1.jpg” ALT=“Picture of some idiot”> • IE will also show it as a tooltip
Images • Other IMG attributes • HEIGHT=# (# is number of pixels or %) • WIDTH=# • ALIGN=? – controls images position in relation to the text around it • ? can be LEFT, RIGHT
Images Example • First, find and save an image file • Go to the Web and find a picture • Right-click on it, then ‘Save Picture As’ • Change ‘Save In’ location to the same folder where your HTML file is • Change the filename to something short and sweet • Note what’s in ‘Save as type’ • Click ‘Save’
Images Example • Put this after the ordered list: <h1>Image stuff</h1> <IMG SRC=“filename.filetype” ALT=“my picture”> I’m trying out images. This might be fun – well, sort of. • ‘filename’ is what you called it • ‘filetype’ is what was in ‘save as type’ when you saved it 3
Images Example • Put this after the last image stuff: <h1>More Image stuff</h1> <IMG SRC=“filename.filetype” ALT=“my picture again” HEIGHT=# WIDTH=# ALIGN=???> Let’s see what happens when I use the attributes on the IMG tag. • Enter different values for # and ??? and see what happens
Links • Main way web pages are connected • Called Anchor links • Uses the Anchor tag <A></A> • Whatever is between the two tags becomes the link on your page • You can link to virtually any file
Links • The <A> tag uses the HREF attribute to point to the other page/file. • Like this: <A HREF=“URL or file”>Text that shows as the link</A>
Links • As with images, links require the browser to find the page or file • For external web pages, you must provide the correct URL (it’s best to include the whole thing including http://) • For local pages and files, you must provide the filename and possibly the file’s location (path) • If you don’t provide a location, the page/file must be in the same folder as the HTML source file
Links • External web page example <A HREF=“http://www.yahoo.com”> Yahoo</A> • Local web page example <A HREF=“somepage.html”>My Page</A> • Local file example <A HREF=“somefile.doc”>My doc</A>
Links Example - External • Put this after the image stuff: <BR> <h1>External link</h1> <A HREF=“http://www.ajc.com”>Click here for the AJC</A> <BR>
Links Example – Your Other Page • Put this after the external link: <BR> <h1>Link to my other page</h1> <A HREF=“{name of your first page}.html”>Click here for my first web page</A> <BR> 4
Links Example – Your Other Page • Open your first HTML file and add this at the bottom: <BR> <h1>Link to my other page</h1> <A HREF=“{name of your second page}.html”>Click here for my second web page</A> <BR>
Links • Want to create a popup? Use the TARGET=“_blank” attribute to open the linked page in another window <A HREF=“http://www.yahoo.com” TARGET=“_blank”> Yahoo</A> • Try it!!