Download
1 / 28
290 likes | 410 Vues
Tutorial for Blackboard 9.1. Alex Ikeuchi Kamehameha Schools Hawaii Blackboard 9.1. Table of Contents. Logging In Pg. 3 Forgot Password Pg. 3 Changing the Password Pg. 4 Changing Class Title Pg. 5 Viewing List of Users Pg. 6 Enrolling Users Pg. 7

E N D
Tutorial for Blackboard 9.1 Alex Ikeuchi Kamehameha Schools Hawaii Blackboard 9.1
Table of Contents Logging In Pg. 3 Forgot Password Pg. 3 Changing the Password Pg. 4 Changing Class Title Pg. 5 Viewing List of Users Pg. 6 Enrolling Users Pg. 7 Adding Content Pg. 8-9 Adding a Document Pg. 10-11 Adding Images Pg. 12-13 Adding Videos Pg. 14-15 Adding Videos Using YoutubePg. 16-17 Adding URLs/Links Pg. 18-19 Adding Folders Pg. 20-21 Adding Discussion BoardsPg. 22-23 Adding TestsPg. 24-25Editing Content Pg. 26-27 Deleting Content Pg. 28
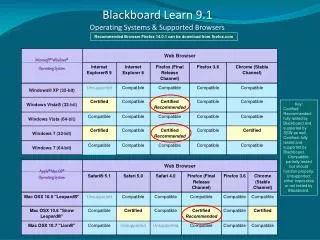
Logging In • 1. In your address bar, go to http://bb.ksbe.edu/ • 2.Enter your username and password within the respective fields. Forgot Password • 1.If you have forgotten your password, click the Forgot Your Password? link above the Login button. 2.Use either the Username Option or the Email Address Option to retrieve your password. Go to your email and follow the steps instructed to you from the blackboard email message.
Changing Your Password 1. On the top of the page, click on My Places. 2. A new page should appear. From here, click on “Personal Information” 3.Click on Change Password. 4. Input your new password in the Password field and then again in the Verify Password field. Your password should contain at least one character and no spaces. Click on the Submit button.
Changing Class Title 1. In the Control Panel, click Customization and then Properties. 2. Change the class name in the Class Name field. Then click Submit.
Viewing List of Users 1. Within the Control Panel, click on Users in the Users and Groups section. 2. On the Users page, click on Show All. 3. A list of all of the users enrolled in your class should appear.
Enrolling Users 1. Within the Control Panel, click on Users in the Users and Groups section. 2. On the Users page, click on Find Users to Enroll. 3. Find a user’s username by using Browse. Give the user a Role and then click Submit.
Adding Content 1. Click on Content in the sidebar of your page. 2a. Roll you mouse over Build Content and choose to add videos, images, files, new pages, etc. 2b. Roll your mouse over Create Assessment and choose to add a test, survey, or assignment
Adding Content Continued 2c. Roll your mouse over Add Interactive Tool and choose to add blogs, journals, groups, etc. 2d. Roll your mouse over Assign Textbookand either search for a textbook or add it in manually.
Adding a Document 1. Click on Content in the sidebar of your page. 2. Roll you mouse over Build Content and under Createclick Item.
Adding a Document Cont. 3. Add a title in the Name field for your folder. 4. Click on Submit. Descriptions, attachments, or viewing options can be added, but those are optional.
Adding Images 1. Click on Content in the sidebar of your page. 2. Roll you mouse over Build Content and under Create click Image
Adding Images Cont. 3. Click on one of the three Browse… buttons to select an image. Create a title. 4. Customize your image by filling in the optional fields under Image Options and Standard Options. Click Submit.
Adding Videos 1. Click on Content in the sidebar of your page. 2. Roll you mouse over Build Content and under Create click Video.
Adding Videos Cont. 3. Click on one of the three Browse… options to find a video. Give the video a title. Customize your video. 4. Select viewing options for your video. Click Submit.
Adding Videos Using Youtube 1. Click on Content in the sidebar of your page. 2. Roll you mouse over Build Content and under Mashupsclick Youtube Video. 3. Search for a video within the Search field.
Adding Videos Using Youtube Cont. 4. Click on Select under the thumbnail of the video you want. 5. Click on Submit. Descriptions, links, or viewing options can be added, but those are optional.
Adding Links/URLs 1. Click on Content in the sidebar of your page. 2. Roll you mouse over Build Content and under Create click URL.
Adding Links/URLs Cont. 3. Add the URL and a title for it in their required fields. 4. Click on Submit. Descriptions, attachments, or viewing options can be added, but those are optional.
Adding Folders 1. Click on Content in the sidebar of your page. 2. Roll you mouse over Build Content and under New Pageclick Content Folder.
Adding Folders Cont. 3. Add a title in the Name field for your folder. 4. Click on Submit. Descriptions or viewing options can be added, but those are optional.
Adding Discussion Boards 1. Click on Content in the sidebar of your page. 2. Roll you mouse over Add Interactive Tool and click Discussion Board. 3. Click on Link to Discussion Board Page, Select a Discussion Board Topic, or Create New Topic.
Adding Discussion Boards Cont. 4a. If you clicked Create Topic, create a Name. Click Submit. Topic Availability or Topic Settings options can be added, but those are optional. 4b. Once a link or discussion board page is selected, create a Link Name. Click Submit. Descriptions or Viewing Options can be added, but those are optional.
Adding Tests 1. Click Tests, Surveys, and Pools under the Class Tools header. 2. Click Tests. 3. Click either the Build Test or Import Test buttons to either create a new test or upload a test from the computer or blackboard, respectively.
Adding Tests Cont. 4a. If you chose to import a test, click either the Browse My Computer or Browse Class buttons to find a test from your computer or blackboard. Click Submit. 4b. If you chose to create a new test, create a name in the Name field. Click Submit. Descriptions and instructions are optional.
Editing Content 1. Go to the content you want to delete, possibly in the Content Folder or a Custom-made Folder. 2. Click on the Item Options Icon to bring up a drop-down menu. Click on Edit at the top of the list.
Editing Content Cont. 3. You can edit either the name in the Title field or the description in the Description field. 4. Click on Submit. Descriptions or viewing options can be edited as well.
Deleting Content 1. Go to the content you want to delete, possibly in the Content Folder or a Custom-made Folder. 2. Click on the Item Options Icon to bring up a drop-down menu. Click on Delete at the bottom of the list.