Download
1 / 15
150 likes | 311 Vues
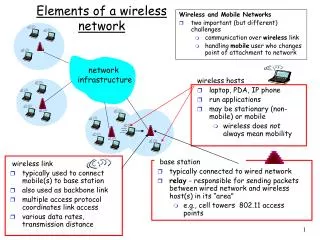
How To Achieve a Wireless Internet Connection Without a Wireless Network Card. Jose Mendez March 6, 2010 ENGL 393. Introduction. This process is meant for anyone who has a desktop computer (which does not have a Wireless Network Card) that they would like to connect to their Wireless Network.

E N D
How To Achieve a Wireless Internet Connection Without a Wireless Network Card Jose Mendez March 6, 2010 ENGL 393
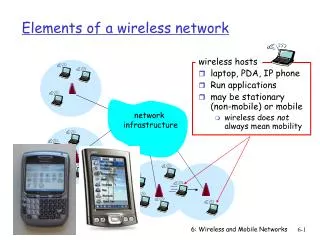
Introduction • This process is meant for anyone who has a desktop computer (which does not have a Wireless Network Card) that they would like to connect to their Wireless Network. • If buying a Wireless Network Card is out of the question, it is possible to achieve wireless on the desktop computer through a laptop. • This process assumes that the user has a basic knowledge of computers, the Windows operating system, and connecting to a wireless network. • All steps are done using Windows 7. • Materials: • 1 Desktop Computer • 1 Laptop • 1 Ethernet Cable • Accessible Wireless Internet Connection
Step 1: Overview • This is what the system will look like once complete • Make sure both computers are on
Step 2 • Connect to your wireless network on the laptop
Step 3 • On the laptop, click on the Windows “Start” button • Click on “Control Panel”
Step 4 • Click on “View network status and tasks”
Step 5 • Click on “Change adapter settings”
Step 6 • Click on “Local Area Connection” • While holding the “ctrl” button on the keyboard, click on “Wireless Network Connection” so that both are selected
Step 7 • Right Click on “Wireless Network Connection” • Click on “Add to Bridge”
Step 8 • Wait for the bridge to be established
Step 9 • The “Network Bridge” should now have the Wireless Network’s name under it (in this case, “UMBC Campus”) • The “Wireless Network Connection” should now say “Enabled, Bridged” under it
Step 10 • Plug one end of the Ethernet cable into the desktop computer’s Ethernet port • Plug the other end of the Ethernet cable into the laptop computer’s Ethernet port
Step 11 • The “Local Area Connection” should now say “Enabled, Bridged” under it
Step 12 • Set-up is complete • The desktop computer is now connected wirelessly to the Internet