Download
1 / 12
120 likes | 354 Vues
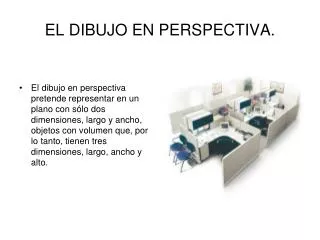
Perspectiva Isométrica en Corel. 3º ESO – IES Pando. Figura a dibujar. Dibujamos arista Eje Z. * Mirar que el ángulo de restricción = 30º Dibujamos una línea vertical Y le damos altura 40mm. Dibujamos Arista Eje Y. Dibujamos una línea horizontal de 30mm. Giramos la línea 30º.

E N D
Perspectiva Isométrica en Corel 3º ESO – IES Pando
Dibujamos arista Eje Z • * Mirar que el ángulo de restricción = 30º • Dibujamos una línea vertical • Y le damos altura 40mm
Dibujamos Arista Eje Y • Dibujamos una línea horizontal de 30mm • Giramos la línea 30º
Dibujamos Arista Eje X • Dibujamos una línea horizontal de 20mm • Giramos la línea - 30º o 360 -30 = 330º
Creamos cara ZX • Copiar y pegar (botón derecho) creamos la cara con líneas alineándolas en los nodos de las esquinas
Creamos cara ZX • Seleccionamos mediante una ventana los 4 objetos
Creamos cara ZX • Presionamos el botón crear nuevo objeto que rodea a los seleccionados
Creamos cara ZX • Ya tenemos los 4 objetos independientes y un objeto cerrado que desplazamos hacia un lado al que podemos dar relleno y contorno
Crear cara XY • Con las líneas de 30 y 30 creamos la cara XY
Crear cara YZ • Con las líneas de 40 y 30 creamos la cara YZ
Juntamos las 3 caras • Seleccionamos los 3 objetos y agrupar