Download
1 / 43
430 likes | 547 Vues
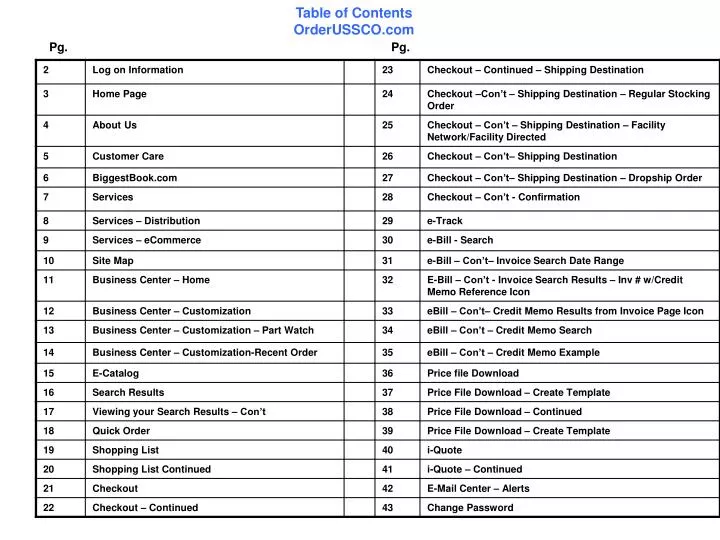
Table of Contents OrderUSSCO.com. Pg. Pg. Current Users Users will login to www.orderussco.com Type in your username, which is your email address The website will auto fill the username with the username that was last used successfully to login to the website.

E N D
Table of ContentsOrderUSSCO.com Pg. Pg.
Current Users Users will login to www.orderussco.com • Type in your username, which is your email address • The website will auto fill the username with the username that was last used successfully to login to the website. • If the username is entered incorrectly, the website will default back to the last successful login/username • Type in your password, and then press enter or select the login Link Log On: 2
About Us 4
Customer Care * Product Link – WWW.Biggestbook.com 5
Services 7
Site Map 10
Business Center Home • This is the home page for the Order Ussco Business Ctr. • There are three main parts to this webpage: • Customize This Page – Allows you to select and sort the options you would like to view • Recent Orders: Displays a user specified (you) -number of recent orders that can be viewed. Each line contains the following: order number, PO#, order date, ship to location, order status, and last shipment date. Order number and last shipment are links to more information regarding order. Up to 1500 orders can be viewed at a time. More orders equals longer load time for the page. • Part Watch: This allows you to enter specific part numbers that you wish to see the status up to the minute. Each and every time you refresh this page the item will automatically update any change in status. Each part has links to more product information and quantity available broken down to distribution facilities. Multiple part numbers can be viewed • Edit – Allows for editing of each section for a personalized website 11
Customize Business Center – Part Watch Customization • Add to Watch List: Allows user to add an item to the watch list for reference on the Business Center home page. Part number must be the same as appears in e-Catalog or print catalogs. Prefix and part number, no spaces or hyphens. • Remove from Watch List: this allows user to remove an item from the watch list 13
Customize Business Center – Recent Order Edits Customization • Customize Recent Orders: This permits the user to select one of two ways to view recent orders. • Number of most recent orders (Note: Maximum display number is 100, however, the greater the amount displayed will delay retrieval time. • Or • Select orders from a set number of prior days. • Click on save changes if any changes are made. 14
eCatalog The eCatalog is mainly used for pricing, availability A user can search for items either by: Key word search Category search – Allows you to search by category, then by sub-categories until the item number is found by reaching the lowest common denominator for that category Manufacturer search – Works identically to the category search but starts with the manufacturer and narrows items down from that point. 15
Viewing your search results Pricing Availability – Click on the quantity available to view the quantity available by warehouse location. Add to your shopping cart – Enter the quantity you would like to purchase or do an iQuote - then select the “Buy” link to have the item added to your shopping cart 16 Item Information – Click on the Item Number to view more detailed item information and retrieve the item image, if available.
Viewing your search results - cont To remove an item in your shopping cart, just select the radio button next to the item you would like to remove Click here to show stock by facility (for all facilities) 17
Quick Order • Quick Order allows user to enter up to 20 items at a time. • Enter up to 20 item numbers and the desired purchase quantity. • Select the “Add to Cart” link 18
Shopping List Shopping List – Allows the user to create custom lists of frequently purchased items Select the “edit” link to create a new shopping list Enter a name for the list 19
Shopping List - Continued You can then add & remove items. You can only add valid item numbers to your list 20
Checkout If a user is setup with the Online Ordering privilege they will see a Checkout link at the bottom of the shopping cart. If the user does not have the Online Order privilege, they will see a link that says “Click here to download the Online Ordering User Agreement Once selected, the Agreement will be displayed via Adobe Reader. The user will need to fill out the form and fax it to the number on the form. It usually takes 24-48 hours to process agreement 21
Checkout - Continued To begin check out – select the “checkout” link. 22
Checkout – Continued Shipping Destination Choose your location type, either Regular Stocking Order” (fields repopulate with system address information) or select “DropshipOrder” to your customer 23
Checkout – Continued Shipping Destination - Regular Stocking Order • When a user selects the Regular Stocking Order option, the address is pre-filled with their Ship to address for the account. • The user can then enter any Packing Slip Comments and the PO • A duplicate PO check occurs on this page to keep users from entering a duplicate PO • Select either the Will Call or Ship Out option Reseller End User 24
Checkout – Continued Shipping Destination - Facility Network/Facility Directed The user has a choice to place the order using either their Facility Network or as a Facility Directed order. Select the tab for the type you would like. Facility Network – Uses your standard account setup allowing order to fill from 1 or more facilities. Facility Directed – Only use when no stock is available in your Freight Network *Please note using Facility Directed Additional Freight Charges may apply 25
Checkout – Continued Shipping Destination – Facility Directed Select the warehouse you would like to ship your order from. – NOTE: the website will not allow you to select a warehouse that can not fill every item in the order. Choose to either Review your order or Submit the order. NOTE: Internal users can get up to this point, but w ill not be able to submit the order. 26
Checkout – Continued Shipping Destination – Dropship Order • Once the user has selected the Drop ship option, they will need to enter in the Dropship address. • Once the address has been entered, it can be saved into the Address Book • New Personal – Saves the address into your personal address book. No-one else will be able to view them • New Shared – Allows other users registered under the same account to also view the address record. Only you will be able to edit or delete the entry. • If you would like to ship to an address that you have previously saved in your address book, select the “open Address Book” link. Then select the address you would like to use by using the radio button next to the desired record. • If you need to update the address, just select the address from the Address Book, make any necessary changes, then select the “Update Entry” button • Enter any Packing Slip Comments (optional) • Enter the Purchase Order • Enter the Dropship PO (optional) • Select either Will Call or Ship Out 27
Checkout – Continued Confirmation The Order Confirmation page confirms that the order was placed and gives the user a unique reference number given to the order. This number is only available on the website and can be used to refer to or search for the order in the future. The user has the option to either return to the eCatalog or view the Order Status and verify that it is being Transmitted and Processed. 28
E-Track • The eTrack can be accessed by selecting the eTrack link found on the left • The user can search their orders 4 different ways: • United Stationers Order Number or Web Reference Number • United Stationers Item Number • Your PO Number • Order Date Range • After they select the “Find My Orders” button, the orders matching the query will be listed 29
eBill – Search The eBill page is used to search, view and print invoices and or Credits online. eBill can be accessed by selecting the eBill link found on the left. You can search for Invoices by selecting Search Invoice or You can search for Credits by selecting Search Credits Note: Users that just have the default privileges will not have access to eBill and therefore the link will not be displayed. The user can search their orders by either: United Stationers Invoice Number United Stationers Item Number Your PO Number Invoice Date Range 30
eBill – Continued – Invoice Search Date Range Credit Memo Reference Icon – You will find this Icon located to the right of your invoice results please see next slide After you select the “Find My Invoices” button, the invoices matching the query will be listed. A user can then view invoices individually by selecting the Invoice # link. You can also download selected invoices in either PDF or zip format. 31
e-Bill – Continued Invoice Search Results - Invoice Number w/Credit Memo Reference Icon 32
eBill – Continued Credit Memo Results from Invoice page Icon 33
eBill – Continued Credit Memo Search You can search Credits by: 1.) Credit Number 2.) Invoice Number 3.) Date Range 34
eBill – Continued Credit Memo Example 35
Price File Download The Price File Download page allows the user to create customized price files. Start by creating a new template by selecting the “Create new template” link Price File Download can be accessed by selecting the Price File Download link found on the left. 36
Price File Download – Create Template Enter a name for the template Select Enter 37
Price File Download – Continued Choose whether to share this template with others registered under the same account . Highlight the field you would like to add and then select the “Add Field to Your Field” link. You field will then display the box under “Your Download Preferences” Repeat step #2 until all desired fields have been selected. If all vendors are preferred, leave the Include all Vendors box selected. Otherwise, unselect the box and select the box next to each vendor to be included in the file. Select the “Finished” button at either the top or bottom of the page 38
Price File Download – Continued Keep the drop down on the default, “Full Product Mix” to include all items in the price file, or select other available options, like promos or catalog specific items. The user now has the option to download the field in either CSV (comma delimited), TXT (text), or Excel format Note: If the browser has a pop-up blocker, the user will need to disable it in order for the file to be opened or saved. The user also has the option to Edit their template or Delete it. 39
iQuote 40
eMail Center- Alerts • The eMail Center allows a user to either subscribe or unsubscribe from email mailings. • The eMail center can be accessed by selecting the eMail center link found on the left. By checking or un-checking the box, the user can easily subscribe or unsubscribe from the different mailings. • Frequent Promotions – When selected, the user is opting to receive promotional emails. • Personal Shipping Alerts – When selected, the user will receive shipping alert emails for all orders placed on their accounts. • Customer Shipping Alerts – When selected, orders placed on OrderUSSCO.com have the option of including the end-users email address. If the email address is present, the end-user will receive the shipping alert email. 42
Change Password Once logged in, the Change Password page can be accessed by selecting the Change Password link found on the left. From here the user can change their current password. A password can not be used again until 1 year later. Also, the password must follow the guidelines, which are displayed on the page. NOTE: Password Does Not Expire 43