Download
1 / 53
560 likes | 886 Vues
PowerPoint Best Practices. Text Fonts Colors Bullets. Graphics Transitions Sound and Motion Final Suggestions. Agenda. TEXT. Introductory Slide. Should include: Name of your topic Name(s) of your presenters. Presentation Cycle. Introduction or Agenda Body – Main Points

E N D
Text Fonts Colors Bullets Graphics Transitions Sound and Motion Final Suggestions Agenda
Introductory Slide • Should include: • Name of your topic • Name(s) of your presenters
Presentation Cycle • Introduction or Agenda • Body – Main Points • Conclusion – Summary
You can’t include EVERYTHING! • Each slide should contain main points • Use phrases rather than sentences • Elaborate to audience in oral presentation
Too Much Text! • The Life Cycle of a Book • Concepting -- The birth of the story. The book is concepted by the editor, author, and editorial director and assigned a place in the publication schedule. This process can occur up to two years before the release date of the book. Sometimes we have story summits that allow us to interact with a wider group of people, such as several authors, several editors, game designers and editors, and many others! • Cover art. The editor and author write an art suggestion, which is sent to the art director, who contracts an artist to paint the cover art and any interior illustrations or maps. The artist submits sketches, which are approved by the editorial department. Then the artist submits the final painting and any interior illustrations or maps, which are approved by the editorial department and art director. (To get an artist's perspective on how this process sometimes works, you can see Matt Stawicki's art and read an interview with him that covers this subject briefly.) • Cover design. The finished painting is electronically scanned and given to a designer, who designs the cover for the book. The designer takes the painting and either designs an entire new cover using the painting as inspiration (under the direction of the art director) or uses it in an existing format and makes changes that work with the art (as in a series). This finished part of the cover design process also needs approval from the editing department. • Cover copy. The editor writes cover copy for the book, which is edited by the marketing specialist and sent to the designer for placement. • First draft -- Adolescence begins. The author turns in a first draft. The editor reads the first draft and makes comments about both substance and continuity and returns the comments to the author. • Second draft. The author turns in a revised draft. The editor rereads it for continuity, edits the book for changes in language, etc., and copyedits the book for grammatical style. • Typesetting. The book is sent to typesetting, which converts the text into a Quark file and produces a set of galleys, including interior art and maps received from the art director. Up to this stage, most of the work on the manuscript is done electronically. • Proofing. The galleys are proofed by the editorial department, and a set of galleys are sent to the author for correction. Each corrected set of galleys is, in turn, checked again. • Image review. The completed proof, as well as the cover, are sent to Image Review, where everything is color corrected and checked for imperfections. Production produces a further text proof, which is scanned for any significant errors, and film for the cover. • Printer -- The book reaches adulthood. The film and text files are sent to the printer, who produces a final proof (called bluelines) which is reviewed and approved by the editorial staff. • Distributor. The book is printed and shipped to the distributor, who, in turn, ships it to the various bookstores and hobby stores that have placed orders for it. • Release Date -- The end of the cycle. Our books hit store shelves and are available to the public. BETTER Source: www.wizards.com
Concepting Cover art Cover design Cover copy First draft Second draft Typesetting Proofing Image review Printer Distributor Release Date The Life Cycle of a Book
Font Etiquette • Use Sans Serif fonts, such as: • Tahoma, or • Arial • Rather than Serif fonts, such as: • Times New Roman, or • Garamond
Interpretations of Fonts • Times New Roman – conservative audiences or serious messages • Comic Sans MS – a “fun” font for lighthearted messages • Times New Roman and Georgia – easier to read for large amounts of text • Arial and Verdana – cleaner and make better titles and headlines • Verdana, Tahoma and Georgia – designed for online viewing; Arial and Times New Roman also work well
Visibility • Web site links: www.hclib.org • Images: • Text: at least 24 points
Case Readability Lower Case is easier to read than upper case. UPPER CASE IS HARDER TO READ THAN LOWER CASE.
Font Recommendations • Follow “top-down” theory • Headlines always bigger than text • Italics is harder to read • Use bold to highlight important info
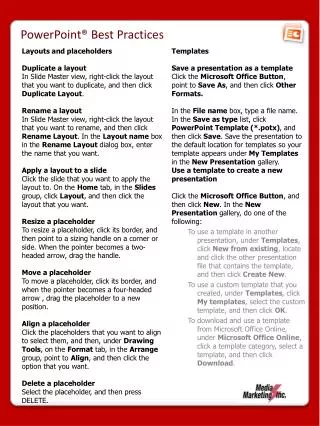
Example of Title Placeholder: Example of Text Placeholder: Placeholders Name given to the box that surrounds: • Text • Charts • Tables • Media clips • Clip art
Use Point and Example Pattern • KidLinks • brighter palette colors • WorldLinks • subdued palette colors
Background and Text Colors • Use a dark background with light text – either white or very light pastel • Always use strong contrasting colors for background and text • Or…
Background and Text Colors • Use a light background with dark text – either black or dark blue • Always use strong contrasting colors for background and text • These contrasts help both the readability and projection of text
Color Contrast – Warm • Warm colors (reds, oranges, yellows) come forward and command attention • Text may be lost or overpowered in a warm color background…people will pay attention to the color not the message • Warm colors are difficult to look at in large quantities
Color Contrast – Cool • Cool colors (blues, greens, and some purples) recede from our eyes • Backgrounds in cool colors are easier to view • Cool colors provide contrast with text
Keep it Simple! Keep the background simple. Try using a background with a solid color, subtle texture or a gradient sweep fading from one color to another. Instead of…
Color Combinations Be aware of certain color combinations. Red text on a green or blue background is a problem for people who are color-blind or visually impaired. For example: Red text on a green background. Red text on a blue background.
Limit the Number of Colors Limitthenumberofcolorsinaslidetotwoorthreethat work well together.
BULLETS
Use points to… • Prompt • Illustrate • Summarize
Major Points versus Sub Points Three sub point examples: • Use color to: • Distinguish points • Use font size to: • Distinguish points • Use bullets to: • Distinguish points
Bullet Justification • Left justify your bullets • Rather than center justify • Or, right justify • Left justify your bullets • Rather than Center justify • Or, right justify • Left justify your bullets • Rather than center justify • Or, Right justify
Apply the Rule of 6 • No • More • Than • Six • Bullets • Per Slide
Follow the 666 Rule • 6 words per bullet • 6 bullets per image • 6 word slides in a row Important to note!By the end of 6 text filled slides, you have been talking for ten minutes without a visual.
Graphic Placement • Place bulleted text on the right • Place graphic on the left
Information vs. Graphics Information is more important than graphics. Do not clutter your screen with graphics.
Use Graphics as Mnemonics and Reinforcers Research Steps to Success • Prepare for research • Access resources • Process information • Transfer your learning
TRANSITIONS
Slide Transitions Slide transitions should be consistent throughout the presentation. Multiple slide transitions divert attention from the information presented.
Text Transitions Focus attention with text transitions
Use Natural Transitions • Text that moves from right to left is the most natural as that’s how we read • Too many things flying around on the screen detracts from the message • Too many transitions slow down the presentation
Sounds! • Use sound with discretion as they can distract and annoy! • An occasional burst of music or sound during a transition or animation can focus the audience on the slide show • Remember not to overdo it — frequent use of special effects can draw attention away from the content of your presentation
Motion Use motion with discretion as it can also distract and annoy!
PowerPoint Notes Use PowerPoint’s “Notes” option to make handouts which expand on the slides rather than simply printing the slides themselves as a handout.
Check Your Desktop If the Desktop of your computer is decorated with photos, illustrations, slogans, etc., make sure that the content is appropriate for public viewing. If not, change it prior to your presentation.
Use Correct… • Grammar • Spelling • Punctuation • Capitalization
Rehearse, Rehearse! Try to rehearse your presentation with the computer connected to the projection device.
Numbering Slides Numbering slides gives you the option of referring to them by number as you move from slide to slide. For example: “On Slide #2, we continue with the point…”
Keyboard Shortcuts Press F1 (or SHIFT+?) and Slide Show Help will display automatically during your PowerPoint slide show. Click your right-mouse button to get a shortcut menu.
Multi-Tasking Alt+Tab will give you a quick live web connection.
Variety Try to insert… • exercises, • activities, or • topic shifts at least every 20 minutes of your session to recognize the length of most adults’ attention span.