Download
1 / 10
110 likes | 250 Vues
How to make tables in HTML. By Daniel Arze. How do they do this?. Requirements and tools. Familiarity with some HTML Notepad Web Browser. Quick HTML sample page. We are assuming that you already know the meaning of the following code to start a basic HTML page <html> <title> </title>

E N D
How to make tables in HTML By Daniel Arze
Requirements and tools • Familiarity with some HTML • Notepad • Web Browser
Quick HTML sample page • We are assuming that you already know the meaning of the following code to start a basic HTML page <html> <title> </title> <body bgcolor="white" text="black"> </body> </html>
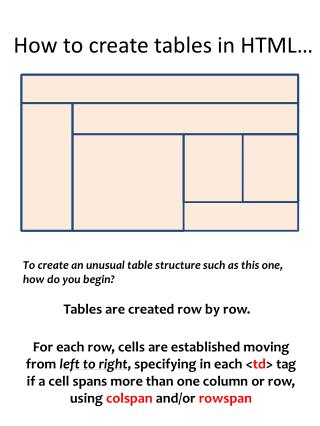
Making a table in HTML • First insert the <table border> tag after the opening <body> tag. (This tells the computer that we will be creating a table and that it will have a border) <body> <table border> </body> • Next insert a <td> tag followed by your data and close it </td> (This tells the computer that we are going to enter data in the first cell) <body> <table> <td> Our first cell </td> </body>
Creating cells • To make another cell repeat the previous step (This creates the cells side by side, from left to right, feel free to add more) <body> <table border> <td> Our first cell </td> <td> Our second cell </td> <td> Our Third cell </td> </body>
Creating rows • To make a row insert a <tr> tagand close it at the end of the cells with the </tr> tag <table border> <td> Our first cell </td> <td> Our second cell </td> <td> Our Third cell </td> <tr> <td> Second row 1st cell </td> <td> Second row 2nd cell </td> <td> Second row 3rd cell </td> </tr> </body>
Finishing the table • To insert additional cells and rows just follow the previous step. • Once you are finished inserting all the cells and rows, all you need to do in order to finalize the table, is to close it with the </table> tag at the end and before the </body> tag.
The entire HTML code <html> <title> </title> <body bgcolor="white" text="black"> <table border> <td> Our first cell </td> <td> Our second cell </td> <td> Our Third cell </td> <tr> <td> Second row 1st cell </td> <td> Second row 2nd cell </td> <td> Second row 3rd cell </td> </tr> </table> </body>
Saving and displaying • Save the page with the HTML extension and you are ready to view your table in any browser. • Here is our sample: www.gl.umbc.edu/~darze1/table.html