Solutions Wavlink Ap.setup Not Working
Looking to set up your Wavlink WiFi device quickly and easily at home? Let Wavlink Wizard be your go-to guide for configuring Wavlink devices. Our simple, step-by-step setup instructions make installation hassle-free. If you're experiencing any connectivity problemsu2014whether it's setup issues, slow speeds, or the device not respondingu2014our support team is here to help. Contact us for expert assistance with Wavlink device installation, network configuration, and performance optimization.<br><br><br><br><br><br><br><br><br>


Solutions Wavlink Ap.setup Not Working
E N D
Presentation Transcript
Solutions: Wavlink Ap.setup Not Working
Solution1: Ensure Power Supply If there is on power supply to the extender or the extender is getting electricity cuts again and again then you should change the power socket. Use other working power outlet to plug the Wavlink extender and connect it to the home main network router.
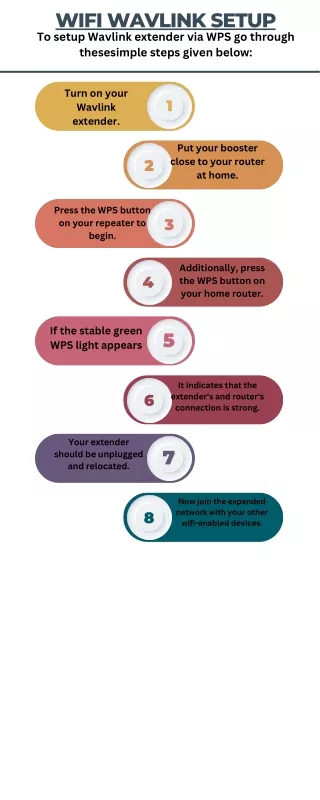
Solution2: Ensure Connection The extender to router connection must be good and linked. Make sure that if you are using the WPS method then keep the extender on in the reach of the router. Also, if you are using the cable to connect then make sure the cable is non-damaged.
Solution3: Use IP Instead Default IP address of the extender is 192.168.10.1. This IP address also works as the URL ap.setup. Just try and use the IP address to reach to the login page. Follow the instructions: Connect the extender to the router and link the computer to extender network. Open web browser and enter the IP address 192.168.10.1 in the URL bar. You will reach to the extender interface login page, enter the username and password. Reach the interface window and then you can enable the features you want.
Solution4: Update Browser The browser should run on the latest version, because it will cause interruption. There are easy steps to update the browser. Open the browser and click on the Settings. Choose the ABOUT option and select UPDATE button. After few seconds browser will update.
Solution5: Reboot Network You can reboot it to reach the interface login window. Just turn off and on the device to restart. There are two ways to do that. One is pressing the power button on the Wavlink extender for two times. Second is plugging out the device and plug it in the electric wall socket..
Solution6: Reset Extender This reset process will clear all previous data and deletes adjusted settings. So, ensure first and then run this solution. Extender device reset process is pretty easy. There is a button on the back of the device, it is a pinhole button. You have to use a sharp object to press the button. Press and hold the button for 7-10 seconds. Release the button will start the process. Now, you should sun the Wavlink setup process again.
FOR ANY QUARY VISIT US https://wavlink-setup.net/
Conclusion At the conclusion, we have provided all recommended solutions to fix the ap.setup not working issue related to the Wavlink extender configuration.
Thank You