koi pond filter
WattMizer PLUS System Instructions<br>Congratulations <br> on your new GC TEK Filter System <br>Your filter system was designed to go together easily even for a novice. Each of the <br>components was carefully chosen to provide you with years of dependable service and <br>clear water for you and your pond. <br>Take a few minutes to look at this manual and familiarize yourself with each of the comu0002ponents and what part they play in the WattMizer PLUS system. <br>Due to the custom nature of these systems your components may differ slightly from <br>the various components shown, but assembly of the system is basically t

koi pond filter
E N D
Presentation Transcript
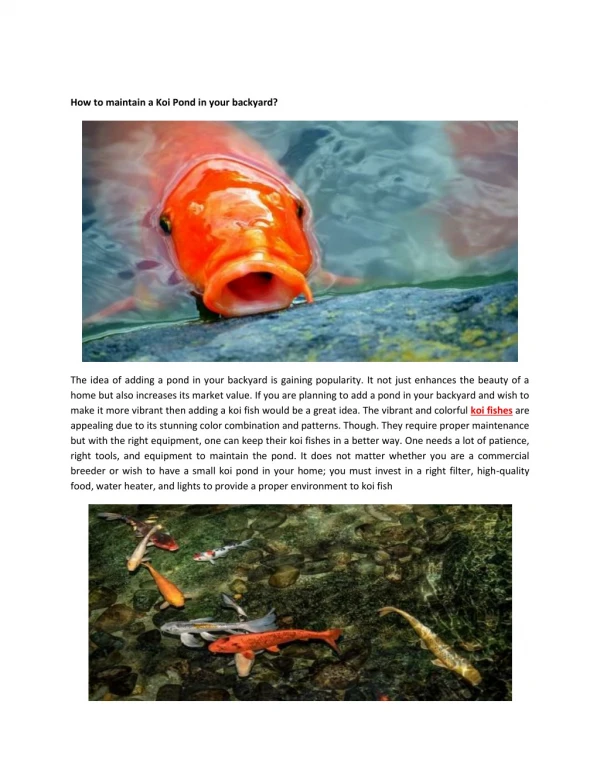
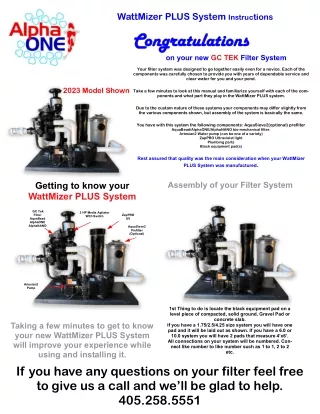
WattMizer PLUS System Instructions Congratulations Congratulations on your new GC TEK Filter System Your filter system was designed to go together easily even for a novice. Each of the components was carefully chosen to provide you with years of dependable service and clear water for you and your pond. 2023 Model Shown Take a few minutes to look at this manual and familiarize yourself with each of the com- ponents and what part they play in the WattMizer PLUS system. Due to the custom nature of these systems your components may differ slightly from the various components shown, but assembly of the system is basically the same. You have with this system the following components: AquaSieve2(optional) prefilter AquaBead/AlphaONE/AlphaNANO bio-mechanical filter. Artesian2 Water pump (can be one of a variety) ZapPRO Ultraviolet light Plumbing parts Black equipment pad(s) Rest assured that quality was the main consideration when your WattMizer PLUS System was manufactured. Getting to know your WattMizer PLUS System Assembly of your Filter System GC Tek Filter AquaBead AlphaONE AlphaNANO 2 HP Media Agitator With Switch ZapPRO UV AquaSieve2 Prefilter (Optional) Artesian2 Pump 1st Thing to do is locate the black equipment pad on a level piece of compacted, solid ground, Gravel Pad or concrete slab. If you have a 1.75/2.5/4.25 size system you will have one pad and it will be laid out as shown. If you have a 6.0 or 10.0 system you will have 2 pads that measure 4’x6’. All connections on your system will be numbered. Con- nect like number to like number such as 1 to 1, 2 to 2 etc. Taking a few minutes to get to know your new WattMizer PLUS System will improve your experience while using and installing it. If you have any questions on your filter feel free to give us a call and we’ll be glad to help. 405.258.5551
GC Tek Hooking up the Plumbing System layout assembly Return (Outlet) Inlet (If equipped with the AquaSieve2 Prefilter) Inlet (if not equipped with the AquaSieve2 Prefilter) ZapPRO UV Filter Waste Line AquaSieve2 Prefilter (optional) Make Connections as shown with your supplied plumbing. Prime the pump with water by filling it with water from the pond and once it starts to flow it will fill the filter with water and water will flow back to the pond. Check for leaks at all your connections and tighen if necessary. Sit back and enjoy the Pond! Should you need help or just have ques- tions please fill free to contact us on our toll free line 866.712.7007 You are the reason we’re here! You are the reason we’re here! Artesian2 Pump Or an alternative pump 2nd step is to place the filter to the back left on the pad as shown. 3rd step is to place the ZapPRO UV as shown to the right of the filter. 4th step is to place the pump as shown. 5th step is to locate the AquaSieve2 as shown if so equipped. Assembly of the Plumbing I IF FYOU YOUHAVE HAVEQUESTIONS QUESTIONSABOUT FILTER FILTER SYSTEM SYSTEMAND ANDNEED NEEDHELP TACT TACTYOUR YOURDEALER GC T GC TEK 405 405- -258 F FAX AX 866 866- -728 I INFO NFO@ ABOUTYOUR YOUR HELP, , PLEASE PLEASECON- DEALEROR OR EKAT AT 258- -5551 5551 728- -0678 0678 @GCTEK GCTEK. .COM COM HANKYOU YOUFOR FORCHOOSING GC T GC TEK EK — — G GARY CON- 1. Attach the Multiport valve to the filter, it hand tightens with the 2 unions. 2. Your plumbing connections are marked with numbers– connect like number to like number such as 1 to 1, 2 to 2, 3 to 3 etc until all components are connected. 3. If you have the optional AquaSieve2 Prefilter you will connect the line coming from the pond to the upper opening on the AquaSieve2. We have included a swing check valve that should be placed on the line coming from the pond as close to the pond as possible. If you have more than one line coming to the filter system from the pond may require 2 or more swing check valves. If you don’t have the Optional AquaSieve2 Prefilter then you will enter the system via the front of the pump and the swing check valve(s) will be on this line. 4. Place the media in the filter and then close lid. It is a good idea to coat all rub- ber components(such as gaskets/orings) with a good silicone lube for the best seal possible and to enable an easy removal the next time you remove the item. Winterizing the GC Tek Filter System 1. Turn pump off and drain water from pump basket and volute. If your pump has a drain plug you might find it smart to place the drains plugs in the strainer basket in the pump so you have easy access to them in the Spring when you restart the system. 2. Open water drain on filter. No media will come out, only water. Make sure all water is out of filter or damage will occur and this is not covered by warranty. It is the system owners responsibility to make sure all water is removed from tank to prevent freezing because damage due to freezing is not a warranty covered item. 3. Loosen the Multiport valve from the housing and back the valve away from the tank to release any water in the valve. 4. Open drain on the ZapPRO UV and allow water to drain out. 5. Remove unions from the AquaSieve2 and tip on its side to remove all remaining water in the bottom. 6. Wait for Spring! T THANK CHOOSING RYER CRYER ARY C
![Kernmodel Onderwijsinformatie [ KOI ]](https://tcdn.slideserve.com/1_1505876.jpg)