Download
1 / 3
40 likes | 107 Vues
<br>Have you been wondering to install decorative brick at your home? If yes, this is the right time to install some of the best decorative bricks that will make your home look fantastic today. So, if you were looking forward to buy decorative bricks, Impex Stone is the best place to buy different types of bricks that can be installed indoor. Go ahead and try it today. For more information visit : http://www.impexstones.com/products/bricks/

E N D
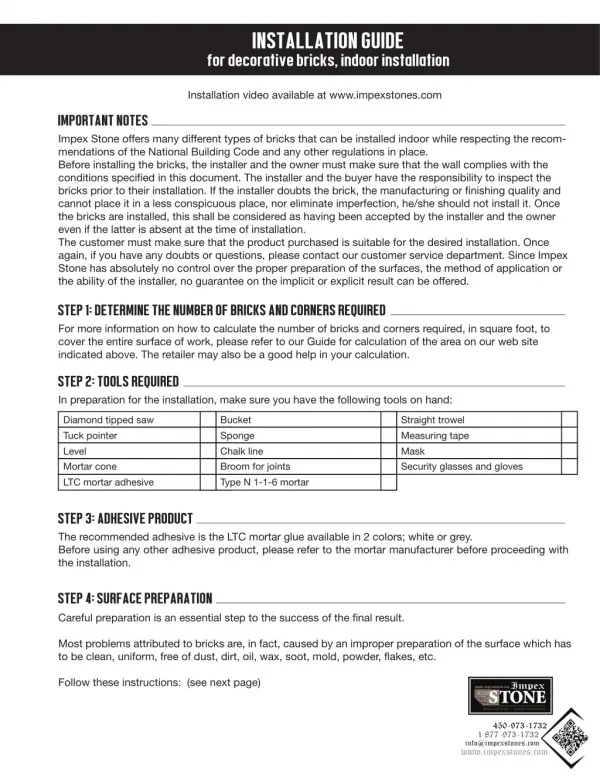
INSTALLATION GUIDE for decorative bricks, indoor installation Installation video available at www.impexstones.com IMPORTANT NOTES Impex Stone offers many different types of bricks that can be installed indoor while respecting the recom- mendations of the National Building Code and any other regulations in place. Before installing the bricks, the installer and the owner must make sure that the wall complies with the conditions specifed in this document. The installer and the buyer have the responsibility to inspect the bricks prior to their installation. If the installer doubts the brick, the manufacturing or fnishing quality and cannot place it in a less conspicuous place, nor eliminate imperfection, he/she should not install it. Once the bricks are installed, this shall be considered as having been accepted by the installer and the owner even if the latter is absent at the time of installation. The customer must make sure that the product purchased is suitable for the desired installation. Once again, if you have any doubts or questions, please contact our customer service department. Since Impex Stone has absolutely no control over the proper preparation of the surfaces, the method of application or the ability of the installer, no guarantee on the implicit or explicit result can be offered. STEP 1: DETERMINE THE NUMBER OF BRICKS AND CORNERS REQUIRED For more information on how to calculate the number of bricks and corners required, in square foot, to cover the entire surface of work, please refer to our Guide for calculation of the area on our web site indicated above. The retailer may also be a good help in your calculation. STEP 2: TOOLS REQUIRED In preparation for the installation, make sure you have the following tools on hand: Diamond tipped saw Tuck pointer Level Mortar cone LTC mortar adhesive Bucket Sponge Chalk line Broom for joints Type N 1-1-6 mortar Straight trowel Measuring tape Mask Security glasses and gloves STEP 3: ADHESIVE PRODUCT The recommended adhesive is the LTC mortar glue available in 2 colors; white or grey. Before using any other adhesive product, please refer to the mortar manufacturer before proceeding with the installation. STEP 4: SURFACE PREPARATION Careful preparation is an essential step to the success of the fnal result. Most problems attributed to bricks are, in fact, caused by an improper preparation of the surface which has to be clean, uniform, free of dust, dirt, oil, wax, soot, mold, powder, fakes, etc. Follow these instructions: (see next page) 450-973-1732 1 877-973-1732 info@impexstones.com
STEP 4: SURFACE PREPARATION (more) For drywalls A galvanized wire mesh is required and must be installed this way: 1. Identify the studs and trace a vertical line using a chalk line. 2. Install the galvanized wire mesh using no. 12 screws and a galvanized steel washer. Attention: The wire mesh must be fxed to the wall making sure the alveolus are facing upwards in order for the mortar to be held in place during its application. 3. Prepare the mortar following the manufacturer’s instructions then apply it on the wire mesh with a straight trowel. 4. Let it dry until the following day. Lightweight cement boards or concrete surface (For any installation over 8 feet high, the National Building code requires a wire mesh). 1. Secure the lightweight cement boards with no. 12 galvanized screw. 2. Plaster the panels using fber glass tape and LTC mortar. 3. For concrete surfaces, make sure they are clean, uniform, dust and dirt free. No other preparation is required. STEP 5: INSTALLATION Once you have calculated the amount of bricks required, received the products and prepared the surface, you are now the principal contractor of your work. Follow these steps to install the bricks properly: 1. Open all the boxes, take out the bricks and choose them according to the desired effect. Put any broken brick aside and use them for cuts. 2. In a clean bucket, prepare the LTC mortar adhesive according to the manufacturer’s instructions. 3. Brick laying requires a double sticking, that is, the mortar adhesive must be applied on the wall and on the brick. Use a straight trowel to apply it on the wall and on the brick. Apply enough pressure on the brick to make it adhere frmly to the wall and ensure a perfect contact between the stone and the wall. Apply the mortar on a maximum surface of 15 square feet at a time to prevent the mortar from hardening too quickly on the wall. 4. Always start from the bottom. If corner bricks are required, install these frst. 5. Make sure the joints are of the same width between 1/4’’ and 3/8’’ maximum. 6. The space between joints must be free of the adhesive mortar in order to facilitate the application of Type N mortar for the joints. If there are residues, it may complicate the scraping of the joints the next day. 7. Let it dry. 8. Important: Take the necessary measures to avoid spreading the adhesive mortar on the bricks. If it happens, wait 15 to 20 minutes before wiping it with a dry cloth. Do not scrub it. Do not use water as it may affect the colors. 450-973-1732 1 877-973-1732 info@impexstones.com
STEP 6: APPLICATION OF TYPE N 1-1-6 MORTAR FOR THE JOINTS If necessary, the following day, apply type N 1-1-6 mortar as follows: 1. In a clean bucket, prepare the Type N mortar according to the manufacturer’s instructions. 2. Fill the mortar cone using a trowel. 3. Align the tip of the mortar cone on the joint and twist it. The mortar will be expelled between the stones to form a joint. TIP: To make this operation easier, add a very thin thread of transparent hand soap into the mortar. Important: Take the necessary measures to avoid spreading type N mortar on the bricks. If it happens, wait 15 to 20 minutes before wiping it with a dry cloth. Do not scrub it. Do not use water. 4. 15 to 20 minutes after applying the mortar, scrape off the joints with a tuck pointer. Important: Do not wait until the following day to scrape off the joints. Do not scrape the bricks with a wire brush, acid or any product containing acid. Do not use a wetted brush and never use water. Use a dry cloth to remove excess mortar on the stones. Do not scrub. 5. Let it dry. WARRANTY Impex Stone products have a limited warranty of 10 years from the date of purchase (proof required) when the installation is done in accordance with the recommendations of the National Building Code and the installation guide included in the product specifcations of the manufacturer. The original invoice from the authorized dealer must be supplied. The warranty does not cover any damages resulting from: - Improper installation. - Wall movements due to the subsidence of the soils or other causes. - Contact with chemical products, paint or others. - Stains, oxidation, discoloration and fading due to polluting atmospheric agents or any external agents. - Impex Stone products are not suitable for use on any area subjected to walking surfaces. This warranty only covers Impex Stone defective products. It does not include labor and is limited to the original buyer. We invite to visit our website regularly to discover our continuous fow of novelties. 450-973-1732 1 877-973-1732 info@impexstones.com