Download
1 / 2
20 likes | 67 Vues
Impex Stone offers many different models of leather tiles that can be installed indoor while respecting the recommendations of the National Building Code and any other regulations in place. Leather Tiles can make your home look gorgeous. If you want to give your home a different look, leather tile is a good way to give a unique style to your home. For more information visit:http://www.impexstones.com/products/leather-tiles/

E N D
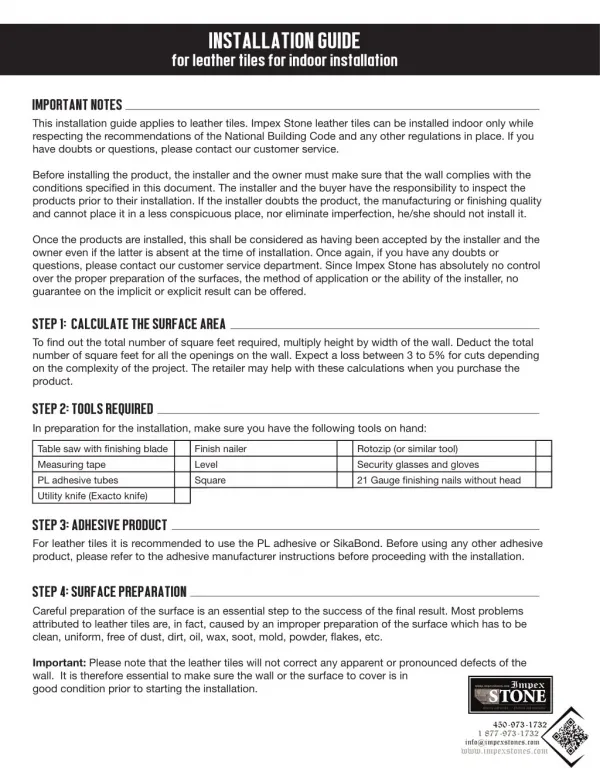
INSTALLATION GUIDE for leather tiles for indoor installation IMPORTANT NOTES This installation guide applies to leather tiles. Impex Stone leather tiles can be installed indoor only while respecting the recommendations of the National Building Code and any other regulations in place. If you have doubts or questions, please contact our customer service. Before installing the product, the installer and the owner must make sure that the wall complies with the conditions specifed in this document. The installer and the buyer have the responsibility to inspect the products prior to their installation. If the installer doubts the product, the manufacturing or fnishing quality and cannot place it in a less conspicuous place, nor eliminate imperfection, he/she should not install it. Once the products are installed, this shall be considered as having been accepted by the installer and the owner even if the latter is absent at the time of installation. Once again, if you have any doubts or questions, please contact our customer service department. Since Impex Stone has absolutely no control over the proper preparation of the surfaces, the method of application or the ability of the installer, no guarantee on the implicit or explicit result can be offered. STEP 1: CALCULATE THE SURFACE AREA To fnd out the total number of square feet required, multiply height by width of the wall. Deduct the total number of square feet for all the openings on the wall. Expect a loss between 3 to 5% for cuts depending on the complexity of the project. The retailer may help with these calculations when you purchase the product. STEP 2: TOOLS REQUIRED In preparation for the installation, make sure you have the following tools on hand: Table saw with fnishing blade Measuring tape PL adhesive tubes Utility knife (Exacto knife) Finish nailer Level Square Rotozip (or similar tool) Security glasses and gloves 21 Gauge fnishing nails without head STEP 3: ADHESIVE PRODUCT For leather tiles it is recommended to use the PL adhesive or SikaBond. Before using any other adhesive product, please refer to the adhesive manufacturer instructions before proceeding with the installation. STEP 4: SURFACE PREPARATION Careful preparation of the surface is an essential step to the success of the fnal result. Most problems attributed to leather tiles are, in fact, caused by an improper preparation of the surface which has to be clean, uniform, free of dust, dirt, oil, wax, soot, mold, powder, fakes, etc. Important: Please note that the leather tiles will not correct any apparent or pronounced defects of the wall. It is therefore essential to make sure the wall or the surface to cover is in good condition prior to starting the installation. 450-973-1732 1 877-973-1732 info@impexstones.com
STEP 5: LEATHER TILES INSTALLATION Once you have calculated the required quantities, received the products and prepared the surface, you are now the principal contractor of your work. Follow these steps to install the tiles properly: Important: The leather tiles must be stored in the room where the installation will be done at least 72 hours prior to the installation. It is essential for the tiles to become acclimatized to the room conditions. 1. 2. 3. 4. 5. If required, install the appropriate contour moldings. Draw a level line on the wall at the top of the frst tile. If necessary, apply some dye on the apparent cuts. On the back tile, spread 6 points of the PL glue. With the fnish nailer, fx 6 nails per tile. Verify the level of each row and adjust it if necessary. WARRANTY Impex Stone products have a limited warranty of 1 year from the date of purchase (proof required) when the installation is done in accordance with the recommendations of the National Building Code and the installa- tion guide included in the product specifcations of the manufacturer. The original invoice from the autho- rized dealer must be supplied. EXCLUSIONS. Impex Stone does not cover any of the following: - Installation contrary to our Installation Guide or proper installation practices. - Damage caused by mold or mildew. - Discoloration or color variation caused by UV exposure or contact with liquid. - Damage caused by furnitures. - Damage from any post-treatment product applied to the tiles. - Damage of tiles from any post work done on tiles i.e. nailing, hammering, etc. - Damage caused by improper use or maintenance. - Damage caused by improper storage or handling. - Application of tiles on a fexible, non-rigid wall surface. - Applied to an exterior wall. This warranty only covers Impex Stone defective products. It does not include labor and is limited to the original buyer. We invite to visit our website regularly to discover our continuous fow of novelties. 450-973-1732 1 877-973-1732 info@impexstones.com