Solved: QuickBooks POS Printer Issues and Cash Drawer will Not Opening Issues
60 likes | 105 Vues
The above solutions is given by the Intuit Experts. In case you are having trouble to solve QuickBooks POS Receipt Printer not working & Cash Drawer not opening issues you can contact to the third party QuickBooks Point of Sale Support dial toll-free number 1800-935-0532

Solved: QuickBooks POS Printer Issues and Cash Drawer will Not Opening Issues
E N D
Presentation Transcript
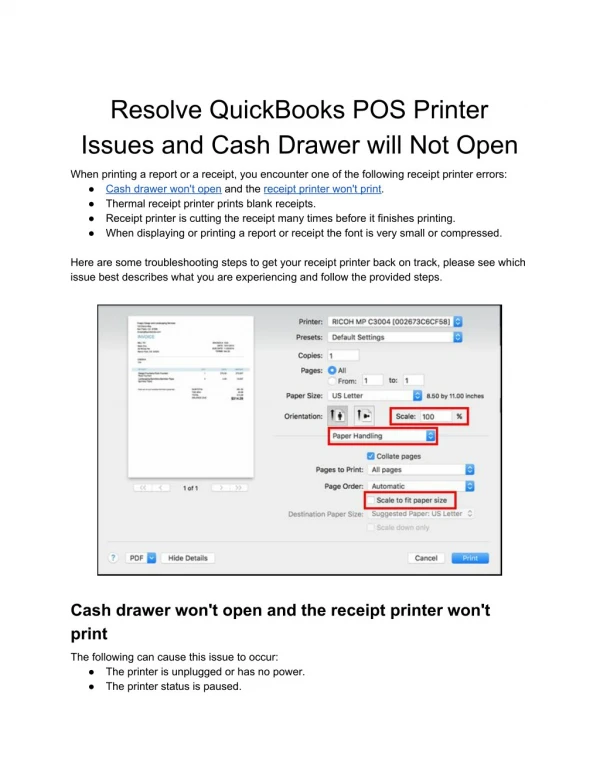
Resolve QuickBooks POS Printer Issues and Cash Drawer will Not Open When printing a report or a receipt, you encounter one of the following receipt printer errors: ● Cash drawer won't open and the receipt printer won't print. ● Thermal receipt printer prints blank receipts. ● Receipt printer is cutting the receipt many times before it finishes printing. ● When displaying or printing a report or receipt the font is very small or compressed. Here are some troubleshooting steps to get your receipt printer back on track, please see which issue best describes what you are experiencing and follow the provided steps. Cash drawer won't open and the receipt printer won't print The following can cause this issue to occur: ● The printer is unplugged or has no power. ● The printer status is paused.
● ● ● The print spooling process is damaged. The wrong printer driver has been installed. More than one instance of the printer has been installed. To verify if issue is resolved, test the printer and cash drawer after each numbered step: To test the printer from within Point of Sale: 1. Choose File > Preferences > Workstation. 2. Select Documents & Printers and click Print Test Page. To test the cash drawer from within Point of Sale: 1. Choose File > Preferences > Workstation. 2. Select Cash Drawer, ensure the Receipt Printer and Cash Drawer Connection are properly configured, and click Open Cash Drawer. Solution 1: Purge the printer memory 1. Turn the printer off. 2. Press and hold the feed button and turn the printer back on. 3. When the printer begins its self-test, release the feed button. 4. Once test completes, attempt to print from within Point of Sale again. Solution 2: Ensure that the printer has power Check if the power cord is connected to the printer and there is a power light when switched on. Do not connect the receipt printer to a USB hub as it will not supply enough power for proper function of the printer. Solution 3: Ensure the printer is not paused 1. Click the Windows Logo button, choose Control Panel. 2. Click Devices and Printers, then double-click the receipt printer. 3. Select X documents in queue, then choose Printer > Cancel All Documents. Click Yes to confirm the action. 4. Click the Printer menu again, if Pause Printing is checked, click Pause Printing. 5. Close this window and test the cash drawer function. If it fails, continue to the next step. Solution 4: Bypass the print spooling process 1. In the Devices and Printers window, from the Control Panel, right-click the receipt printer, then Printer Properties. 2. Click on the Advanced tab, then Print directly to the printer. 3. Click OK and test the cash drawer function. If it fails, continue to the next step.
Solution 5: Remove and reinstall the printer 1. In the Devices and Printers window, right-click the receipt printer, then Remove device. Click Yes to confirm the action. 2. Repeat this process for additional copies of the printer that may be installed. 3. Reinstall the receipt printer. The cash drawer should now function properly. Thermal receipt printer prints blank receipts The following can cause this issue to occur: ● Paper is not thermal ● Paper is put in backwards ● Bad thermal heads ● Bad printer installation Solution: 1. Ensure you have a thermal paper loaded properly. If it is thermal paper, a scratch with a thumbnail or the edge of a coin will leave a black mark. Ensure that the paper is inserted in the printer where it feeds form underneath the roll towards the front 2. Run a printer self test. a. Turn the printer off. b. Hold down the feed button and turn the printer back on. ■ If the self-test print works, the paper is good and the thermal heads are fine. ■ If it fails, disconnect all connections except the power cord from the printer and try the self-test again. 3. Delete and reinstall the printer. 4. Note: Verify if printing from a windows test page works, if it comes out blank but the self test was fine, this is likely a Windows issue.
Receipt printer is cutting the receipt many times before it finishes printing The following can cause this issue to occur: ● Cash drawer is pointing to the wrong printer in your preferences. ● Your print template is damaged. Solution 1: Ensure to select the correct printer in the preferences 1. Choose File > Preferences > Workstation. (In versions 9 and earlier, choose Edit > Preferences > Workstation.) 2. From the left pane, select Cash Drawer. 3. Update the Receipt Printer and Cash Drawer Connection preferences to point to the correct receipt printer. ○ From the Receipt Printer drop down, select the correct receipt printer ○ From the Cash Drawer Connection drop down, select the correct setting to match your receipt printer Solution 2: Repair templates by repairing Point of Sale Note: You may need to have your Point of Sale installation CD or you may need or download the software from your Intuit Account to complete the steps below.
1. Close QuickBooks Desktop Point of Sale. 2. Click the Windows Start button and click Control Panel or press Windows+R then type Control Panel and press enter. 3. Click Programs and Features. 4. Select your version of Point of Sale and click Repair. 5. Note: If a security warning appears, click Yes. If you are asked for the location of the installer and you have downloaded the installer from the website, select Browse and then search for the installer's location. 6. Follow the on-screen instructions to complete the repair. 7. Close the control panel and open Point of Sale. Displays or prints very small font or compressed receipt or report The following can cause this issue to occur: ● From the Documents and Printers preferences in Point of Sale, the Letter template and receipt printer are selected to display or print reports/receipts. ● Font size is not properly modified. Solution 1: Select the correct template for receipt printer used. 1. From the File menu, select Preferences > Workstation. 2. Assign a compatible template for the printer. 3. Note: If you have a 40-column printer,select a 40-column template. Using a letter template may cause small or compressed font. 4. Click Save. 5. Print the document. Solution 2: Configure the printer driver properly. 1. Go to Control Panel, then select Devices and Printers. 2. Right-click, then select Printer Properties. 3. Click Device Settings. 4. In the Friction field, select 72 mm x Receipt.Click OK > Apply > OK. 5. Close the Control Panel window, then print the document again. Solution 3: Modify Font from the Print Designer. 1. On QuickBooks Desktop Point of Sale, click File > Tools > Print Designer. 2. Select the Document type > Available template. Click Modify. 3. Note: Ensure to select the compatible template for your printer. 4. From the Document Preview, right-click the section to modify and select Properties. 5. Click the Fields tab, then select Change Font. 6. Modify the font style or size, click OK and print a document.
Solution 4: Reinstall the Printer 1. In the Devices and Printers window, right-click the receipt printer, then Remove device. Click Yes to confirm the action. 2. Repeat this process for additional copies of the printer that may be installed. 3. Reinstall the receipt printer. The cash drawer should now function properly. The above solutions is given by the Intuit Experts. In case you are having trouble to solve QuickBooks POS Receipt Printer not working & Cash Drawer not opening issues you can contact to the third party QuickBooks Point of Sale Supportdial toll-free number +1800-935-0532