Download
1 / 22
220 likes | 379 Vues
2 Bedroom / 2 Bath 1240 Sq. Ft. Floor Plan Areas of Interest (#1) Hall Bath (#2) Kitchen (#3) Master Bath (#4) Air Conditioner (#5) Threshold. (#1) BEFORE Hall Bathroom. Back to Floor Plan. (#1) AFTER Hall Bathroom Remove the wing wall to increase maneuvering room

E N D
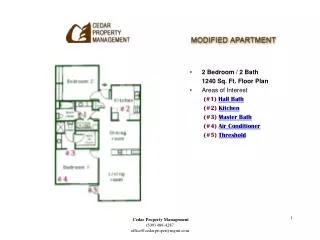
2 Bedroom / 2 Bath 1240 Sq. Ft. Floor Plan • Areas of Interest (#1) Hall Bath (#2) Kitchen (#3) Master Bath (#4) Air Conditioner (#5) Threshold Cedar Property Management(509) 489-4287 office@cedarpropertymgmt.com
(#1)BEFORE • Hall Bathroom Back to Floor Plan Cedar Property Management(509) 489-4287 office@cedarpropertymgmt.com
(#1)AFTER • Hall Bathroom • Remove the wing wallto increase maneuvering room • Note: Interior door left in place Back to Floor Plan Cedar Property Management(509) 489-4287 office@cedarpropertymgmt.com
(#1) AFTER • Hall Bathroom • Remove the wing wallto increase maneuvering room • Note: Interior door removed Back to Floor Plan Cedar Property Management(509) 489-4287 office@cedarpropertymgmt.com
(#1) BEFORE • Tub Grab Bar Reinforcing Back to Floor Plan Cedar Property Management(509) 489-4287 office@cedarpropertymgmt.com
(#1) AFTER • Tub Grab Bar Reinforcing • Install “wing-it” mounted grab bars Back to Floor Plan Cedar Property Management(509) 489-4287 office@cedarpropertymgmt.com
(#1) BEFORE • Toilet Grab Bar Reinforcing Back to Floor Plan Cedar Property Management(509) 489-4287 office@cedarpropertymgmt.com
(#1) AFTER • Toilet Grab Bar Reinforcing • Install “wing-it” mounted grab bars Back to Floor Plan Cedar Property Management(509) 489-4287 office@cedarpropertymgmt.com
(#1) BEFORE • Hall Bathroom Toilet Back to Floor Plan Cedar Property Management(509) 489-4287 office@cedarpropertymgmt.com
(#1) AFTER • Hall Bathroom Toilet • Relocate the toilet using an offset toilet flange or furr-out grab bar Back to Floor Plan Cedar Property Management(509) 489-4287 office@cedarpropertymgmt.com
(#2) – BEFORE • Kitchen Range • Note: Cabinet located to right of stove Back to Floor Plan Cedar Property Management(509) 489-4287 office@cedarpropertymgmt.com
(#2) AFTER • Kitchen Range • Modify location of range and/or make adjacent cabinet removable to provide centered clear floor space • Note: Cabinet is left in place Back to Floor Plan Cedar Property Management(509) 489-4287 office@cedarpropertymgmt.com
(#2)AFTER • Kitchen Range • Modify location of range and/or make adjacent cabinet removable to provide centered clear floor space • Note: Cabinet is removed upon request Back to Floor Plan Cedar Property Management(509) 489-4287 office@cedarpropertymgmt.com
(#2) BEFORE • Kitchen Counter Outlets • Standard outlet Back to Floor Plan Cedar Property Management(509) 489-4287 office@cedarpropertymgmt.com
(#2) AFTER • Kitchen Counter Outlets • Provide a surface mounted outlet extender Back to Floor Plan Cedar Property Management(509) 489-4287 office@cedarpropertymgmt.com
(#2) BEFORE • Framed Room Openings (Doors) - to Kitchen • Note: Trim on doorway Back to Floor Plan Cedar Property Management(509) 489-4287 office@cedarpropertymgmt.com
(#2) AFTER • Framed Room Openings (Doors) - to Kitchen • Remove wood base trim to increase door width Back to Floor Plan Cedar Property Management(509) 489-4287 office@cedarpropertymgmt.com
(#3) BEFORE • Framed Room Openings (Doors) - to Master Bath • Heater in place Back to Floor Plan Cedar Property Management(509) 489-4287 office@cedarpropertymgmt.com
(#3) AFTER • Framed Room Openings (Doors) - to Master Bath • Relocate the baseboard heater unit away from the Master Bath entry to provide 32” nominal width Back to Floor Plan Cedar Property Management(509) 489-4287 office@cedarpropertymgmt.com
(#4) AFTER • Bedroom Air Conditioner Controls • Install remote air conditioner Back to Floor Plan Cedar Property Management(509) 489-4287 office@cedarpropertymgmt.com
(#5) AFTER • Primary Entry Door Thresholds • Modify (lower) primary entry door thresholds Back to Floor Plan Cedar Property Management(509) 489-4287 office@cedarpropertymgmt.com
If you wish to request any of these accessibility features please contact the Resident Manager. • Press the ESC key to exit. Cedar Property Management(509) 489-4287 office@cedarpropertymgmt.com