Download
1 / 33
330 likes | 1.44k Vues
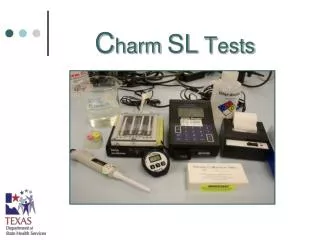
C harm SL T ests W ork A rea Areas neat, clean, well ventilated, and temperature controlled (7 – 35 0 C or 44.6 – 95 0 F) Lighting at least 50 foot candles at working surface (preferably 100) Incubator / Heat Block 56 0 C + 1 0 C (SL & SL3) 45 0 C + 2 0 C (SL6)

E N D
Work Area • Areas neat, clean, well ventilated, and temperature controlled (7 – 350C or 44.6 – 950F) • Lighting at least 50 foot candles at working surface (preferably 100) • Incubator / Heat Block • 560C + 10C (SL & SL3) • 450C + 20C (SL6) • Thermometer for each incubator • Level
Pipettor Calibration • Fixedvolume pipettors forcertified labs –300 ul– calibrate every6mos – newtag • ONLYScreening labs may use the disposable bulbs supplied by Charm
Pipettor Calibration • Serial #etched with identification or manufacturers ID number. • Thetagwill include the average weight, date, location, and analysts initials. • Calibrated with 10 consecutive weighings. • Weighing must be+ 5%of the specified volume. • .285 to .315 • Recordsmaintained.
TheNIST traceablethermometer calibrated at ice point annually. The “in use” thermometers calibrated against the NIST traceable thermometer at eachtemperature ofuse upon receiptandannually. Tagincluded temp checked at, date of check, analyst initials and correction factor. Records maintained. ThermometerCalibrations 8/31/2005 LT Charm SL Block 560C CF -0.50C
Refrigerator Temperature • Thermometers placed – top / bottom shelves. Check daily for screening / twice a day for Certified Labs. • Graduation interval not greater than 0.50C.
Refrigeration Requirements • Remove only enough Charm SLstrips for a12hour period of use. After 12 hours, throw away. • Do not leave the container out on the counter! • Record - date received/analyst & date opened/analyst on the container & date of initial testing w/ analyst initials.
Controls – All Tests • AllSL test controls may be frozen. • Add the tablet to the container. Add 5 ml of previously tested negative raw milk. Shake. Refrigerate (or set in ice bath) for 5 minutes before use. • To Freeze– Aliquot controls into freezer safe screw cap vials and freeze within 6 hours of preparation. • Stored in a non-frost-free freezer or in a styrofoam container in a frost free freezer, for no more than2months at -150C or below. • Remove frozen controls from freezer / thaw in icewater or in fridge.DO NOTthaw in hands / pockets / on the counter, etc.
FrozenControls • NOTE: If control(s) are frozen the analyst must: • Thaw0-4.40C (in ice water or refrigerator). • Mix the control 25 times in 7 seconds. • Centrifuge SL for 3 minutes. (SL controls only) • Keep in ice water and do not mix again once it has been centrifuged. It is now ready to be tested. • Do not shake after centrifugation. • If maintained refrigerated, control may be used for 24h. Do not re-freeze.
Fresh Positive Controls • Record the following information from the positive control onto the QA/QC record. • Manufacturer. • Lot #. • Expiration Date. • Date & Time made. • The positive control is good for 48h when kept at 0-4.40C (or 2 months when frozen at –150C or below in a screw cap vial).
Positive Controls • Reagents shall be stored at0-4.40C, in a closed bag in container with a desiccant. • Record the datereceived, date opened, and analyst(s) initials on the reagent bag.
Fresh Negative Controls • Obtain a raw milk sample from a silo/tanker/holding tank that has been pre-tested as NF with the Charm SL test kit. • Identifywith time, date, analyst, and silo / producer, etc. it was taken from.
Fresh Negative Controls • Fresh negative control is good for72hrswhen maintained at 0-4.40C (or 2 months when frozen at –150C or below in a screw cap vial). (If frozen and then thawed in ice water it is only good for 24h.) • Records maintained.
Reagent Stability • SL-6 & SL-3 reagents received refrigerated. • Reagents stored at0-4.40Cmaintained no longer than manufacture’s expiration date. • Negative Control(raw Milk tests as): • SL & SL-3 Beta-Lactam-600or less (more negative). • SL-6 Beta-lactam-400or less. • Positive control(Manufacture supplied): • Must produce+400or greater reading • Test for suitability each time prepared and/or day of use. • Do not proceed if controls are out of range.
New Lot Numbers • The Lot # and expiration date for the Charm SL strips is printed on the side of the strip container. • Check each new lot with a positive and negative control for to make sure they are working properly. Record on separate form. • Input new lot # into the ROSA Reader. • Record expiration date and lot # on the daily log sheet.
Work Area • Wash hands prior to testing samples. • Clean counter area and wipe dry. • Keep the incubator clean. • Wipe off splashed milk.
Test Procedure • Strip incubator for SL & SL3 maintains 56 + 10C (& Aflatoxin) & 45 + 10C for the SL6. • Level. • Check temperature of the incubator before use each day with a calibrated thermometer. • Record incubator temperature on the daily log sheet.
Performance Testing • Check calibration strips each day of testing. These strips are reader specific. • 2lines for SLBL • 3lines for SL6 • ROSA Pearlstrip is dark pink on low side / lighter pink on high side
Performance Testing • Run a negative and positive control for each day of testing. • Reader versions 1.5 and higher, use escape 5 reader to enter performance monitor mode. • Calibrators and controls must give appropriate results before running any samples / tankers.
Testing Worksheet • Recordcalibrator strip readings. Be sure that the values are in the correct range. If not, clean the strip(s) and re-insert. If this does not work – call Charm. No testing may be done until these work properly. • Record kit lot #, expiration date, date controls are prepared and expire and initial on the daily log.
Test Procedure • Sample container and temp control must be identified properly (Date, producer, tank #, silo #, etc.). • The temperature control sample must be identified as the “TC” on the label or lid. • Record time, date and temperature of samples as received and tested. • Determine sample temperature by inserting a pre cooled certified/calibrated thermometer into the temperature control (TC).
Test Procedure • Do not accept producer samples that are >3/4 full. (Samples that are over full.) • If the raw milk TC sample exceeds 4.40C on receipt do not test. (Samples may be received at 70C if time of receipt is less than 3 hours from collection and arrival temperature is equal to or less than temperature of collection.) • Visually inspect test strips before use. • Re-shape any dents in the sample compartment to allow unrestricted absorbance of milk by sample pad and strip to fit into incubator. • If a sample compartment is too ‘mashed’ to be used, throw it away.
Test Procedure • Place strip(s) in the heater block. • Label each test strip with sample ID or control ID while they are in the heater block so they are not bent or damaged. • Hold the test strip flat in the heater block and peel back the plastic just to the beginning of the white strip “the peel to here line” to expose sample pad. • Mix milk sample and non-frozen controls 25 times in 7 seconds with a 1 ft movement. • Shaking must be done vigorously • Test samples / controls within 3 minutes of shaking.
Test Procedure • Before use of mechanical pipettors, vigorously depress the pipettor plunger 10x to redistribute lubrication and assure smooth operation. • Examine pipettor to assure it has not been contaminated. If fouling is detected, clean as per manufacture’s recommendation and recalibrate. • Use a separate clean tip for each sample. • Hold sample at an angle and avoid foam. • Insert tip no more than 1cm. • Pre wet pipet tip with the sample before removing the test portion. • Touch tip off to inside of sample container above the sample surface.
Test Procedure • To avoid foam – • Tilt sample container at a 45 degree angle • Insert pipet into as vertically as possible about 1 inch below sample surface
Screening Labs Only • Only Screeningfacilities may use the poly pipet from Charm. • While holding poly pipet almost vertically with the bulb side pointing down, depress top bulb and insert into sample (below foam). • Release bulb and sample should completely fill pipet shaft and bottom 1/2 of the lower bulb. (It is okay to get milk in the overflow bulb!) • Dispense sample in pipet shaft by depressing top bulb only into test strip while leaving excess samplein overflow bulb.
Test Procedure • Slowly pipette 300 microliters of milk to either side of the sample pad compartment holding pipettor as vertically as possible. (if applicable, use etched line on the incubator as location guide). Avoid contact of the sponge with the pipet tip. • DO NOTpipet to the front!! • Re-seal plastic over the sample pad compartment. • Note: Only one test strip may have the plastic peeled back at a time. The sample is delivered, the compartment is re-sealed, the next strip may then have its plastic peeledback (the testing steps3 - 7are repeated until all of the strip sample wells have been properly filled).
Test Procedure • The used pipet tips should be discarded in a biohazard container or placed in disinfectant before they are thrown away. • Close and latch the incubator cover. • All of the above steps to be completed in 2 mins for SL & SL6; 1 min 15 sec for SL3) • Most incubators have built in timers – some have count down timers on the front. If there is no automatic timer, a separate timer must be set for 8 minutes.
Test Procedure • At end of incubation, visually inspect C (control) line • An absent C line, partial C line, or an indistinct C line indicates an invalid test and the sample/control must be re-tested. Do not read strip. • Note that the test line can be very light or absent.
ROSAReader • Insert only valid test(s) in the ROSA reader. • Press “ESC” then “PREV”to change between a 2 line and 3 line test. • Slow blink for the 2 line SL Beta-lactam test. • Rapid blink for the 3 line SL-6 Beta-lactam test. • No blink for SL-3 Beta-lactam test. • Reading and interpretation appears in 5 seconds. Read strips within 10 minutes of completion of incubation.
Interpretation • If there is a negative or zero reading on the reader, the sample is negative, report as Not Found (NF). • Record actual test # and interpretation for each sample, control, calibration strip tested. If a result is negative then a (-) sign must be recorded. If a result is positive then a (+) sign must be recorded. • If there is a positive reading on the reader – run the calibrator strip(s), new positive and negative controls and repeat the same sample in duplicate (same analyst). If one or both of these duplicate tests give a positive result the load is presumptive positive. Report as Presumptive Positive (PP).
Reporting • Attach Rosa Reader print out for positive and negative controls and all truck samples received and tested each day to the daily antibiotic worksheet. • The lot # of the SL strips must be on the printout.