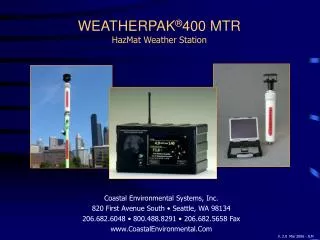
WEATHERPAK ® 400 VM Vehicle Mounted HazMat Weather Station
Coastal Environmental Systems, Inc 820 First Avenue South • Seattle, WA 98134 206.682.6048 • 800.488.8291 • 206.682.5658 Fax www.CoastalEnvironmental.Com. WEATHERPAK ® 400 VM Vehicle Mounted HazMat Weather Station. V. 1.4 Apr 2003 - JLM.
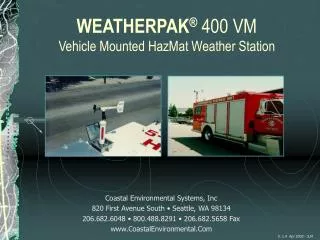

WEATHERPAK ® 400 VM Vehicle Mounted HazMat Weather Station
E N D
Presentation Transcript
Coastal Environmental Systems, Inc 820 First Avenue South • Seattle, WA 98134 206.682.6048 • 800.488.8291 • 206.682.5658 Fax www.CoastalEnvironmental.Com WEATHERPAK® 400 VMVehicle Mounted HazMat Weather Station V. 1.4 Apr 2003 - JLM
In the mid-1980’s NOAA (National Oceanographic Atmospheric Administration) approached Coastal Environmental Systems with the prototype of their plume dispersion modeling software ALOHA. They asked us to build a portable weather station designed specifically for hazmat responders that automatically updates the CAMEO/ALOHA model. Since that time Coastal Environmental Systems has become the leading manufacturer of professional portable weather stations. Since the original was introduced in the 1980’s the WEATHERPAK® has undergone many upgrades and revisions to improve performance and dependability... But the original mandate remains the same... design a sophisticated professional weather station to meet the requirements of hazmat responders and build it to withstand the rigors associated with hazmat response. WEATHERPAK ® is the #1 Choice...
WEATHERPAK® is rugged... Constructed of 6061-T6 “non-sparking and intrinsically safe” aluminum the WEATHERPAK® is impervious to most airborne chemicals… It will survive a 6-foot drop to concrete… It can be submerged in liquid to a depth of 10 feet… and it will, of course, withstand a decontamination scrub-down. WEATHERPAK ® is easy to use... The sensor package weighs less than 15 lbs... The WEATHERPAK® can easily be deployed by one person (without tools) in less than 60 seconds from case to full operation. The electronic compass automatically aligns the WEATHERPAK® 400 to True North, making manual alignment unnecessary, saving valuable time and potential data errors.
System Components - Sensor Package The sensor package consists of a hermetically sealed aluminum cylinder containing the automatic compass,barometer,microprocessor and other electronics. The temperature/relative humidity sensor and barometer port are located beneath the “gill” solar radiation shield at the top of the cylinder. The wind speed and direction sensor is attached to the top of the sensor package.
The WEATHERPAK® measures the air temperature, relative humidity, barometric pressure, wind speed and direction every 2 seconds. The resulting data is used to automatically compute the stability class of the wind and 5-minute running averages of wind speed, direction, and temperature. Every 30 seconds this data is transmitted to the Display Box and then output to your computer… automatically updating the plume modeling software. ALOHA and MARPLOT screens
Important Note: When using the WEATHERPAK® with ALOHA & MARPLOT the ALOHA application must be running in a window in front of MARPLOT. The plume on MARPLOT will not update every 30 seconds unless the ALOHA application window is on top. Resize the ALOHA window and move it to an area of the screen where the plume will not be obscured. While it is advisable to resize the ALOHA window, do not make it so small that it might be inadvertently “lost” behind the MARPLOT window.
System Components – Display Box The Display Box is also the interface with the PC and plume modeling software. The LCD displays the following data… - Wind Speed and Direction (WS) (5-minute running average) - Instant Wind speed (IW) - Wind Stability (ST) - Air Temperature (TEMP) - Relative Humidity (RH) - System ID# (ID) - Barometric Pressure (BP)
Setup - Siting Considerations Compass Measurements– The WEATHERPAKhas an electronic compass for automatic alignment to North. Like all compasses, it will be adversely influenced if located (laterally) near large steel objects. (i.e. on top of a van is OK, but next to it is not an ideal location.) Wind Measurements– Select a site that is exposed to the wind as much as possible. The wind pattern around a building or other obstacle is disturbed for a considerable distance… Place the vehicle in a manner that provides the WEATHERPAK the best opportunity to measure undisturbed air flow.
Kamlock Quick Release The Van Mount Quick Release is permanently mounted on the vehicle. Because of the variability of vehicles and mounting styles, the lower part of this bracket is assumed to be customer furnished. Coastal supplies the “Quick-Release” with 1-½” female SPT.
Setup - Assembly Open the WEATHERPAK carry case. Please note… the Wind Monitor is located under a layer of foam in the carry case lid.
Remove the wind monitor from the carry case… located under the foam padding in the carrying case lid. Place the propeller on the shaft… Either direction is OK. ...secure with the nut.
Plug the wind vane into the top of the WEATHERPAK. There is an alignment pin and slot inside the connector to assure proper alignment. Alignment Mark Alignment Slot Be certain that the wind vane is plugged all the way in. DO NOT rotate the wind vane when installing or removing.
Align the slot on the WEATHERPAK with the guide pin on the Quick Release... push straight in. (DO NOT “screw” the WEATHERPAK onto the quick release.) This is a “tight-tolerance” machined fit and may require an extra push… then push the arms of the clamp down to assure a tight fit. The WEATHERPAK is now running and is sampling data. When the WEATHERPAK is removed from the “Quick Release”, it will stop sampling and shut itself off. DO NOT rotate the WEATHERPAK when installing or removing.
Connecting to Computer • Plug the display box power cord into a power source. (110V unless otherwise marked) • Plug one end of the serial data cable into the computer COM port. • Turn the power switch on. • The power indicator light should now be on. • If the WEATHERPAK is set up and running, the “Data” light on the display box should blink briefly every 30 seconds as data is received. If the light doesn’t blink, see the section on troubleshooting.
WEATHERPAK® VM Operation Once the WEATHERPAK is set up, it turns itself on, starts sampling and transmits data every 30 seconds. You can view the data on the Display Box LCD, or you can view and manipulate the data on the computer using the ALOHA plume model software. Low Power Indicators There is a low power warning indicator which will flash in the lower right corner of the display. A flashing “R” indicates that the Display Box “internal” back-up battery is low.
Operation Low Power Indicators(Continued) If the display box lights go out, plug the display into a wall outlet, then reset by flipping the power switch off then back on. This will recharge the internal Display Box battery. Display Box battery lasts = Approximately 4 hours Full Recharge time = 1 hour
Power The WEATHERPAK® 400 VM is powered by 120 VAC (standard) or 12 VDC (by request) supplied by the vehicle. The “Internal” back-up battery in the Display Box should provide several years of service and is not user maintained. If you believe the Display Box battery is not functioning properly, call Coastal’s Service Department. Please refer to the WEATHERPAK® manual for more on low battery indicators and battery replacement.
Maintenance Periodic maintenance schedule Routine maintenance is required on the WEATHERPAK every 12 months. This maintenance is to ensure that the system and its sensors are working and performing to specifications. The actual service varies, based on the sensors installed in your model of WEATHERPAK. For example, a WEATHERPAK 400 should have the wind, compass, air temperature (and, optionally, the barometric pressure and relative humidity) sensors tested to their stated specifications. In addition, the entire WEATHERPAK should be examined for any wear, damage or other non-conforming variances.
Troubleshooting Do not take the WEATHERPAK or the Display Box apart…this will void the warranty. If the procedures below do not solve the problem, call Coastal Environmental Systems’ Service Department at 800-488-8291 x157. Is the WEATHERPAK on? Once the WEATHERPAKis set up, it turns itself on, starts sampling and transmits data every 30 seconds. If it does not: - Check that the WEATHERPAK is properly secured in the quick release... re-seat firmly. - Check the power connection to the WEATHERPAK, or - Check the power supply at the Display Box.
Troubleshooting Is the Display Box on? The display back-light should be on and the display characters visible. If this does not occur, do the following: - Be sure the Display Box is plugged in and turned on. Check the power light on the front panel. It should be lit. - If the power light is not lit, check for power at the outlet where the Display Box is plugged in. Power Indicator Light
Troubleshooting - Data light not flashing? Every 30 seconds, the data light will flash signifying the WEATHERPAK® is updating the display. If the light does not flash, then do the following: - Be sure the Display Box unit is plugged in and turned on. Check the power light on the front panel, it should be lit. - Unclamp and remove the WEATHERPAK® from the Kamlock, wait 10 seconds, then replace WEATHERPAK® on the tower (this resets the WEATHERPAK®). Data Light
Troubleshooting - Incorrect Wind speed ? - Check that the propeller is turning. - There is a minimum threshold of about 2.5 – 3 MPH before the propeller will begin to spin. - Propeller is turning, wind speed reads zero? - Make sure that the wind monitor has been pushed down all the way on to the WEATHERPAK®. See manual or “Setup – Assembly” on slide 13).
Troubleshooting - IncorrectWind direction? For this job you need a partner. Have your partner go to the wind monitor and hold the vane so the propeller points in a known direction. Does the display read correctly? If not: - Confirm that the wind monitor has been pushed down all the way on to the WEATHERPAK®. There is an alignment pin and slot inside the connector to assure a proper and aligned fit; make sure that the pin is in the slot. (See manual, or “Setup – Assembly” on slide 13).
Troubleshooting Do you suspect other sensor’s are inoperative or reading improperly? Contact Coastal’s Service Dept… Your WEATHERPAK® may require professional service. Weatherpak® struck by lightning.
Troubleshooting - The Computer There is data on the display, but there is either no data or erroneous data at the computer. - Check all the connections from the Display Box to the computer. - Error messages while running plume model are not related to the use of the WEATHERPAK®. They are messages from the plume modeling software or your computer’s operating system. - Consult the EPA web-site www.epa.gov/ceppo/cameofor CAMEO/ALOHA support. - You may, as a last resort, contact Coastal. We are not CAMEO/ALOHA representatives or certified trainers; but, we may be able to help.
Please… Read the User’s Manual ! This presentation is intended to provide a quick overview of the WEATHERPAK® 400 VM. It is not intended to provide all the information necessary for the proper use and maintenance of the system. The User’s Manual provides a great deal more information and a level of detail not available in this presentation. A printed copy of the user’s manual was shipped with the WEATHERPAK® . It is also available in a separate file on this disk in Adobe® PDF format. Should you discover contradictory statements or information, consider the manual as the correct and final source. If you do find a discrepancy; or have a suggestion on how to make this presentation more useful, please contact the Coastal Environmental, Sales Dept. at 800-488-8291 x133
A Final Note... We, at Coastal Environmental Systems, Inc., are very proud of the WEATHERPAK® and the service it has provided to the HazMat Response community, both civilian and military. Be assured your WEATHERPAK® has been designed and built to the highest standard and will provide many years of quality service. If we can be of further assistance, please do not hesitate to call us at… 800-488-8291 Sales Department x133 Service Department x157