Sterilization: Process, Sterilants, and Monitoring
Learn about the sterilization process, different sterilants like Saturated Steam, Ethylene Oxide, and more, and the importance of monitoring for steam sterilization. Discover Biological Indicators, Chemical Indicators, and Mechanical Indicators for proper sterilization validation.


Sterilization: Process, Sterilants, and Monitoring
E N D
Presentation Transcript
Sterilization – In General • What’s the process? • Decontamination – removes > 80% of microbes • Sterilization – Kills/inactivates the remaining microbes • What are the Sterilants? • Saturated Steam • Ethylene Oxide • Ozone • Hydrogen Peroxide • High Level Disinfectants (Glutaraldehyde, OPA, PAA)
Sterilization – In General • What’s the process? • Decontamination – removes > 80% of microbes • Sterilization – Kills/inactivates the remaining microbes • What are the Sterilants? • Saturated Steam • Ethylene Oxide • Ozone • Hydrogen Peroxide • High Level Disinfectants (Glutaraldehyde, OPA, PAA)
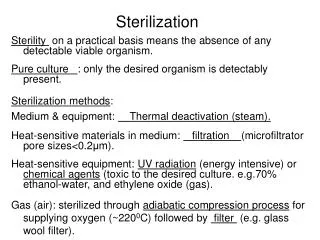
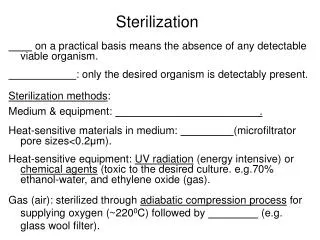
Steam Sterilization • “Critical” Variables • Time. • Temperature. • Saturated Steam. (Depends on Temperature and Pressure) • Other Variables (Incomplete List) • Loading • Sterilant contact with items to be sterilized • Outside weather changes • Boiler Chemicals • Wrapping Materials • Etc, etc, etc…….
Saturated Steam Superheated Steam Wet Steam/ Liquid Water
Saturated Steam – What is it? • It is a colourless gas, containing < 3% liquid water • Depends on temperature and pressure • It will condense if it cools down a fraction of a degree • It releases latent or potential heat energy as it condenses • It is the latent or potential heat transferred to microbes that kills/inactivates them
Latent Heat = Potential Energy Researcher knows the 16 ton weight has zero Potential energy. She is not afraid. 16 Ton weight is sitting on the floor It has zero Potential energy 16 Tons
Latent Heat = Potential Energy 16 ton weight is now 2 meters off the ground. It has quite a lot of potential energy with respect to the researcher 16 Tons The researcher is now very afraid of the 16 ton weight’s potential energy 2 meters
Latent Heat = Potential Energy Latent or Potential energy from the 16 ton weight is now realized. Especially by the late Researcher. 2 meters 16 Tons
Latent Heat = Potential Energy 16 Tons Steam (Gas) Water (Liquid) 16 Tons
The “Experiment”Generating Saturated Steam at 1 Atmosphere 100ºC Temp All the energy is now going in To creating “latent” heat in the steam With no increase in temperature It takes 150 KJoules to heat 1 lb of water from 20ºC to 100ºC and 1023 Kjoules to convert 1 lb of water from liquid to gas at 100ºC Time
Sterilization Monitoring • We monitor the Process not sterility of items • Because the process is validated (by the manufacturer of the sterilizer) we assume that, if the process functions correctly, the goods in the process will be sterile.
Process Monitors for Steam Sterilization • 3 Major types used: • Biological Indicators: • Monitor all variables in the process • Chemical Indicators: • Monitor one or more of the critical variables • Mechanical Indicators: • Monitor one of the critical variables
Process Monitors for Steam Sterilization • Individually they provide information, but only together do they tell the whole story! • A failure in any one of the monitors implies the process is incomplete in one or more necessary variables
Biological Indicators • Large # (> 105 or 106) of resistant spores • Usually “Self-contained” type • Placed in a normally loaded sterilizer • At least one per day per cycle (CSA) • Final Readout made at 1, 3, 24 or 48 hours • Test the process to ensure it is capable of killing microorganisms
Self-contained Biological Indicator Vial Ampoule + Growth media & Indicators Cap Spore Strip Filter
How do they Work? • Colour change indication: • If spore survives, it is incubated • Spore consumes nutrients, excretes acid • Spore creates subsequent generations that also consume nutrients and excrete acids • Purple (or other) dye is acid sensitive • If enough acid is produced, dye will change from purple to yellow (or other colour change) • Process can take up to 48 hours to get reliable prediction of kill
How do they Work? • Rapid Read BIs • Spore survives the sterilization cycle and is incubated • Nutrients are “tagged” with a U.V. fluorescent dye • As spore consumes nutrients the dye is released and begins to fluoresce • Fluorescence is detected electronically • Process takes up 3 hours to get reliable prediction of kill
What bout these “Extended Cycles”? • G.stearothermophilus will still be the test spore. • Requires a new Process Challenge Device (test pack) not a new BI • Extended cycle required because bigger. Heavier more complex sets protect microbes better • PCD must provide the same protection to the BI
BIs and CIs • All current sterilization standards (AAMI, CSA and ISO) require the use of Biological indicators. • Chemical Indicators cannot replace Biological indicators because: • Biologics are far more complex • Biologics have the potential to recover after serious damage • Chemistries only approximate the response of Biologics • Chemical kinetics are far simpler than biologic kinetics • Chemical indicators only measure the critical variables of the process. Biologics integrate all the variables of microbial death
Understanding Chemical Indicators • To fully understand Chemical indicators one must understand: • BIER/CIER Vessels/Test methods used by manufacturers • Stated Values (SVs) • ISO/AAMI Classifications of Chemical Indicators • How it all relates to YOUR sterilization process • What a pass/fail result really means
Test Methods for Testing Chemical Indicators • Must be reproducible, controlled and consistent • Based on standard test “Sterilizers” called BIER or CIER vessels • BIER = Biological Indicator Experimental Resistometer • CIER = Chemical Indicator Experimental Resistometer • BIER/CIER vessels performance specified by ISO 18472 • BIER/CIER Vessels behave very differently from a typical health care sterilizer
BIER/CIER Vessels • Very Small Chamber • Very tight controls • Highly reproducible results • Basis for all Biological and Chemical indicator testing • All CI “Stated Values” are based on this vessel
Some Requirements of CIER Vessels • Come-up time < 10 seconds • Come-down time < 10 seconds • Vacuum air removal < 2 minutes • No steam allowed during air removal • Set Temperature within 0.5ºC • Set Time within 1 second • Pressure within 3.5 Torr • One data point recorded per second
Contrast CIER Vessel to Health Care Sterilizer • Come-up time 5 to 15 minutes • Come-down time 5 to 15 minutes • Vacuum air removal 5 to 15 minutes • Steam used during air removal • Set Temperature within 2ºC (?) • Set Time within ?? • Pressure within ?? • One data point recorded per 30 seconds
Test Methods for Chemical Indicators • All testing done in a CIER Vessel • Must meet requirements of ISO 11140-1 • ISO 11140 is written for Manufacturers not end users • Specifications are broken in to 6 categories • Only need to show the ability to reach the stated values.
Stated Values: What are they? • For any given chemical indicator to be compliant with ISO 11140-1, it must have “Stated Values” for the parameters it measures. • Example: For a Class 3 Chemical Indicator, it must have a stated value for temperature. This is the temperature at which we can expect to see the change in the CIER vessel.
Stated Values and ISO 11140-1 • The standard uses the “Stated Values” to define how the indicator will perform. • Example: A Class 4 Indicator • Stated Values: • 134ºC • 4 Minutes • ISO allows a range: • Colour change (Pass result) must be seen at 134ºC, after 4 minutes exposure in the CIER vessel. A fail (no colour change) result must be seen at 132ºC after only 3 minutes exposure. No additional testing is required at points in between.
Stated Values and ISO 11140-1 • A Class 6 example: • Stated Values: • 134ºC, 4 Minutes (Saturated steam) • A pass result must be seen ( in the CIER vessel) after 4 minutes exposure at 134ºC • A Fail result must be seen at 133ºC after 3 min 45 second exposure in a CIER vessel. • No additional testing of points in between is required.
Stated Values and ISO 11140-1 • The BIG QUESTION • So, if a chemical indicator shows a “pass” result in your sterilizer does it mean that the Stated Values given for that particular chemical indicator have been achieved?
Chemical Indicators • Changes (reactions that cause colour change) start at temperatures well below the stated values for the CI • Temperature at which the reaction starts is the initiation temperature • Changes (reactions) will continue once initiated and the temperature is above the initiation temperature
Rates of Reaction and Initiation Energies In our house my wife allows me the honour of pressing my own shirts. As part of that process I have learned a lot about the chemistry of burning fabrics.
Rates of Reaction and Initiation Energies For example, I discovered that if I place an unplugged (cool) iron on a shirt, I can leave it there indefinitely and it will not scorch the shirt. That’s because the energy imparted to the shirt from the cool iron is well below the initiation energy required to start the burning reaction of the fabric. It also doesn’t remove wrinkles
Rates of Reaction and Initiation Energies • I’ve also learned that I can leave an iron on its lowest setting on the shirt indefinitely and it will not scorch the shirt either. I guess the low setting still doesn’t deliver enough energy to start the burning reaction
Rates of Reaction and Initiation Energies • Of course, an iron on medium setting will scorch the shirt, but it takes quite a few minutes to do so, • On high setting, the wrinkles go, but if I leave the iron on the shirt for even a short time, it will scorch.
Chemical Indicators • Example (Theoretical) CI has stated values of 134ºC, 4 minutes: Initiation temperature may be 100ºC and reaction (change) will start to occur at that temperature and continue while the temperature remains over 100ºC. • The rate of change will vary with temperature once initiated. Usually faster as temperature increases
Next Big Question(s) • If chemical indicators start to react below the stated values: • How fast do they react at lower temperatures? • Will they change if they spend sufficient time at lower temperatures? • What does that mean for monitoring my sterilizer?
Extended Cycle Time Temperature Plot: Set Points 132ºC, 18 min)
Conclusions so far….. • Stated Values cannot be duplicated in Health Care Sterilizers • Stated values can be used only for comparative purposes between Chemical Indicators of the same class • Stated Values are used by Manufacturers of Chemical Indicators to make CSA/ISO or AAMI Classification claims.
CSA/ISO/AAMI Classification of Chemical Indicators • All follow the ISO 11140, 6 tier classification structure • All state the class has no hierarchical significance. (i.e. a Class 2 is not “better” than a Class 3 or a Class 6 is not “better” than a Class 5.) • Classification structure is to provide specifications and targets for manufacturers of chemical indicators • It may be used by users for comparing CIs within the same class
Definitions Critical Variable • For steam sterilization Time, Temperature and Saturated Steam • For Ethylene Oxide: EtO concentration, humidity, time, temperature • Critical Parameter • A set value of a critical variable that must be attained • Stated Values • The critical parameters measured by a Chemical Indicator in a CIER vessel
CSA/ISO/AAMI Classification • Class 1 – Process Indicators • Autoclave tapes, built-in CIs on peel pouches • Simply identify processed from unprocessed packages • Class 2 – Special Indicators • Bowie-Dick Type Tests • Class 3, 4, 5, and 6 are all Internal Indicators
Classes 3 - 6 • Class 3 Indicator: • Measures only one of the critical variables of the process • Class 4 Indicator: • Measures 2 or more of the critical variables of the process • E.g. Time and temperature, or time saturated steam.
Classes 3 - 6 • Class 5 Integrating Indicator • Measures all critical variables of the process, and correlates with the test spore for that process across a range of sterilization conditions • For steam sterilization, the Class 5 must correlate with G.stearothermophilus at 121ºC, 128ºC* and 135ºC • Has a known response over a range of sterilization temperatures * May be other temperatures within the range of 121 - 135ºC
Class 3 - 6 • Class 6 Emulating Indicator • Measures all critical variables of the process • Tightest specifications of all indicators • Stated Values are for a specific time and temperature for steam sterilization