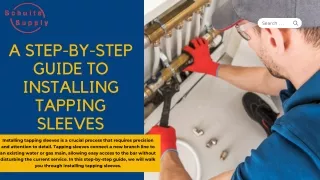
A Step-by-Step Guide to Installing Tapping Sleeves
0 likes | 21 Vues
Installing tapping sleeves is a crucial process that requires precision and attention to detail. Tapping sleeves connect a new branch line to an existing water or gas main, allowing easy access to the bar without disturbing the current service. In this step-by-step guide, we will walk you through installing tapping sleeves.

A Step-by-Step Guide to Installing Tapping Sleeves
E N D
Presentation Transcript
Search . . . A STEP-BY-STEP GUIDE TO INSTALLING TAPPING SLEEVES Installing tapping sleeves is a crucial process that requires precision and attention to detail. Tapping sleeves connect a new branch line to an existing water or gas main, allowing easy access to the bar without disturbing the current service. In this step-by-step guide, we will walk you through installing tapping sleeves.
GATHER THE REQUIRED MATERIALS Before you begin the installation process, ensure you have all the necessary materials. You will need tapping sleeves, bolts, gaskets, and a wrench. It is also essential to have safety equipment such as gloves and eye protection.
PREPARE THE MAIN LINE The first step in installing tapping sleeves is to prepare the main line. This involves cleaning and sanding the surface of the pipe where the tapping sleeve will be installed. This will ensure a secure and leak-free connection.
INSTALL THE TAPPING SLEEVE Next, place the tapping sleeve over the prepared section of the main line. Make sure the gasket is in place and the bolts are loosely installed. Adjust the tapping sleeve so that it is centered over the section of the main line where you want to make the connection.
TIGHTEN THE BOLTS Once the tapping sleeve is in place, use a wrench to tighten the bolts evenly. Start with the bolt opposite the gasket and work around in a criss- cross pattern. Be careful not to overtighten the bolts, as this can damage the tapping sleeve or central line.
MAKE THE CONNECTION With the tapping sleeve securely in place, it is time to connect to the new branch line. There are two ways to do this: using a tapping machine, cutting a hole in the tapping sleeve, and adding a valve or fitting to create the connection. A tapping sleeve is a device used to create a new branch line from an existing pipeline. Once the tapping sleeve is securely attached to the channel, the next step is to create a connection to the new branch line. This can be done in two ways:
TEST FOR LEAKS After making the connection, it is crucial to test for leaks. Turn on the water or gas supply and check for any signs of leaks around the tapping sleeve or new connection. If there are no leaks, you can continue with your project. Installing tapping sleeves is a critical process that requires careful preparation and execution. Following these six steps, you can ensure a secure and leak-free connection that will provide easy access to your water or gas main for years. Remember always to prioritize safety when working with pipes and other plumbing equipment.
THANK YOU www.Schultesupply.com