Constraint Layout Tutorial
Constraint Layout is a ViewGroup which allows you to create large and complex layouts with a flat view hierarchy, and also....more info check here:- https://abhiandroid.com/ui/constraintlayout

Constraint Layout Tutorial
E N D
Presentation Transcript
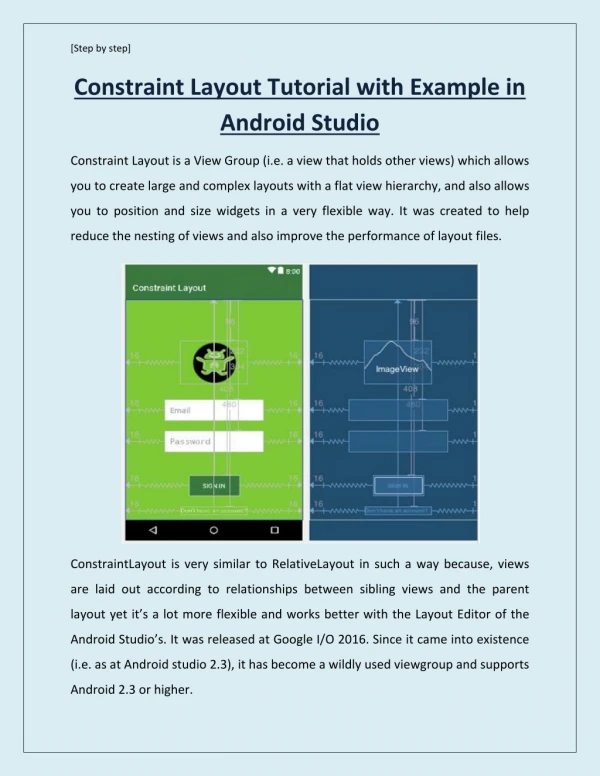
[Step by step] Constraint Layout Tutorial with Example in Android Studio Constraint Layout is a View Group (i.e. a view that holds other views) which allows you to create large and complex layouts with a flat view hierarchy, and also allows you to position and size widgets in a very flexible way. It was created to help reduce the nesting of views and also improve the performance of layout files. ConstraintLayout is very similar to RelativeLayout in such a way because, views are laid out according to relationships between sibling views and the parent layout yet it’s a lot more flexible and works better with the Layout Editor of the Android Studio’s. It was released at Google I/O 2016. Since it came into existence (i.e. as at Android studio 2.3), it has become a wildly used viewgroup and supports Android 2.3 or higher.
[Step by step] Table of Contents 1.Advantages of Constraint Layout over Other Layouts……………………………………. 2.Using Constraint Layout in Android Studio……………………………………………………….. 3.Design or Blueprint Mode in Android Studio………………………………………………….. 4.Understanding Handles or Anchor Points in Constraint Layout…………………………. 5.Attribute Window for ConstraintLayout…………………………………………………………. 6.Relative Positioning in Constraint Layout……………………………………………………… 7.Android Constraint Layout Overview…………………………………………………………. 8.Control linear groups with a chain………………………………………………………………… 9.Automatically create constraints………………………………………………………………. 10.Keyframe animations…………………………………………………………………………………… 11.Additional resources………………………………………………………………………………..
[Step by step] Advantages of Constraint Layout over Other Layouts •One great advantage of the constraintlayout is that you can perform animations on your ConstraintLayout views with very little code. •You can build your complete layout with simple drag-and-drop on the Android Studio design editor. •You can control what happens to a group of widgets through a single line of code. •Constraint Layout improves performance over other layout. Using Constraint Layout in Android Studio It is not bundled as part of Android SDK and is available as a support library. Due to this, any update in the future would be compatible with all versions of Android. To use Constraint Layout make sure you have declared below repository in build.gradle file repositories { maven { url 'https://maven.google.com' } } Now to use ConstraintLayout features in our android project, we will need to add the library to our build.gradle app module dependencies section. Open your build.gradle (Module app) and add the code below: dependencies { compile 'com.android.support.constraint:constraint-layout:1.1.0-beta3' }
[Step by step] Design or Blueprint Mode in Android Studio In Android Studio design and blueprint mode are added which display the layout design in design and blueprint mode. You can enable any mode or both together according to your requirement. Important Note: To help you understand ConstraintLayout, we will enable both(design and blueprint mode) for this tutorial. Understanding Handles or Anchor Points in Constraint Layout Let’s suppose you drag a TextView element in ConstraintLayout visual editor of Android Studio. Immediately after dragging you will notice an error with a message, “This view is not constrained…” So this simply means the view we created is not constrained and we need to fix it. If we don’t fix it, the view won’t render properly when it will run in App.
[Step by step] Now I hover around the button, you can see different points which can be called as handles or anchor points in Constraint Layout. Click on the any handle and drag it to make connection with something else around it. Important Note: You will need to make at least two connections of handles with something else to make it Constrained. So this way you can create Constrained.
[Step by step] Resize handle – To resize the view size, you can use resize handle found at the corners which keeps constraint intact. Just simply drag and resize it according to your App UI requirements. Side handle– The side handle are circular handle used to set the top, left, bottom and right constraints of the view.
[Step by step] Attribute Window for ConstraintLayout On the right side you will notice a attribute window which share lots of details about the views that we used for View in ConstraintLayout. You control sizing of the element by clicking on 4 side arrows to change wrap_content to match_constrained, fixed size etc. Bias decides view placement between its constraints on an axis. By default it is set 50% and can be changed easily by dragging. Important Note: Biasing is difficult to achieve in Linear Layout, Relative layout etc. Relative Positioning in Constraint Layout Relative Positioning is the most important type of Constraint Layout and considered as the basic block building in it. The different constraint option it offers works in relation/relative to position of one another. Those relative positioning works only in vertical and horizontal axis only. Using horizontal axis, you can set positioning of one widget in right, left, end and start sides of other widget. While using vertical axis you can set bottom, top sides and text baseline.
[Step by step] Let’s now understand the concept by taking an example. In the below example, we will create two TextView. In first TextView we will write Hello and in second we will write AbhiAndroid. We will set position of “AbhiAndroid” left of the “Hello” but in the right side. Below is the XML code: Here constraint means that the system will try to share the same location with both sides. The textview1 is left side of textview2 to be constrained to the right side of textview1. <?xml version="1.0" encoding="utf-8"?> <android.support.constraint.ConstraintLayout xmlns:android="http://schemas.android.com/apk/res/android" xmlns:app="http://schemas.android.com/apk/res-auto" xmlns:tools="http://schemas.android.com/tools" android:layout_width="match_parent" android:layout_height="match_parent" tools:context=".MainActivity"> <TextView android:id="@+id/textview1" android:layout_width="wrap_content" android:layout_height="wrap_content" android:text="Hello "/> <TextView android:id="@+id/textview2" android:layout_width="wrap_content" android:layout_height="wrap_content" app:layout_constraintLeft_toRightOf="@id/textview1" android:text="AbhiAndroid"/> </android.support.constraint.ConstraintLayout> Important Note: To define a view’s position in ConstraintLayout, you must add at least one horizontal and one vertical constraint to the view. Each constraint defines the view’s position along either the vertical or horizontal axis; so each view must have a minimum of one constraint for each axis, but often more are necessary. There are several types of restrictions. In particular, the following are some of the restrictions that can be used to set a position relative to another item:
[Step by step] layout_constraintLeft_toLeftOf: the left border of the element is positioned relative to the left border of another element layout_constraintLeft_toRightOf: the left border of the element is positioned relative to the right border of another element layout_constraintRight_toLeftOf: the right border of the element is positioned relative to the left border of another element layout_constraintRight_toRightOf: the right border of the element is positioned relative to the right border of another element. Android Constraint Layout Overview Android ConstraintLayout is used to define a layout by assigning constraints for every child view/widget relative to other views present. A ConstraintLayout is similar to a RelativeLayout, but with more power. The aim of ConstraintLayout is to improve the performance of the applications by removing the nested views with a flat and flexible design. A view inside the ConstraintLayout has handles (or anchor points) on each side which are used to assign the constraints. Let’s drag and drop a TextView on the layout and assign the constraints to it.
[Step by step] The TextView above has three types of handles: Resize handle– It’s present on the four corners and is used to resize the view, but keeping its constraints intact. Side handle– It’s the circular handle present on the centre of each side. It’s used to set the top, left, bottom and right constraints of the view. Baseline handle– It’s used to align the baseline with another textview in the layout. Let’s assign the constraints on the TextView and look into the xml code of it. Control linear groups with a chain A chain is a group of views that are linked to each other with bi-directional position constraints. The views within a chain can be distributed either vertically or horizontally.
[Step by step] Automatically create constraints Instead of adding constraints to every view as you place them in the layout, you can move each view into the positions you desire, and then click Infer Constraints to automatically create constraints. Infer Constraints scans the layout to determine the most effective set of constraints for all views. It makes a best effort to constrain the views to their current positions while allowing flexibility. You might need to make some adjustments to be sure the layout responds as you intend for different screen sizes and orientations. Autoconnect is a separate feature that is either on or off. When turned on, it automatically creates two or more constraints for each view as you add them to the layout, but only when appropriate to constrain the view to the parent layout. Autoconnect does not create constraints to other views in the layout. Autoconnect is disabled by default. You can enable it by clicking Turn on Autoconnect in the Layout Editor Toolbar. Keyframe animations A ConstraintSet is a lightweight object that represents the constraints, margins, and padding of all child elements within a ConstraintLayout. When you apply a ConstraintSet to a displayed ConstraintLayout, the layout updates the constraints of all of its children. To build an animation using ConstraintSets, specify two layout files which act as a start and end keyframe for the animation. You can then load a ConstraintSet from the second keyframe file and apply it to the displayed ConstraintLayout. Note: TransitionManager is available in the Support Library for Android 4.0 (API level 14) or higher. Important: ConstraintSet animations animate only the size and position of child elements. They do not animate other attributes (such as color).
[Step by step] The code example below shows how to animate moving a single button to the bottom of the screen. // MainActivity.kt fun onCreate(savedInstanceState: Bundle?) { super.onCreate(savedInstanceState) setContentView(R.layout.keyframe_one) constraintLayout = findViewById(R.id.constraint_layout) // member variable } fun animateToKeyframeTwo() { val constraintSet = ConstraintSet() constraintSet.load(this, R.layout.keyframe_two) TransitionManager.beginDelayedTransition();] constraintLayout.apply(constraintSet) } // layout/keyframe1.xml // Keyframe 1 contains the starting position for all elements in the animation as well as final colors and text sizes <?xml version="1.0" encoding="utf-8"?> <android.support.constraint.ConstraintLayout xmlns:android="http://schemas.android.com/apk/res/android" xmlns:app="http://schemas.android.com/apk/res-auto" android:layout_width="match_parent" android:layout_height="match_parent"> <Button android:id="@+id/button2" android:layout_width="0dp" android:layout_height="wrap_content" android:text="Button" app:layout_constraintEnd_toEndOf="parent" app:layout_constraintStart_toStartOf="parent" app:layout_constraintTop_toTopOf="parent" /> </android.support.constraint.ConstraintLayout> // layout/keyframe2.xml // Keyframe 2 contains another ConstraintLayout with the final positions <?xml version="1.0" encoding="utf-8"?> <android.support.constraint.ConstraintLayout xmlns:android="http://schemas.android.com/apk/res/android"
[Step by step] xmlns:app="http://schemas.android.com/apk/res-auto" android:layout_width="match_parent" android:layout_height="match_parent"> <Button android:id="@+id/button2" android:layout_width="0dp" android:layout_height="wrap_content" android:text="Button" app:layout_constraintEnd_toEndOf="parent" app:layout_constraintStart_toStartOf="parent" app:layout_constraintBottom_toBottomOf="parent" /> </android.support.constraint.ConstraintLayout> Additional resources ConstraintLayout is an Android component.