Capture 4.9.0
Capture 4.9.0. For SharePoint 2010. KnowledgeLake Capture 4.9.0. In This Presentation Capture Overview Capture Requirements Capture Installation Capture Initial Launch and Profile Creation Capture Usage: Scan, Index, and Release Capture Usage: Document Assembly


Capture 4.9.0
E N D
Presentation Transcript
Capture 4.9.0 For SharePoint 2010
KnowledgeLake Capture 4.9.0 • In This Presentation • Capture Overview • Capture Requirements • Capture Installation • Capture Initial Launch and Profile Creation • Capture Usage: Scan, Index, and Release • Capture Usage: Document Assembly • Capture Usage: Barcodes and Barcode Rules • Capture Usage: Architecture • Capture Usage: Options • Capture Tools • Capture Profile Administration Utility
Overview Production CaptureKnowledgeLake Capture
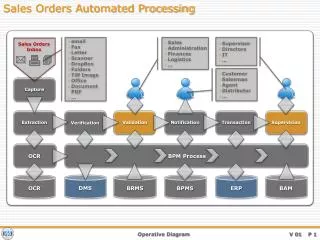
What is “Production Capture”? • Production Capture is a process entailing the capture of images into a system that allows for the assembly and indexing of those images into documents. • These documents will be released into a permanent image repository. • The source for these images could be a high-speed scanner, a fax server, a file system, or other devices that create images. • SharePoint WFEs
Production Capture: Document Preparation • Before scanning, documents need to be separated into one or more batches. • If the documents contain a variable number of pages, separator sheets with barcodes or patchcodes are often placed between documents.
Production Capture: Barcodes and Patchcodes • Barcodes and patchcodes can be used to separate a document or a batch. • During a barcode recognition operation, the image being processed is searched for possible barcodes. • Barcodes can be used to automatically assign specific attributes to a document. Barcodes Patch T/ Transfer Patch
KnowledgeLake Capture Overview • KnowledgeLake Capture is an application used for production image capture, indexing, and batch management. • The primary function of KnowledgeLake Capture is to convert paper content to an electronic format. • KnowledgeLake Capture was built to capture anywhere from a few hundred to hundreds-of-thousands of images per day. • Users assign metadata (a process referred to as indexing), and then release the content along with the associated metadata to a SharePoint repository.
KnowledgeLake Capture Overview • Three main components make up the production capture process: • Scan: An operator scans paper documents to import content into Capture and create a batch. • The file importer or a directory watcher may also be used. • Index: A user applies metadata to each document in the batch. • Assigning relevant metadata facilitates the search and retrieval of documents from within the SharePoint repository. • Release: After all documents in a batch have been indexed, the batch is released. • Typically, Capture releases to a SharePoint repository.
Requirements Hardware RequirementsSoftware Requirements
Requirements • Desktop Software Requirements: • Microsoft Windows 7 x32 or x64 or greater • Microsoft Windows Vista x32 or x64 +SP2 • Microsoft Windows XP Professional +SP2 or greater • Microsoft .Net Framework 4.0 Full Framework
Requirements • Desktop Hardware Requirements: • 1 GHz processor or higher • 1 GB RAM • 50 MB hard disk space + space for documents to be scanned • 1024x768 or higher display resolution • ISIS, TWAIN or WIA compatible capture device, if scanning rather than using File Import. Ensure that the desktop hardware meets the scanner manufacturer’s documented requirements. *These are the minimum required hardware specifications. For recommended hardware in a high volume scanning environment, please refer to Appendix 1 of the Capture Admin Guide
Supported Server Systems • Microsoft Windows SharePoint Services 2.0or greater (WSS) • Microsoft Windows SharePoint Portal Server 2003 (SPS) • Microsoft Office SharePoint Server 2007 (MOSS) • Microsoft SharePoint Server (“SharePoint 2010”) • Microsoft SharePoint Foundation (“SharePoint 2010”) • Note: Product does not install on the server, it is a desktop application only. For more information on Capture requirements, read the Capture 4.9.0 Release Notes.
Installation Product InstallationProduct Activation
Pre-Installation • You must be logged in as an administrator to install and activate KnowledgeLake Capture. Capture will not install successfully using the “Run-As” Administrator option. • Allow the installation scripts to run completely. Failure to do so results in the inability to properly remove or repair the product.
Installation • Run KL_Capture_PDF_Module.exe • The self-extractor prompts the installer to select a destination for the extraction of the installation files. • This is not where the application will be installed—it is where the installation files will be saved. • You may modify the destination or keep the default, then check Launch Setup When Finished, then click Extract. • Click Yes to create the destination directory.
Installation • A wizard takes you through the installation process. • After the extraction step, there are no other “turning points” during the installation—follow the prompts until the sequence is complete.
Profile Creation Initial LaunchThe Setup Wizard
Initial Product Launch • Launch KnowledgeLake Capture from your computer’s Start menu in the usual manner. • When you run Capture for the first time, the Setup Wizard runs and you must create a profile.
Product Activation • When you start the application for the first time, you will be prompted for activation preferences. Select the Standard Activation.
Product Activation • KnowledgeLake products requires that you enter a valid registration key before the product is usable. Select the On-Premise Server and enter the key. • The registration key should be obtained from KnowledgeLake or your software reseller.
Product Activation • A software registration key is tied to your company and the specific software products that have been purchased and registered by you. • For example, if your company has purchased 50 KnowledgeLake Capture licenses, 3 KnowledgeLake Imaging licenses and 3 KnowledgeLake Connect licenses, you will receive one registration key that will allow the successful installation of each of these purchased products.
Profile Creation • The Setup Wizard • When you start Capture for the first time, the Setup Wizard will run. • After completing this wizard you will have created your first Capture profile. • Profiles allow users to quickly and efficiently switch to different scanners, destinations, and options.
Profile Creation • General Options • Select the desired options for this profile.
Profile Creation • Scanning • You can choose an attached scanner or File Import. • File Import allows you to select files for indexing that are already saved on your hard disk.
Profile Creation • SharePoint Site Type Selector: • Even if you choose to release to Capture Server or a folder, you need to define the SharePoint site so Capture can retrieve content types. • Site URL is the address of your SharePoint site. Define the top level if you want to retrieve all content types. • Credentials connect to SharePoint, and must have contribute access to libraries in order to save content. • Checking Default Credentials will set Capture to use the credentials of the currently logged-in user when connecting to SharePoint. • Click Next and the Site URL will validate. Click OK.
Profile Creation • SharePoint Site • Expand the top level site, then use the Ctrl key to multi-select the locations you want included in the profile. • You may also use the buttons on the right to add, remove, or modify locations.
Profile Creation • Saving: • You can choose to save documents to a local or network drive, to a SharePoint site, or to KnowledgeLake Capture Server. • Auto Foldering automatically generates folders to store documents. • A folder structure based on year, month, and date is created within the SharePoint document library. • Doing this dramatically increases the number of documents a SharePoint library can typically store. • If you do not want folders to automatically generate, clear the option and documents will be saved in the root of the document library.
Profile Creation • Release File Type: • You can leave documents in their native format or you can have Capture convert these documents to a specific file type once captured. • Both TIF and PDF are available, and XPS is available if the .NET 3.0 framework is installed.
Profile Creation • Finished: • Upon successful completion of the Setup Wizard, Capture displays the Finished window.
Profile Creation • Select a Content Type: • When you complete the wizard, the application will launch and prompt you to select a default content type. • This indicates that Capture has connected to SharePoint and retrieved the associated libraries, sites, and content types. • Make your selection, then click OK.
The Capture Screen RibbonBar The interface is divided into 3 sections. Panes Status Bar
The Panes BatchTree View Pane – Shows documents and pages in a collapsible tree view Preview Pane – Shows the selected page and annotations Index Pane (or Properties Pane) – Shows the metadata associated with the selected content type
The Ribbon Bar Menu Quick Access Bar Tabs • The ribbon bar, sometimes referred to as a toolset, changes based upon the selected tab: Home, Insert or Scan. • The Insert tab provides tools for inserting screenshots or pages into the existing document. • The Scan tab allows you to select or reset the scanner, and view the scanner properties. Toolset/Ribbon Bar
The Status Bar Current Profile Refresh Content Types Zoom Slider Status of application Document Sets Menu Selected scanner Default Content Type
Messaging Window • The messaging window allows you to see messages, errors, and available batches. • To display or hide the messaging window, click on the Capture status bar.
The Program Menu Capture Program Menu • Click the Capture Program Menu button to see choices for batch manipulation. • You may also open Capture Options from the Program Menu. Options Button
Scan, Index, and Release Capture’s Basic Procedure
Scan • Click the “Scan” button on the Home tab of the ribbon to bring images into the Capture tree-view pane. • For the purposes of this presentation, the term “scan” represents the action of capturing images, either from a physically connected scanner or from the File Importer.
Index • Click the Index button on the Home tab of the ribbon to open the Index panel and begin the indexing process.
Index • Enter appropriate metadata values for the selected content type in the available fields of the Index Pane. • Click Accept to index the next document or to complete the batch after indexing the last document.
Index • The indexing process typically occurs after scanning and prior to releasing documents to SharePoint. • Indexing occurs at the document level. Therefore, you cannot assign different attributes to individual pages of a document.
Point and Shoot OCR Indexing • Metadata can be extracted from an image using Optical Character recognition: • Draw a box around the content you want to be read and assigned as metadata. • Select the desired metadata column from the pop-up submenu. • The data is entered into the selected column. • The white field displaying the selected information is referred to as a snippet.
Release • When all documents have been indexed, you are able to release the batch. You should be prompted with a dialog box, asking if you would like to release the batch. • You may also be able to use the Release option in the Program Menu if you do not wish to release using the Release plug-in. For more information on scanning, indexing, and releasing in Capture, see the Capture 4.9.0 User Guide.
Document Assembly Working With Documents in the Batch Tree View
The Batch Tree View • Capture displays the pages and documents of the current batch in the Batch Tree View, in which you can: • Add documents and/or pages • Merge two documents into one • Move pages within a document • Separate one document into two or more documents • Rotate pages and documents (if image files, not PDF) • Cut or copy pages and paste into another location in the batch
The Batch Tree View • In the Batch Tree View, selecting a specific page will display that page in Capture’s Preview Panel.
The Batch Tree View • Right-click on either a page or document to access tree-view functionality.
The Batch Tree View • Additional documents or pages can be added using the Insert tab of the Ribbon Bar. Find out more about Document Assembly in the Capture 4.9.0 User Guide, pages 33-43.
Rescanning • After reviewing the scanned images, you may want to rescan a page or document. • Rather than rescan the entire batch, Capture permits you to rescan either the document or page. • From the Batch Tree View, highlight the page or document to rescan. • Click the rescan option for Page or Document on the Home tab of the Ribbon Bar.