Database Logging: Connecting and Enhancing Data Analysis
Learn how to connect Geneos to databases, add tables and items, and utilize recorded data for analysis and improvement. Gain insights on supported databases and configuration settings. Maximize the logging capabilities to enhance reliability and performance.

Database Logging: Connecting and Enhancing Data Analysis
E N D
Presentation Transcript
Security: Module Admin Introductions, Facilities, Technology, Emergency Evacuation Procedures Timings: DatabaseLogginglasts for one hour.
Database Logging: Course Contents Connecting Geneos to a database Adding tables to the database Adding items to a database.
Database Logging one Database Logging
Database Logging: Real World Use Record monitored data, for example: Trades per hour/minute/second Latency CPU utilisation Memory Utilisation. Carry out historical search and/or analysis of recorded data. Use results of data analysis to improve reliability, performance and capacity management.
Database Logging: Supported Databases Using Geneos, you can log monitored data to four databases: MySQL Sybase Adaptive Server Enterprise (ASE), versions 12.5 and above Oracle 10g MS SQL Server, version 2008 and above. Note: By default a database does not log all values of all variables. It is up to the user to specify which values should be logged.
Database Logging: Basics • To set up database logging the database has to have already been set up and be writeable by the Gateway user ID. • Mandatory and User defined tables must be created in the target database. • ITRS provides standard create database template scripts for creating tables in your chosen database.
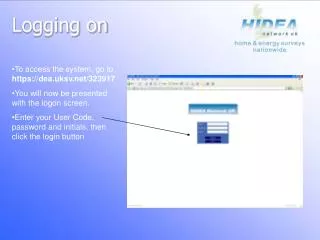
Database Logging: Connecting to MySQL To enter connection information, click on ‘Database Logging’ in the left hand pane of the GSE and complete Basic Tab details: • Logging can be turned on or off • Databases can be: • MySQL (shown in screenshot) • Oracle • Sql Server • Sybase. • Server and Database name • Port Number - will be the default for the database type if not entered.
Database Logging: Connecting to Oracle To enter connection information, click on ‘Database Logging’ in the left hand pane of the GSE and complete Basic Tab details: • Database name • The SID setting is only necessary if the SID does not match the connect identifier (the Database Name) • The hostname or IP address of the machine on which the database is running. • Port Number - will be the default for the database type if not entered.
Database Logging: Connecting to sqlServer To enter connection information, click on ‘Database Logging’ in the left hand pane of the GSE and complete Basic Tab details: • Logging can be turned on or off • Server and Database name • Port Number - will be the default for the database type if not entered.
Database Logging: Connecting to Sybase To enter connection information, click on ‘Database Logging’ in the left hand pane of the GSE and complete Basic Tab details: • Logging can be turned on or off • The alias in the Sybase interfaces file that references the required database server. • Server and Database name • Port Number - will be the default for the database type if not entered.
Database Logging: User IDs and Passwords • Authentication information is necessary for the: • Gateway to write the information • Active Console (clients) users to access the information using historic charting. • Password can be stored in either plain text or in encoded form. • An encoded password will appear in plain text in the text box at first. • The Gateway user must have database write permission. • The Client user must have database read permission. • Successful database connection • Unsuccessful database connection
Database Logging: Connecting – Advanced Tab On the Advanced Tab: • The max. number of queries to the database that the gateway will buffer before writing to a dump file. • A list of error codes. Upon receipt of one of these codes, logging will be suspended. • Specifies the Isolation Level used when performing transactions.
Database Logging: Connecting – Advanced Tab • Variables may be logged following a: • Gateway or a NetProbe starting up. • Change to the Gateway configuration file. • Dataview item being created and transitioning from undefined to OK severity. On the Advanced Tab:
Database Logging: Database Dump Files (1) • If a connection to the database breaks: • The Gateway will buffer updates in an internal queue until connection is re-established. • When the number of updates in the queue exceeds the maximum (default 4000), the Gateway dumps the updates into a file. • When the connection is re-established, the Gateway will attempt to insert the data from the dump file into the database. • This feature ensures that monitored data is not lost.
Database Logging: Database Dump Files (2) On the Advanced Tab: • Disable the dump file and reinsert feature. • Any files more than 7 (default) days will be discarded. • Maximum number of insertion requests made to the database without committing changes. • Maximum number of time (seconds) that will elapse without the gateway committing changes to the database.
Database Logging: Mandatory Tables • Mandatory tables: • version_table – stores the version of the schema, populated by the user. • node_ref table – stores references to Gateways and managed entities that are being logged, populated by the Gateway. • var_ref table – Stores references for variables that are being logged, populated by the Gateway. • event_table – stores events, populated by the Gateway. • Created by scripts supplied by ITRS.
Database Logging: User-Defined Tables • Used for organising and storing logged variables. • Any number of user defined tables can be defined. • Type for each table must be: • int • double • text string • Gateway populates user defined tables.
Database Logging: Adding Tables (1) Tables are added individually and it is important to know what tables are present in the database: • Table names have to be exactly the same as the tables in the database. • It is only necessary to create entries for the tables required. • The event_table, version_table and ref_tables should not have entries created.
Database Logging: Adding Tables (2) • To create a table, click on Database logging->Tables in the GSE • Only two elements need to be configured for tables: • Name • Type - in most cases, this will be ‘double’ as most values written to the database will be numeric, e.g. percentCPU. • If there is a requirement to write text data to the database, this must be written to a table of ‘Type’, ‘String’ (e.g. the text_table).
Database Logging: Configuring Items • Item configuration describes: • Data items that should be logged to the database. • Under which conditions the items should be logged. • How values are logged, so as to avoid filling up the gateway and overloading the database.
Database Logging: Adding Items (1) To add an item, click on Database logging->Items: Target – Drag the target xpath from a cell in the metric. Table – must have already been created and is therefore listed in the drop-down menu. • Normal behaviour: • A value is logged onto the database for the first time. • 5 minutes later the cell is checked to test if it’s value has changed since previously logged. • If it has changed, the new value is logged. • If it hasn’t changed, nothing happens.
Database Logging: Adding Items (2) Click on the Advanced Tab to add more configuration details: • The minimum logging interval (in seconds) for this item. • ‘Forced Interval’ will write the value at the interval time as well as any changes. • Options. • Active Times can also be set for logging. • Setting this value causes the database to write a null value when a cell is deleted. (Useful for tracking creation/deletion of rows or cells over time).
Database Logging: Minimum Intervals • If a cell’s value changes during the interval, the changed value will not be logged. • For example, if the interval is 5 seconds and the cell’s value changes 2 seconds into the interval, the changed value won’t be logged. It will be logged at the first change after the end of the interval, and the interval will be restarted. Value changes to 11 (logged). Minimum interval restarted. Value changes to 8 (not logged). Value changes to 12 (not logged). Value = 10 (Logged) 0 (Secs) 1 2 3 4 5 6 7 Start of interval End of interval
Database Logging: Forced Intervals • Cell’s value is logged if the value changes and at the end of the Forced Interval. • If the interval is 5 seconds and the cell’s value changes 2 seconds into the interval, the changed value will be logged and the value will be logged at the 5 second interval. For example: Value changes to 12 (logged). Value changes to 8 (logged). Value = 10 Value (8) is logged. End of interval Start of interval 0 (Secs) 1 2 3 4 5 Forced Interval configuration takes precedence over any absolute or percentage margin configurations (next slide).
Database Logging: Adding Items - Options The amount of data written to the database can be controlled by setting margins that a value must reach before being written. This can have a significant impact on the volume of data written. • Margins can either be: • Absolute • Percent. • (This is obviously the same for percent values such as percentUtilisation) The above example logs Average CPU Utilisation only if the value changes by more than 5% from the previous value.
Database Logging: Final Points • Icon showing the successful logging of a cell. • Database logging can be suspended by right clicking on the Gateway icon in the Gateway, selecting “Database->suspend” and checking the “suspend database” box. • To un-suspend the database, click on Database->Suspend and uncheck the box.
Docking Framework: Practical Complete Exercise 1