VigorAccess IP DSLAM Management
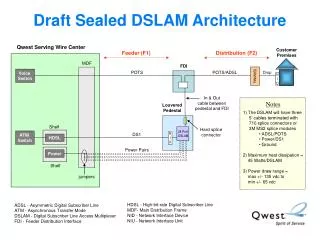
VigorAccess IP DSLAM Management. Aug 22, 2005 by Rafter Lin of DrayTek. Introduction. This presentation is to provide a quick guide to configure the VigorAccess IP DSLAM devices and enable them manageable. Architecture. Two types of topology Master-Slave Slave-Standalone.


VigorAccess IP DSLAM Management
E N D
Presentation Transcript
VigorAccess IP DSLAM Management Aug 22, 2005 by Rafter Lin of DrayTek
Introduction • This presentation is to provide a quick guide to configure the VigorAccess IP DSLAM devices and enable them manageable
Architecture • Two types of topology • Master-Slave • Slave-Standalone
Management Channels • Serial Port • Telnet • EMS (SNMP-based)
Serial Port Management • Console Setting • 9600/8/N/1, no flow control • Master-Slave • Connect to [CONSOLE] port • username/password: admin/1234 • Slave-Standalone • Connect to [CONSOLE] port • no password required
Master-Slave Connectivity • By default, ports G1, G2, ..., G6 are disable • Turn the interfaces ON • Admin>system link -m gn on (where n is 0 to 6) • Admin>system link (check the status)
Master-Slave Connectivity (cont.) • Check the connectivity between the slave and master • Admin>dsl -------------------------------------------------------------------------------- Logic-Name Slave-IP Connection-Status ------------------------------------------------------------- dsl-master 10.0.1.2 ON LINE dsl-slave-01 10.0.1.18 (NA) dsl-slave-02 10.0.1.34 ON LINE dsl-slave-03 10.0.1.50 ON LINE dsl-slave-04 10.0.1.66 (NA) dsl-slave-05 10.0.1.82 (NA)
Login to DSL Module • DSL inside master via serial channel • Admin>dsl -c (type <Ctrl-Z> to return) • DSL inside master via ethernet channel • Admin>dsl -m (type ‘exit’ to return) • DSL inside slave via ethernet channel • Admin>dsl -s n (type ‘exit’ to return), where n is 1 to 6
Version Information • Master Controller • Admin>system basic -------------------------------------------------------------------------------- SYSTEM BASIC INFORMATION -------------------------------------------------------------------------------- Machine Model : IP DSLAM MASTER Firmware Version : V2.1.12 Hardware Version : 0.0 Build Time : Wed Aug 17 14:44:10 CST 2005 System Uptime : 0 days 03h:43m:59s System Contact : admin@urcompany.com System Name : Taiwan001 System Location : urlocation CPU Usage : 01% Memory Usage : 49% Current Time : Thu Jan 01 11:43:42 1970
Version Information (cont.) • DSL (inside master or slave) • $get system info Description : IP DSLAM Name : Taiwan001 Location : Contact : Vendor : LogThreshold : 0 Object-id : 1.3.6.1.4.1.7367.2.11.1 Up Time(HH:MM:SS) : 2:40:40 HwVersion : A-A-24-1GE-1.0 CPSwVersion : V1.1.1_G_016 DPSwVersion : DP_B02_08_07_21 System Time : Thu Jan 01 03:45:33 1970 Time Zone : GMT DST : off Services : physical datalink internet end-to-end applications
Save the Configuration • Master Controller • Admin>commit • DSL module (in master or slave) • $commit
IP Address Setting • Mandatory if Telnet or EMS management is required • Default setting • Master • Outband (MGM port): 172.16.1.1/255.255.255.0 • Inband (Uplink port): 0.0.0.0 (disable) • Slave (DSL module) • Propritery DHCP (support only for master-slave architecture)
Master IP Setting • Outband • Admin>network out <new-ip> <mask> [vlanid] • Inband • Admin>network in <new-ip> <mask> [vlanid] • Status • Admin>network out (in) • outband and inband IP addrsses can not belong to the same domain
Slave-Standalone IP Setting • For 2 fast-ethernet version • $aggr intf ifname aggr-0 ip <new-ip> mask <mask> usedhcp false • For 1 giga-ethernet version • $ethernet intf ifname eth-0 ip <new-ip> mask <mask> usedhcp false • Change back to master-slave architecture • $aggr (ethernet) intf ifname aggr-0 (eth-0) ip 0.0.0.0 mask 0.0.0.0 usedhcp true
Telent Management • Device IP configured well • Connect to ... • Master: MGM port for outband, uplink port for inband • Slave: Any uplink port • Username/Password • admin/1234 (type ‘exit’ to return)
EMS Management • Device IP configured well • SNMP related parameters • Communities • Trap Host
Master SNMP Enabled • Communties • Default: public/private/trap • Admin>service snmp -c <ro> <rw> <trap> • Trap destination • Admin>service snmp -a <ems-server-ip>
Slave-Standalone SNMP Enabled • CLI commands... $create snmp comm community <ro-comm> $create snmp comm community <rw-comm> $create snmp host ip <ems-server-ip> community <ro-comm> $create snmp host ip <ems-server-ip> community <rw-comm> $create snmp traphost ip <ems-server-ip> community <trap-comm>
VigorAccess EMS • Element Management System • Client-Server Model • Pure Java Cross-Platform Architecture
EMS Installation • Retrieve the EMS Software • Following the installation guide... • Server • Install JDK • Install MySQL Database • Install EMSServer • Client • Install EMSClient
EMS Startup • EMS Server • Edit [Bind IP of EMSServer] • Start EMSServer (MySQL will be launched automatically) • EMS Client • Start EMSClient • Username/Password • root/admin123
Add Device into EMS • Choose [Add a Device] • Fill the name of the device • Fill the IP address of the device • Choose the correct Type of the device • Master-Slave • Slave-Standalone • Double-Click the device icon for further management
Advanced • How to set G6 port as uplink • How to set the default gateway • How to upgrade firmware via EMS
How to Set G6 Port as Uplink • For Master Controller • Admin>system G6 up or Admin>system uplink G6 up (the latest version) • Admin>system link -m g6 on • Admin>commit (on demand)
How to Set the Default Gateway • Master Controller • Admin>network route default <gateway-ip> • Standalone-Slave • $create ip route ip 0.0.0.0 gwyip <gateway-ip> mask 0.0.0.0
How to Upgrade Firmware via EMS • Firmware Type • Master Controller • draytek_V2.1.1.all for example • DSL Module • 2 fast-ethernet version, ex, V1.1.1_M_016 • 1 giga-ethernet version, ex, V1.1.1_G_016 -- the one inside master box
How to Upgrade Firmware via EMS (File Upload) • Retrieve the latest firmwares • Using [Advanced]-[File Upload] from EMS client to copy the local files to TFTP server on EMS server • For DSL module, • copy the whole directory is recommended
How to Upgrade Firmware via EMS (FW Upgrade) • Open the device faceplate from EMS client • Choose the target unit -- master controller or DSL module in master or slave • Right-click on the faceplate, choose [FW Upgrade] • Master Controller • DSL module: choose the type and firmware file
How to Upgrade Firmware via EMS (DSL Component) • Upgradable DSL Firmware Components • CP (Control Plane) CP.bin.gz • DP (Data Plane) DP.bin.gz • DSL DSP code gsv_dsl_AD_DM_3C00000C.bin.gz • Factory Default Setting FD.cfg