Download
1 / 8
80 likes | 256 Vues
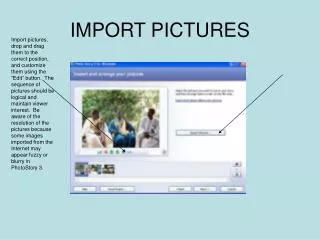
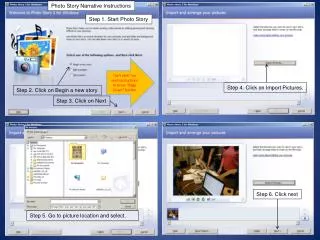
Photo Story Narrative Instructions. Step 1. Start Photo Story. “Left click” for next instructions or press “Page Down” button. Step 4. Click on Import Pictures. Step 2. Click on Begin a new story. Step 3. Click on Next. Step 6. Click next. Step 5. Go to picture location and select.

E N D
Photo Story Narrative Instructions Step 1. Start Photo Story “Left click” for next instructions or press “Page Down” button Step 4. Click on Import Pictures. Step 2. Click on Begin a new story Step 3. Click on Next Step 6. Click next Step 5. Go to picture location and select.
Step 7. Type a title for your picture Step 8. Note that when you type the words appear on the picture. Step 9. Highlight words. Step 11. Select desired font Step 10. Click on Font button. Step 12. Select color that will appear against background of picture.
Step 14. Click Next. Step 13. Click on Align button to move title to desired location. Step 15. Check microphone function by clicking on microphone button. Step 16. Click next.
Step 17. Sound Hardware Test Wizard begins test. Step 18. Read passage to test microphone Step 19. Green level indicator will appear when microphone is working then click Next. Step 20. Read narrative, watch for green level bars, and then click Next.
Step 22. Highlight narrative words. Step 21. Click finish. Step 24. To begin recording, click on red dot. Step 23. Paste or type in narrative.
Step 25. Note red dot blinks during recording. Step 26. Click on Stop button when complete. Step 27. Click on Preview button to check recording. Step 28. Click on X button when complete.
Step 29. To change recording, click clear button and then Red Dot to record again or if satisfied with recording, click Next. Step 30. Save project by clicking on Save Project button. Step 32. Click Save your story, browse to file location, and then click Next Step 31. Type in file name, click Save, and then click Next
Step 33. Photo Story builds your story. Step 34. View your story to see it in Windows Media. Step 35. Exit when satisfied with story. Step 35. Verify Story appears as planned.