Using Open EJB
Using Open EJB. --Use Tomcat, openejb, SSL and JSP to Implement an Inventory Query System Hongfang Shen Praveen Mynam Gaurav Kochhar Bhandari, Arathi. Open EJB.

Using Open EJB
E N D
Presentation Transcript
Using Open EJB --Use Tomcat, openejb, SSL and JSP to Implement an Inventory Query System Hongfang Shen Praveen Mynam Gaurav Kochhar Bhandari, Arathi
Open EJB • OpenEJB is an open source EJB container that you can download for free. All you need is OpenEJB to run Enterprise JavaBeans. The OpenEJB web site has a detailed “Hello World” tutorial that works with a local or remote server. • The OpenEJB web site also provides detailed instructions on how to install OpenEJB on a Tomcat server. Tomcat is a servlet container and does not host EJB components. OpenEJB allows you to add EJB components to Tomcat servlets and Java Server Pages.
Open EJB • The OpenEJB site provides a “Hello World” servlet example called HelloOpenEJB.java and a “Hello World” Java Server Page example called openejb.jsp. Click on Tomcat under Servers on the OpenEJB web site and follow links. • Once you are comfortable with using EJBs with Tomcat, I recommend learning how the javax.ejb package interfaces and exception classes work through examples on the internet. The javax.ejb package can be found in the J2EE 1.4 API. • Here is the link to OpenEJB.http://openejb.sourceforge.net/
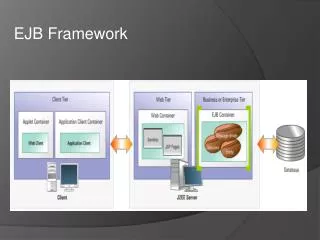
First Tier BROWSER AFS11 (Tomcat+openejb+SSL) Second Tier JDBC Limpid (ORACLE) Third Tier Introduction System architecture
Introduction (cont.) • Highlights--Security • Digital Certificate
Introduction (cont.) • Highlights--Security • Identity authentication
Introduction (cont.) Highlights—Search Engine
System Design • Client/Server • Server side uses Tomcat +SSL+OpenEJB. The business logic is implemented in JSP and Enterprise JavaBeans. • Client side is a standard web browser. • Two Enterprise JavaBeans • search engine Enterprise JavaBean--takes product name as parameter and search the inventory database and return the search result. • authentication bean--takes the users’ ID and password as parameters, and compare the message digest of the password with the digest stored in the database. • Integration • The two Enterprise JavaBeans integrated with Java Server Pages (JSP) to implement the business logic.
Steps to config Tomcat/OpenEJB • Install Tomcat (see related class presentation) • Install OpenEJB • Step1: download openejb-0.9.2.zip http://openejb.sf.net • Step2: unzip openejb-0.9.2.zip to $HOME a new directory openejb-0.9.2 will be created • Step3: add environment variable to .login script file. setenv OPENEJB_HOME $HOME/ openejb-0.9.2 • Step4: make files under the bin directory executable. chmod a+x $OPENEJB_HOME/bin/* chmod a+x $OPENEJB_HOME/openejb.sh
Steps to config Tomcat/OpenEJB(cont.) • Config Tomcat to Support OpenEJB • copy openejb class loader to $TOMCAT_HOME/webapps folder cp $OPENEJB_HOME/dist/openejb_loader-0.9.2.war $TOMCAT_HOME/webapps • modify the config file of openejb class loader to specify openejb home folder. (1) Start the Tomcat server using the following command: $TOMCAT_HOME/bin/catalina.sh run (2) a new folder openejb-loader-0.9.2 will be created under $TOMCAT_HOME/webapps. (3)modify the config file—web.xml under the new folder and change the value of parameter openejb.home to the openejb home folder (the value of $OPENEJB_HOME variable).
Steps to config Tomcat/OpenEJB(cont.) • Config Tomcat to Support SSL Step 1: set JSSE_HOME environment variable. setenv JSSE_HOME $JAVA_HOME/jre Step 2: create a certificate $JAVA_HOME/bin/keytool –genkey –alias tomcat –keyalg RSA System will ask you several questions. After answering all these questions, a .keystore file will be generated. Step 3: modify TOMCAT config file to support SSL. Modify the server.xml file under TOMCAT_HOME/conf folder, uncomment the SSL section. Then change the port number to the number you desire. Finally, add the following content into the server.xml SSL section. <Factory className="org.apache.coyote.tomcat4.CoyoteServerSocketFactory" clientAuth="false" protocol="TLS" keystoreFile="/afs/cad.njit.edu/u/h/s/hs48/.keystore" /> Note: the keystoreFile is the location where your .keystore stored.
Steps to config Tomcat/OpenEJB(cont.) • start and stop Tomcat and OpenEJB. • $TOMCAT_HOME/bin/catalina.sh run • $TOMCAT_HOME/bin/catalina.sh stop
Implement Business Logic • Implement Enterprise JavaBeans • write password authentication Enterprise JavaBean • (1) PasswordHome.java • (2) PasswordObject.java • (3) PasswordBean.java • write inventory search Enterprise JavaBean • (1) SearchHome.java • (2) SearchObject.java • (3) SearchBean.java
Implement Business Logic (cont.) • Register and Deploy Enterprise JavaBeans • First, create a bean descriptor file to describe your beans; • Second,package your bean into a .jar file. • Next, deploy the EJB beans into Openejb. • Finally, register the EJB beans in Tomcat config file so that Servlet or JSP in Tomcat can use it.
Implement Business Logic (cont.) • Password EJB bean descriptor file under META-INF folder -- ejb-jar.xml <?xml version="1.0" encoding="UTF-8"?> <ejb-jar> <enterprise-beans> <session> <ejb-name>Password</ejb-name> <home>cis604.password.PasswordHome</home> <remote>cis604.password.PasswordObject</remote> <ejb-class>cis604.password.PasswordBean</ejb-class> <session-type>Stateless</session-type> <transaction-type>Container</transaction-type>
Implement Business Logic (cont.) </session> </enterprise-beans> <assembly-descriptor> <container-transaction> <method> <ejb-name>Password</ejb-name> <method-name>*</method-name> </method> <trans-attribute>Required</trans-attribute> </container-transaction> </assembly-descriptor> </ejb-jar>
Implement Business Logic (cont.) • package the EJB bean: Jar cvf myPasswordEJB.jar cis604 META-INF • deploy the bean: $OPENEJB_HOME/openejb.sh deploy –a –f –c $HOME/ myPasswordEJB.jar
Implement Business Logic (cont.) • Register the EJB beans in Tomcat server, adding to examples context section of $TOMCAT_HOME/conf/server.xml. <Ejb name="ejb/password" type="Session" home="cis604.password.PasswordHome" remote="cis604.password.Password"/> <ResourceParams name="ejb/password"> <parameter> <name>factory</name> <value>org.openejb.client.TomcatEjbFactory</value> </parameter>
Implement Business Logic (cont.) <parameter> <name>openejb.naming.factory.initial</name> <value>org.openejb.client.LocalInitialContextFactory</value> </parameter> <parameter> <name>openejb.naming.security.principal</name> <value>username</value> </parameter>
Implement Business Logic (cont.) <parameter> <name>openejb.naming.security.credentials</name> <value>password</value> </parameter> <parameter> <name>openejb.naming.provider.url</name> <value>localhost:4201</value> </parameter> <parameter> <name>openejb.ejb-link</name> <value>Password</value> </parameter> </ResourceParams>
Implement Business Logic (cont.) • write Java Server Pages and interface html files (1) login.htm (2) create_new.jsp (3) search_byname.jsp (4) searchejb.jsp