Download
1 / 6
60 likes | 81 Vues
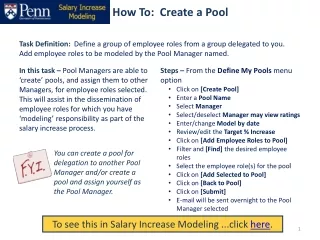
Task Definition: Define a group of employee roles from a group delegated to you. Add employee roles to be modeled by the Pool Manager named.

E N D
Task Definition: Define a group of employee roles from a group delegated to you. Add employee roles to be modeled by the Pool Manager named. In this task – Pool Managers are able to ‘create’ pools, and assign them to other Managers, for employee roles selected. This will assist in the dissemination of employee roles for which you have ‘modeling’ responsibility as part of the salary increase process. • Steps – From the Define My Pools menu option • Click on [Create Pool] • Enter a Pool Name • Select Manager • Select/deselect Manager may view ratings • Enter/change Model by date • Review/edit the Target % Increase • Click on [Add Employee Roles to Pool] • Filter and [Find] the desired employee roles • Select the employee role(s) for the pool • Click on [Add Selected to Pool] • Click on [Back to Pool] • Click on [Submit] • E-mail will be sent overnight to the Pool Manager selected How To: Create a Pool You can create a pool for delegation to another Pool Manager and/or create a pool and assign yourself as the Pool Manager. To see this in Salary Increase Modeling ...click here.
Task: Create a Pool (cont’d) From the Define My Pools menu option, click on [Create Pool] to begin the process.
Task: Create a Pool (cont’d) Note the Parent, the Parent target % increase and the Creator fields. Enter the ‘Pool’ Name. Tip: May want to establish a naming convention for your pools. • Select/deselect • ‘Manager may view ratings’. • Note the Manager named above may view the current performance rating on the Modeling page, and the performance history on the Role Details page, only if • The ‘Manager may view ratings checkbox’ is selected • The role being modeled is in the employees Home ORG • The performance rating has been entered via the Performance Appraisal Database (PAD) • Begin typing the name and select the ‘Pool’ Manager from the active employees in Payroll. • Tip: The name here does not need to be a PennWorks user. • Enter/change ‘Model by date’. • Date here defaults to one day before the parent pool. • Note the date cannot be changed to later than its Parent. • Note the Target % Increase is ‘editable’ here. Be sure to check with your School/Center HR office for approval to change this %. Click on [Add Employee Roles to Pool]to advance to the next slide.
Task: Create a Pool (cont’d) Filter and [Find] the desired Employee Roles, in this case ORG 0603 is selected. Click on [Find] to advance to the next slide.
Task: Create a Pool (cont’d) Note: If multiple results pages are indicated, “Select All’ check box will select the current page only. Select the Employee Roles to be added to the Pool. Note: The Pool is not yet saved until you go back to the Pool page and click on [Submit]. After you finish selecting Employee Roles and click [Add Selected to Pool] the following message will appear; click [OK]. Click [Back to Pool] toreview and confirm the Pool and to advance to the next slide.
Task: Create a Pool (cont’d) This message will appear after clicking on [Back to Pool]; click [OK]. Reminder: The Pool is still not yet saved until you click on [Submit] at the bottom of the page. Click on [Submit] to save the Pool.