Download

1 / 99
1.07k likes | 1.41k Vues
Pets and Disaster Emergency First Aid for Cats and Dogs. Emergency First Aid for Cats and Dogs. Prepared by Amy Stone Clinical Assistant Professor – Small Animal Surgery Department of Small Animal Clinical Sciences University of Florida, College of Veterinary Medicine / IFAS.

E N D
Emergency First Aid for Cats and Dogs Prepared by Amy Stone Clinical Assistant Professor – Small Animal Surgery Department of Small Animal Clinical Sciences University of Florida, College of Veterinary Medicine / IFAS State Agricultural Response Team
Learning Objectives After completing this training activity, participants should: • Describe ways to practice Priority #1 – Prevent Injury to Yourself • Understand the stages of rendering treatment that represent best practice, including: • Describe how to survey and evaluate the emergency situation • List appropriate handling techniques • List vital signs of dogs and cats and how they are measured • List and recognize types of trauma • Recognize which first aid procedures are appropriate to type of trauma State Agricultural Response Team
Primary Objective • When assisting dogs and cats during an emergency situation • Your safety is ultimately the highest priority!!! • Do not endanger yourself or fellow first responders to attempt heroic rescue measures for animals State Agricultural Response Team
This Presentation is Intended for… • Good Samaritans • Emergency Medical Professionals • First Responders • No Matter the level of experience, remember to seek veterinary advice whenever possible! State Agricultural Response Team
Priority #1 -- Avoid Injury to Yourself • Animals in emergency situations • Nervous, anxious, possibly injured • Unpredictable • Dangerous!!! State Agricultural Response Team
Avoiding Injury to Yourself • Dogs • Can bite causing crushing injury • Can scratch causing skin injury • Both bites and scratches can lead to bleeding and infection State Agricultural Response Team
Avoiding Injury to Yourself • Cats • Can bite causing puncture, bleeding and serious infection • Scratch leading to bleeding and infection • They are very flexible and can be difficult to restrain without getting scratched or bitten • If you are scratched or bitten by a cat, contact a medical professional immediately! State Agricultural Response Team
Survey and Evaluate the Emergency State Agricultural Response Team
Survey the Emergency Situation • Avoid becoming a victim; always survey for potential hazards • Oncoming traffic • Downed power lines • Hazardous materials • Dangerous or venomous wildlife State Agricultural Response Team
Survey the Emergency Victim • Approaching an Injured Dog or Cat • Approach very slowly • Approach softly as to avoid startling the animal • Lower your body so that you are not towering over them -- standing at full height could be interpreted as a threat • Do not make direct eye contact with the animal or stare directly State Agricultural Response Team
Survey the Emergency Victim • Keep an eye on the animal’s posture and expressions • Face, ears, tail, fur and body • Allow the animal to smell the back of your hand • WATCH for reactions carefully • Never make quick or sudden movements State Agricultural Response Team
Critical injury Good chance Critical injury Poor chance S e v e r i t y o f i n j u r y Injury Poor chance Injury Good chance C h a n c e o f s u r v I v a l Emergency Triage • When presented with the situation, the animal that is most critical but with the best chance of living should be attended to first State Agricultural Response Team
Warning Signs -- Dogs • Body Language Signs • Growling • Hair standing up (back, shoulders) • Snarling • Tail may be wagging or tucked under the body • Ears straight back • Submission • Dog crouches and assumes submissive posture (lays down with belly exposed), may urinate or lick profusely • A fearfully submissive dog can become a biting dog if you force the situation State Agricultural Response Team
Warning Signs -- Cats • Body Language Signs (Aggressive/Fearful) • Ears flattened • Salivating or spitting • Back may be arched • Hair is standing on end • Hissing State Agricultural Response Team
Handling and Transportation State Agricultural Response Team
Handling Techniques • Gloves • Thick gloves may cause a loss of dexterity with small animals • Latex or vinyl gloves should be worn at all times when handling injured animals • Dogs: Leashes (leather, nylon or canvas -- no chain-link) • Make a large loop by passing the end you normally connect to the collar through the hole in the handle • Standing just behind the animal or to the side, drop the loop over the neck and tighten State Agricultural Response Team
Handling Techniques • Cats: Towels or Blankets • Be aware of cat’s position at all times • Drop towel while standing well over cat • Grasp scruff of neck and wrap towel around cat’s body • Cats or Small Dogs: Boxes • -- Cats will often crawl into them for comfort • --Then you can use the towel technique • --This may also work for small dogs State Agricultural Response Team
Handling Techniques -- Muzzles • May be dangerous to muzzle these situations: • Vomiting • Coughing • Having difficulty breathing • Muzzles may be necessary to treat injured animals • Use soft nylon or leather • There are pre-made muzzles for cats and dogs with short noses State Agricultural Response Team
Making a Home-Made Muzzle • If needed you can make a muzzle that can be used for dogs with the exception of those with short noses. • Start with 18” of material, such as gauze, stocking, neck-tie, soft rope or a piece of soft cloth • Make the beginnings of a knot into a loop that can be placed over the animal’s nose • Note: Keep enough space between you and animal’s mouth so that the animal can’t turn and bite you. State Agricultural Response Team
Making a Home-Made Muzzle • Tighten the loop down on top of the nose, but not so tight that the animal can’t breath • Pull the ends of the material down each side of the face, cross under the chin and bring the ends back behind the ears • Tie the lose ends back behind the ears • Note: For short-nosed dogs and cats, after steps 1-5, take one end of the loop and pass it under the nose loop and tie to the other end around the neck to secure onto the nose State Agricultural Response Team
Restraint Techniques -- Dog • Headlock -- Dog Standing • Stand or kneel with your chest at dog’s side • Place forearm under the dog’s neck and bring the arm up the other side of the neck (around the head) • Lock your forearm under your head • Place the other arm over or under the animal’s belly State Agricultural Response Team
Restraint Techniques -- Dog • Lying on their side • Stand with your body beside dog, facing dog • Reach over dog and then back under dog; take hold of legs closest to your body • Slowly pull the legs up and around the dog, forcing to lay on its side. As the animal drops toward the ground, take care not to let the head hit the floor • Hold front and hind legs straight out, thus preventing animal from standing • Use forearm closest to animal to push neck to the ground State Agricultural Response Team
Restraint Techniques -- Cat • Lying on their side • The same technique as for the dog with some variation • Instead of pushing the neck toward the ground with the forearm, grasp the loose skin behind the neck (the scruff) and hold firmly • Scruff in a sitting position • Grasp and hold firmly a large amount of the scruff • Using the other hand, hold the cat’s body in a sitting position Warning:Some cats are better managed with minimal restraint. They can actually become harder to handle if restrained. State Agricultural Response Team
Carrying and Transporting -- Dog • Small (less than 25 pounds) • Dog can be carried in box or carrier • Alternatively, the dog can be carried in a person’s arms • Cradle the dog with your arms • Place your hand around the dog’s front legs, with two or three fingers between the legs • Hold the legs as you walk • Keep the injured side against your body • Large (25 pounds or more) • Place one arm under or around the neck • Place the other behind the rear legs or under the belly if you suspect a hind-limb injury State Agricultural Response Team
Carrying and Transporting -- Cat • Box or carrier • Ideal way to transport a cat They frighten easily and may jump away from you • Arms • Use the small dog technique • Alternatively, grab the scruff and support the cat’s body with your other hand State Agricultural Response Team
Zoonoses • Zoonoses are diseases of animals transmissible to humans • Ringworm • Scabies • Rabies • Be mindful of these while aiding animals in emergency situations • In general, CPR is not likely to cause human illness State Agricultural Response Team
Vital Signs of Dogs and Cats State Agricultural Response Team
Normal Vital Signs • Heart Rates and Pulses • Heartbeat can be felt on the left side of the chest just behind the bend in the left elbow • If you place your hand over this area, you should be able to feel and count heartbeats State Agricultural Response Team
Normal Vital Signs • Heart Rates and Pulses: Femoral or inner thigh pulse • Place two fingers as high as possible on the inside of either back leg (use light touch) • Feel for pulse in middle of leg about half way between front and back of leg (there is a small recess where the blood vessels run) State Agricultural Response Team
Normal Vital Signs • Just below the wrist (carpus) • Locate the area just above middle pad on underside of either front paw • Lightly place middle and index fingers at this point and feel for pulse • Just below the ankle (hock) • Locate the area just above middle pad on underside of either rear paw • Lightly place middle and index fingers at this point and feel for pulse State Agricultural Response Team
Normal Heart Rate Dog Small, miniature, or toy breed (30 pounds or less) 100 - 160 bpm Medium to large breed (over 30 pounds) 60 - 100 bpm Puppy (until one year old) 120 - 160 bpm Cat 160 - 220 bpm * bpm – beats per minute State Agricultural Response Team
Breathing Rate • Dogs • 10-30 breaths/minute • Up to 200 pants per minute • Cats • 20-30 breaths/minute • Up to 300 pants per minute State Agricultural Response Team
Panting Worry if a cat is panting!! State Agricultural Response Team
Body Temperature • Use a pediatric rectal or digital thermometer • Lubricate the thermometer with a water-based lubricant or petroleum jelly State Agricultural Response Team
Body Temperature Normal body temperatures are: Dogs 100.0 - 102.8 °F Cats 100.5 - 102.5 °F Temperatures under 100°F and over 104°F should be considered an emergency State Agricultural Response Team
Looking at the color of the oral tissues is a good way to determine if the animal is getting oxygen If the dog is pigmented, you can use the membranes in the lower eyelid by gently pulling it down The normal color is pink! Blue, pale, yellow, brick red or brown mucous membranes is an emergency Mucous Membrane Color State Agricultural Response Team
This is the time that it takes for the gums to return to their normal pink color after you press them As you press, the membrane should turn white Then it should only take 1-2 seconds for pink color to return This is a good way to assess circulation If capillary refill time is more than 3 seconds, it is an emergency Capillary Refill Time State Agricultural Response Team
Hydration Pull up on the skin at the back of the animal’s neck It should go back into place immediately (1-2 seconds) If not the animal is likely dehydrated. State Agricultural Response Team
First Aid for Dogs and Cats State Agricultural Response Team
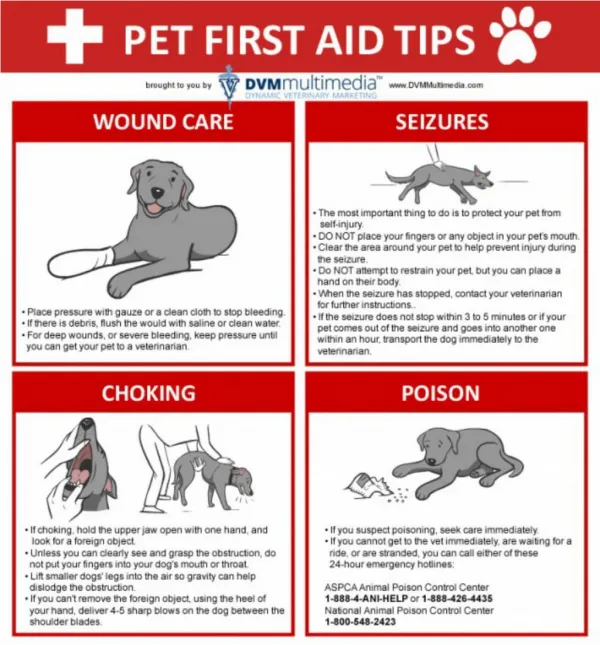
Recognizing an Emergency • Trauma (Falls, hit by vehicle, gun shot, other punctures/cuts) • Difficulty breathing • Seizures • Excessive bleeding (cannot be stopped by applying pressure) • Snake bites • Heat stroke or hypothermia • Poisoning • Shock • Burns • Drowning • Unconsciousness • Others State Agricultural Response Team
Survey the Emergency Victim ABCs of CPR Airway Is there an open airway? Breathing Is the animal breathing? Circulation Is there a heartbeat and a pulse? State Agricultural Response Team
Survey the Emergency Victim State Agricultural Response Team
Survey the Emergency Victim • Mucous Membrane Color ? • Capillary Refill Time ? • Any evidence of bleeding ? • Animal’s level of consciousness ? State Agricultural Response Team
Method to treat an animal that is not breathing and/or has no heartbeat It involves rescue breathing (mouth-to-nose resuscitation) and chest compressions The ABC’s or basic principles (airway, breathing and circulation) must be followed Warning: CPR does not always work even when performed by an experienced veterinarian. If your attempt fails, know that you did everything that you could to save an animal’s life. Cardiopulmonary Resuscitation State Agricultural Response Team
Establish an Airway • Check to see if the throat and mouth are clear of foreign objects • To clear the airway, gently tilt the head back and extend the neck • Pull the tongue between the front teeth • Use your finger to remove any material or liquid from the airway Do not put your finger into the mouth of a conscious animal; you will be bitten State Agricultural Response Team
Establish an Airway State Agricultural Response Team
Breathing • If the animal is breathing, let them continue on their own. If not, then do the following: • Medium and large dogs (over 30 pounds): seal animal’s mouth and lips by placing your hands around its lips • Gently hold the muzzle closed • Cats and small dogs (under 30 pounds): your mouth will seal the mouth and lips -- no need to seal with hands • Place your mouth over the animal’s nose and forcefully exhale • Give 4-5 breaths rapidly, then check if animal is breathing • Continue up to 20 minutes. After each breathing session, check if the animal can breath without assistance State Agricultural Response Team
Artificial Breathing Artificial breathing for medium or large dogs State Agricultural Response Team