Download

1 / 9
90 likes | 156 Vues
The STELR solar cell panel comprises four separate cells to experiment with connecting them in series or parallel. Follow detailed instructions to test, connect, and investigate circuits using different numbers of solar cells. Learn how to connect cells in series and avoid shading issues by connecting cells at the back of the panel.

E N D
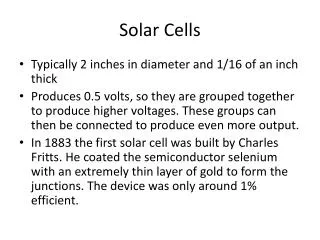
The STELR solar cell panel The STELR solar cell panel is made up of four separate solar cells. The solar cells are NOT connected to each other. Students can experiment with a single cells or multiple cells by connecting them in series and/or parallel.
The STELR solar cell panel Examine the panel closely. The diagram in the centre of the bottom of the panel shows how the four cells are laid out and how they are numbered. The red sockets are the positive terminals and the black sockets are the negative terminals of the cells.
The STELR solar cell panel Examine the panel closely. The diagram in the centre of the bottom of the panel shows how the four cells are laid out and how they are numbered. The red sockets are the positive terminals and the black sockets are the negative terminals of the cells. 1 3 2 4
To test a single solar cell: Insert the banana plugs into the sockets for Cell 1, as shown. • If you wish to investigate a circuit in which the energy source is one solar cell, now connect the two cables shown in the diagram into the circuit. • To connect two or more solar cells in series, go to the next set of instructions. In a circuit diagram, a single solar cell could be shown like this:
To connect two solar cells in series: Step 1 Start with the first cell with the two cables as shown above. Step 2 Connect the (-) terminal of Cell 1 to the (+) terminal of Cell 2, as shown. Step 3 Connect a cable to the (-) terminal of Cell 2, as shown. • If you wish to investigate a circuit in which the energy source is two solar cells in series, now connect the two ‘end cables’ shown in the diagram into the circuit. •To connect more than two solar cells in series, go to the next set of instructions. In a circuit diagram, two solar cells connected in series could be shown like this:
To connect three solar cells in series: Step 1 Start with the first two solar cells connected in series, shown above. Step 2 Connect the (-) terminal of Cell 2 to the (+) terminal of Cell 3, as shown. Step 3 Connect a cable to the (-) terminal of Cell 3, as shown. • If you wish to investigate a circuit in which the energy source is three solar cells in series, now connect the two ‘end cables’ shown in the diagram into the circuit. •To connect four solar cells in series, go to the next set of instructions. In a circuit diagram, three solar cells connected in series could be shown like this:
To connect four solar cells in series: Step 1 Start with the first three solar cells connected in series, shown above. Step 2 Connect the (-) terminal of Cell 3 to the (+) terminal of Cell 4, as shown. Step 3 Connect another cable to the (-) terminal of Cell 4, as shown. If you wish to investigate a circuit in which the energy source is four solar cells in series, now connect the two ‘end cables’ shown in the diagram into the circuit. In a circuit diagram, four solar cells connected in series could be shown like this:
Connecting solar cells at the back of the panel The wires at the front of the solar panel may cast a shadow over part of one or more solar cells. To avoid this, the cells can be connected at the back of the panel. You may wish to label the terminals on the back of the panel using a felt-tipped pen or sticky labels.