Download
1 / 19
190 likes | 328 Vues
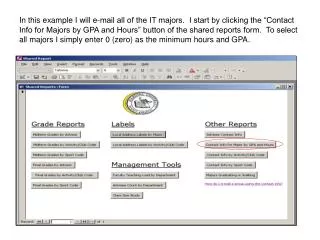
In this example I will e-mail all of the IT majors. I start by clicking the “Contact Info for Majors by GPA and Hours” button of the shared reports form. To select all majors I simply enter 0 (zero) as the minimum hours and GPA.

E N D
In this example I will e-mail all of the IT majors. I start by clicking the “Contact Info for Majors by GPA and Hours” button of the shared reports form. To select all majors I simply enter 0 (zero) as the minimum hours and GPA.
Here is the resulting report. This step may take several minutes. You will know that the report is finished when a number of records is displayed at the bottom of the report.
At this point I usually find it easiest to export the report to an Excel spreadsheet to sort or to use in a Word merge. In the Tools menu, choose Office Links and then Analyze It With Microsoft Excel.
Here is the report in Excel. This is usually a fairly quick step. The file will have been given the same name as the report and saved in the default directory, usually My Documents. Note the file name displayed in the title bar. At this point you can close both Excel and Access.
In Word choose Letters and Mailings from the Tools menu and the choose Mail Merge Wizard.
Change the document type to E-mail messages and then click the Next button at the bottom.
Select “Use the current document” and the click the “Next” button at the bottom.
In the Confirm Data Source box, double-click the entry labeled Excel Worksheet via DDE.
A dialogue box asking which range will appear. There should only by one range (Entire Spreadsheet) so click the OK button.
You may uncheck records if you need to exclude them from the merge. When you have finished excluding records, click the OK button.
Now that you have your data, click the Next button at the bottom of the task pane in order to write your e-mail message.
When you are writing your e-mail message you can click the “More items” button on the task pane to display a list of field to insert in your message.
In this example I am inserting the First Name field into my salutation. Unfortunately, you have to close the field list in order to finish typing your message, so if you want to insert another field in the body of your message you will need to use the “More items” button to redisplay the field list.
Once you have finished typing your letter, click the Next button at the bottom of the task pane.
Your first letter, complete with real data in place of the field markers should be displayed. If it looks correct, click the Next button at the bottom of the task pane.
Finally, enter the subject line for your e-mail message and click the OK button to start sending the messages. If you don’t have Outlook running you will need to open it before the messages will be sent.