Download

1 / 0
Biohazardous Waste Disposal
40 likes | 456 Vues
Biohazardous Waste Disposal. Presented by: Occupational Health and Safety, and The Faculty of Science and Engineering Training Material Available on the OHS website: http://www.yorku.ca/dohs/prog-biosafety.html. Objectives.
Télécharger la présentation 
Biohazardous Waste Disposal
An Image/Link below is provided (as is) to download presentation
Download Policy: Content on the Website is provided to you AS IS for your information and personal use and may not be sold / licensed / shared on other websites without getting consent from its author.
Content is provided to you AS IS for your information and personal use only.
Download presentation by click this link.
While downloading, if for some reason you are not able to download a presentation, the publisher may have deleted the file from their server.
During download, if you can't get a presentation, the file might be deleted by the publisher.
E N D
Presentation Transcript
-
Biohazardous Waste Disposal
Presented by: Occupational Health and Safety, and The Faculty of Science and Engineering Training Material Available on the OHS website: http://www.yorku.ca/dohs/prog-biosafety.html - Objectives To ensure consistency of proper biohazardous waste disposal for each lab Topics: Definitions & Background Regulated Biomedical Waste Disposal Biohazardous Waste Treatment and Disposal: Microbiological Waste
-
Biohazardous Waste Disposal
Definitions & Background - Waste Control Laws Ministry of Environment, Ontario Government: Environmental Protection Act O. Regulation 347, Waste Management Guideline C-4: Biomedical Waste Management Guideline C-17: Non-Incineration Technologies City of Toronto: Sewer By-law Littering and Dumping of Refuse Fines and Jail Time If Not Compliant
- What is Biohazardous Waste? Waste that may contain or have been contaminated with infectious agents The government refers to Biohazardous Waste as “Biomedical Waste” and specifically defines what it is Ministry of Environment enforces regulation (O. Reg 347, C4 Guidelines)
- What is Biomedical Waste? From the C4 Guidelines: Microbiological Waste Human anatomical waste Human blood waste Animal anatomical waste Animal blood waste Sharps Waste Cytotoxic Waste Waste in contact with human blood waste that is infected or suspected of being infected with any infectious substance (human), or Waste containing or derived from one or more wastes described above only stream we can ‘treat’ at York “Regulated waste” that must be shipped out via Stericycle
-
Biohazardous Waste Disposal
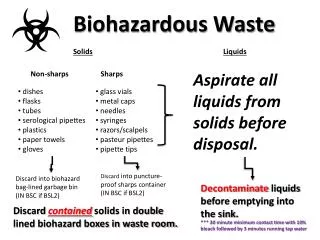
Regulated Biohazardous Waste: Biomedical - Will My Biohazardous Waste Be Shipped Out By Stericycle? No Yes Solid waste: e.g.used lab disposables such as petri plates, contaminated glassware, gloves, paper towels, pipette tips, microcentrifuge tubes, etc. Liquid Waste: e.g. inoculated broth/culture, cell culture waste, etc. Regulated Biomedical Waste: e.g. Needle tips/ razors, blood vials, animal carcasses, human or animal anatomical waste and blood, human or animal blood contaminated disposables, animals in formalin, etc. Can Treat Using Lab Protocols Disinfection Autoclaving Prepare Waste For Shipping Biomedical Waste properly recorded, packaged, & stored
- Disposal: Regulated Biomedical Waste ONLY use Stericyclewaste boxes All supplies available at Farquharson Science Stores Double line the box with a yellow biohazard bag Tape box bottom with strapping tape Label box with Lab PI, Date, and Contact # with permanent marker Place appropriate sticker on box Once the box is full: Use twist-ties to seal the yellow biohazard bag Use strapping tape to seal box at least 2” down sides Place box in the science store fridge or Vivaria Freezer Do not overfill box (14kg max)
- Disposal: Regulated Biomedical Waste Place Anatomical Waste sticker on box if needed: A
- Disposal: Regulated Biomedical Waste Sharps razor blades, needles, scalpels…and any sharp objects contaminated with biohazardous waste Discard syringes immediately into a sharps container No need to detach needle from plastic tube Do not bend, shear, recap the needle
- Disposal: Regulated Biomedical Waste Sharps Label the container with the lab PI, a lab phone number, and date. Use a permanent marker. When a sharps container filled to the line transfer it to Farquharson Science Stores. Do not over fill past the line. Place inside lined Stericycle waste box (labelling rules apply)
-
Biohazardous Waste Disposal
Biohazardous Waste Treatment & Disposal: Microbiological Waste - What is Microbiological Waste? From the C4 Guidelines: Human or animal cultures Stocks or specimens of microorganisms Human diagnostic specimens (excluding urine, feces) Disposable laboratory material that has come into contact with one or more of the items listed above Only waste stream that York U can treat by: Chemical Disinfection Physical Disinfection (Autoclaving)
- Storage: Microbiological Waste ALWAYS LABEL WASTE CONTAINERS Custodians may pick up waste if not labeled Emergency Response Personnel need to know Clear waste bags should NOT be outside of a labeled container if unautoclaved
- Disinfection: Definitions 101 Sterilization:Destroy/eliminate all microbes with the intent to protect against recontamination Disinfect: Destroy/eliminate all non-spore forming microbes Decontamination: Disinfection/sterlization of contaminated articles Antiseptic: Prevent/stop the growth & action of microbes Sanitize: Reduce the number of microbes to a safe level -Cide:destorys/eliminates (bactericide, fungicide, etc) -Static: prohibit growth but may not kill (Bacteriostatic, etc) Applied Biosafety, 3rd Edition, PAGES?
- Disinfection: Why Disinfect & Sterlize? Minimize risk of contamination Prepares media and reagents for experiments Prevents unwanted microbial growth (e.g. cell cultures, agar plates) Minimize risk of exposure in the lab Routine surface decontamination Treatment of biohazardous waste Immediate spill cleanup Part II: Disinfection
- Disinfection: Disinfectant Resistance -Prions -Bacterial spores -Coccidia (Cryptosporidium mycobacterium) -Nonlipid viruses (hepatitis A, polio) -Fungi -Rickettsiae, Chlamydiae -Vegetative bacteria -Lipid-containing viruses (e.g. HIV) Increasing Resistance
- Disinfection: Disinfectant Considerations Surface topography:rough surfaces harder to clean Temperature: high temps may inactivate disinfectant Organic load: higher load requires higher disinfectant concentration Concentration: low concentrations may not disinfect , too high concentration may be hazardous Contact time: short contact times may not disinfect
- Disinfection: Types of Disinfection Chemical Disinfection 6 classes Physical Disinfection Thermal (autoclave, incineration) Filtration (water treatment) Irradiation (UV, gamma radiation)
- Disinfection: Chemical Disinfectants Classes Halogens (e.g. Chlorine, Iodine) Alcohol Phenolics Quaternary ammonium compounds (e.g. lysol) Aldehydes (e.g. glutaraldehyde, formaldehyde) Hydrogen peroxide
- Disinfection: Common Lab Disinfectants 5-10% household bleach solution 5% for 1 hour / 10% for 30 mins advantages: very effective, affordable disadvantage: easily inactivated by organics, corrosive Must change solution often and make fresh batches 70% ethanol (EtOH) solution advantages: very effective, affordable disadvantage: flammable, does not kill spores
- Disinfection: Common Usage
- Disinfection: Physical Disinfection Thermal Steam Sterilization (e.g. autoclave) advantages: nontoxic disadvantages: burn hazard, expensive Incineration disadvantage: not available on-site UV radiation advantages: no chemical hazard disadvantages: skin/eye exposure hazard, limited use (effectiveness is questionable)
-
Autoclave Use
The Hands-on Training Guide - Pressurized device that uses heat, steam and pressure to achieve sterilization or decontamination Disinfection: Autoclave
- Autoclave Overview Typically operated at 121°C, 15psi, for 15-45 minutes. Allows the heating of liquids above boiling point. Uses moist heat (steam) to increase efficiency of sterilization. Heat is used to coagulate proteins, which destroys microorganisms and any potential biohazard.
- Autoclave Hazards Tremendous pressure from steam in chamber provides explosive potential. High temperatures creates potential for burns and scalding. Potential exposure to hazardous vapours Inadequate decontamination allows for the potential of biological hazards to contaminate personnel and the environment.
- Autoclave Hazards
- What you CAN autoclave? From the C4 Guidelines: Human or animal cultures Stocks or specimens of microorganisms Human diagnostic specimens (excluding urine, feces) Disposable laboratory material that has come into contact with one or more of the items listed above Autoclaving is also used for: Items for sterilizations such as; glassware media, aqueous solutions
- What you CAN’T Autoclave DO NOT Autoclave: BIOMEDICAL WASTE (except Microbiological) Including human anatomical or blood waste, animal anatomical or blood waste, cytotoxic waste, or any waste in contact with these waste products (including sharps waste). RADIOACTIVE WASTE HAZARDOUS CHEMICAL WASTE This includes anything contaminated with a toxic, volatile, corrosive, or mutagenic chemical (e.g.) bleach, formalin, glutaraldehyde, ethidium bromide Check MSDS beforehand
- Lumbers Room 120A Farquharson 227A Life Sciences Building 3rd Floor Autoclaves at York
- Steps to Autoclaving Preparing your items for autoclaving Loading the autoclave Choosing the cycle settings Unloading the autoclave Aborting Autoclave
- Sign into log book Keeps track of autoclave use for maintenance records Use personal protective equipment! Eye protection Heat resistant gloves Lab coat Autoclaving: Preparing your items
- Use a primary container Container comes into direct contact with the contaminated or non-sterilized material or fluid Do not fill more than 2/3 of holding capacity Must NOT be a tightly sealed container (might explode) MUST allow steam penetration Autoclaving: Preparing your items
- Use a primary container - MUST allow steam penetration Bottles: Loosen screw caps or use self venting caps Cap open containers with aluminum foil or muslin Autoclaving: Preparing your items Loosen screw caps
- Use a primary container - MUST allow steam penetration For waste bags: Do not pack or compress contents, do not knot or seal the bag Label with Date, Lab PI, Lab Phone extension Use a chemincal integrator Do not knot or seal bag: can fold excess over but keep open Autoclaving: Preparing your items
- Autoclaving: Preparing your items Chemical Integrators The steam sterilization process is the function of three basic parameters: time, temperature and steam penetration Chemical Integrators are a good way of testing these parameters Black band must be within the ‘Accept’ area If the black band does not reach the ‘Accept’ area, re-autoclave the load: Increase the sterilization temperature, time, or steam penetration Non-autoclaved Accept (throw in bin) Reject (re-autoclave)
- Autoclaving: Preparing your items Place the Chemical Integrator (CI) centrally within the waste bag Use the extenders to place the CI: It avoids direct contact with waste Attach the CI to one end of the extender. The extender can be autoclaved Note: Not every bag of waste per load must receive a CI. Place CI in the bag which occupies the most challenged position in the load. CI
- Use a secondary container Used to contain any spills The sides of the secondary container must be sufficiently high to contain any spill that may occur Tray MUST be autoclave safe Autoclaving: Preparing your items
- Use temperature sensitive tape Will indicate that high temperature has been achieved Will not prove that decontamination or sterilization was successful Will assist in keeping track of autoclave and non autoclaved items Autoclaving: Preparing your items Before After
- Be cautious if autoclave was recently used Loading rack may be hot Use heat protective gloves Make sure loading rack is locked on cart Rack may slide out unexpectedly if not locked Autoclaving: Loading the autoclave
- Farquharson: Tighten door so that prongs are fully extended If noise and/or steam escapes, abort the cycle and tighten the door more Lumbers Keep the door button pushed until the ready prompt is on the screen Autoclaving: Loading the autoclave
- Autoclaves run 3 types of cycle programs The type of cycle depends on what is being autoclaved: Notes When in doubt, use Solid/Gravity for waste Do not autoclave liquids with a solid load Autoclaving: Which cycle to use
- Autoclaving: Choosing a Cycle For Liquids: 20 mins / litre of liquid, 5 mins per additional litre For Solids: Glassware (empty): 20 mins Instruments (utensils): ~30 mins Biohazardous Garbage: at least 60 mins Use biological test strips to optimize duration Can decrease time if biological testing proves effective
- Use PPE Wait for autoclave to state END CYCLE before opening door When opening, stand away from door opening Make sure no one is standing by door opening Farquharson: turn door knob slowly and open door slightly to allow steam to escape Lumbers: make sure your hands are not above the top vents Autoclaving: Unloading autoclave
- Make sure rack is locked on to cart Analyze chemical integrator (if failed, redo sterilization) and note results in log book Please put back heat resistant gloves for other users Keep autoclave doors shut when not in use How to Autoclave – Unloading autoclave
- Waste Disposal: Treated Waste Unmark any biohazard signs and words that may be seen on waste bags! City waste collectors have complained and refused to pick up our waste in past Note: It is best to use clear autoclave bags
- Waste Disposal: Treated Waste Autoclaved bags to be put into the red bins outside the autoclave room Unmark all biohazardous symbols Always label waste bags (Date, Lab PI and contact #) Do not over fill red bins
- How to Autoclave – Aborting Only qualified personnel should attempt to troubleshoot an autoclave Farquharson Large autoclave: push abort button Small autoclave: (note do not use for waste!) need to manually advance through the autoclave cycle Lumbers Push abort button
- How to know if autoclave is functioning correctly: Autoclave: Performance Indicators
- Autoclave Issues/Concerns? Contact: Your Supervisor Farquharson and Lumbers: Jane Grant, Biology, Lumbers 130, x22657 Debbie Freele, Biology, Lumbers 115, x22655 Prof. Roger Lew, Biology, Farq 230, x66114 Brad Sheeller, 647.999.9806 FSE LSB Lab in charge of autoclave at the time Brad Sheeller, 647.999.9806 FSE General Inquiries: York Biosafety Officer: Francis Arnaldo, DOHS, x44745
- + Treat according to radiation waste protocol, then as biohazard. + Chemically disinfect biological waste first. If biological material cannot survive or is not infectious, treat as chemical waste. + + Treat in order (radiation, biological, chemical). Contact DOHS for assistance Disposal: Mixed Waste Chemical Radiological Biological Try to keep waste streams separate as much as possible Limit experiments that create mixed waste streams, where possible. Contact DOHS if unsure how to handle any waste stream.
-
End
Thank you, Please remember to keep record of your training in the lab group’s safety binder Training Content maintained by Occupational Health and Safety http://www.yorku.ca/dohs/prog-biosafety.html Inquiries – Telephone : 416-736-2100 ext 44745Fax : 416-650-8057Email : farnaldo@yorku.ca


More Related