Java Applets
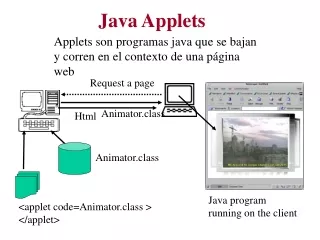
Java Applets. CS442- Advanced Programming using Java. x. ( x,y ). width. (x1,y1). drawRect. ( x,y ). drawOval. height. (x2,y2). fillOval. width. ( x,y ). ( x,y ). fillRect. height. y. import java.applet.Applet ; import java.awt.Graphics ;. import java.applet .*;

Java Applets
E N D
Presentation Transcript
Java Applets CS442- Advanced Programming using Java Prepared By: TA.Eman AlMoaili
x (x,y) width (x1,y1) drawRect (x,y) drawOval height (x2,y2) fillOval width (x,y) (x,y) fillRect height y Prepared By: TA.Eman AlMoaili
import java.applet.Applet; import java.awt.Graphics; import java.applet.*; import java.awt.*; public class exampleextendsApplet { public void init() { ---------------- } public void paint(Graphics g) { -------------------- } } OR Prepared By: TA.Eman AlMoaili
importjava.applet.Applet; • importjava.awt.Color; • importjava.awt.Graphics; • publicclassDemoTestextends Applet{ • publicvoid init() • { • this.setSize(200,240); • this.setBackground(Color.LIGHT_GRAY); • } • publicvoid paint(Graphics g) • { • g.setColor(Color.red); • g.drawString("HELLO", 30, 30); • g.setColor(Color.blue); • g.drawLine(100, 30, 150, 30); • g.setColor(Color.orange); • g.drawRect(30, 50, 50, 30); //position(30,50) width = 50 height = 30 • g.setColor(Color.green); • g.drawOval(30, 100, 50, 50); // position(30,100) width = 50 height = 50 • g.setColor(Color.yellow); • g.fillRect(30, 160, 50, 50); • g.setColor(Color.magenta); • g.fillOval(100, 160, 80, 50); • } • } import java.applet.*; import java.awt.*; OR Prepared By: TA.Eman AlMoaili Prepared By: TA.Eman AlMoaili
Applet with awt (Abstract Windowing Toolkit) importjava.awt.Panel; importjava.awt.Button; importjava.awt.Label; importjava.awt.TextField; Label TextField Button Panel They are Classes ! Prepared By: TA.Eman AlMoaili
nameLabel myPanel enteredName newGridLayout(3,2) 3 rows & 2 columns emptyLabel helloResult helloBtn Prepared By: TA.Eman AlMoaili
Steps to create simple applet with awt • Create Panel • Set Layout for the Panel • Add components (Label, TextField, Button) to the Panel • Add the Panel to the applet Prepared By: TA.Eman AlMoaili
importjava.applet.Applet; importjava.awt.Graphics; importjava.awt.Color; importjava.awt.Panel; importjava.awt.Button; importjava.awt.Label; importjava.awt.TextField; importjava.awt.GridLayout; importjava.awt.event.ActionListener; importjava.awt.event.ActionEvent; OR 1 2 • importjava.applet.*; • import java.awt.*; • importjava.awt.event.*; 3 4
How to make the Button responds to the click event? Prepared By: TA.Eman AlMoaili
Status Bar Prepared By: TA.Eman AlMoaili
NOTE: When you read fromTextField, you read a String . When you write to TextField, you write a String. SO: When read a number from TextField, convert it from String to number. When write a number to TextField, convert it from number to String. From String to Double From String to Integer From Double to String int x = 10; Stirng s = Integer.toString(x); //from Integer to String Prepared By: TA.Eman AlMoaili
From String to Number: String s = “200”; inti = Integer.parseInt(s); Double d = Double.parseDouble(s); To int To Double Between() From From Number to String: inti = 3 ; Double d = 2.5 ; String s = Integer.toString(i); String s = Double.toString(d) ; To String Prepared By: TA.Eman AlMoaili
How to run applet using applet viewer? • Open the project & the file Select the file Prepared By: TA.Eman AlMoaili
OR Prepared By: TA.Eman AlMoaili
How to Working with APPLET Tag Prepared By: TA.Eman AlMoaili
<APPLET CODE=“applet class file.class” WIDTH=“pixels” HEIGHT=“pixels” [CODEBASE=“directory to look for”] [ALT=“alternate text”] [NAME=“name of current applet instance”] [ALIGN=“applet alignment”] [VSPACE=“pixels”] [HSPACE=“pixels”]> [<PARAM NAME=“par.name” VALUE=“par.value”> ………. ………. <PARAM NAME=“par.name” VALUE=“par.value”>] [HTML statements] </APPLET> Prepared By: TA.Eman AlMoaili
To deal with the APPLET tag in the previous slide, you have to add HTML file Prepared By: TA.Eman AlMoaili
You need to show the Project Explorer ( NOT Package Explorer): Prepared By: TA.Eman AlMoaili
Under the project folder, you can see the src folder only. BUT, How can you show bin folder? Prepared By: TA.Eman AlMoaili
Remove the tick Now, it is shown Prepared By: TA.Eman AlMoaili
HOW to add html file to your project ? You can add .html file to : 1- project folder. OR 2- bin folder. Prepared By: TA.Eman AlMoaili
add html file to project folder Prepared By: TA.Eman AlMoaili
add html file to project folder Prepared By: TA.Eman AlMoaili
add html file to project folder Prepared By: TA.Eman AlMoaili
add html file to project folder Prepared By: TA.Eman AlMoaili
add html file to bin folder • Right click the bin folder, then apply the same steps before Prepared By: TA.Eman AlMoaili
add html file to bin folder • Finally, you will get it here Prepared By: TA.Eman AlMoaili
If you put the HTML file inside the project folder: <APPLET CODE BASE=“bin” CODE=“packageName/ClassName.class” WIDTH=…… > If you put the HTML file inside the bin folder : <APPLET CODE=“packageName/ClassName.class” WIDTH= ....…. > Prepared By: TA.Eman AlMoaili
You should write the APPLET tag inside the <body> tag Prepared By: TA.Eman AlMoaili
NOTE: If you start editing the html file, and you get this window, click Yes. Prepared By: TA.Eman AlMoaili
How to run applet from html ? • Open the browser ( IE ) • Open the html file from the bin folder. NOTE: If you make any changes in the applet java file: • Save the applet java file(ctrl+s) • Clear the web browsing storage.Tools Internet Options Delete • Close IE • Open IE • Open the html NOTE: If you make changes to html: • Save the html file(ctrl+s) • refresh html OR open it again. Prepared By: TA.Eman AlMoaili
If you get this security warning, right click then Allow Blocked Content Prepared By: TA.Eman AlMoaili
If you use PARAM in the APPLET tag, you can run the applet from html file not from applet viewer in Eclipse. Prepared By: TA.Eman AlMoaili
EXAMPLE Prepared By: TA.Eman AlMoaili