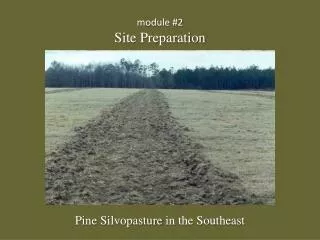
SITE PREPARATION
SITE PREPARATION. A plan should be produced showing all areas for excavation, tipping and filling before commencing earth moving.

SITE PREPARATION
E N D
Presentation Transcript
A plan should be produced showing all areas for excavation, tipping and filling before commencing earth moving. • The quantities of excavated material and required fill should be shown on this plan, so as to facilitate the most economic movement of soil. When large quantities of soil have to be moved, a 'mass haul' diagram should be prepared (Fig 2.1). • Such a diagram shows the distances and direction of haul and gradients calculated to balance the cut and fill.
Fig 2.1 Mass Haul Diagram (Source : Fig 2.1 Holmes, R.(1995), Introduction To Civil Engineering Construction, University of the West of England, Bristol)
If the excavated material is likely to be particularly variable some indication should be given of its method of disposal, i.e. whether to haul to spoil heap rather than fill areas. • Construction methods for smaller sites, eg basements, deep pits, trenches etc, will depend to a great extent on the following factors: • Type of soil or rock • Quantity of material to be moved • Presence of water • Depth of dig • Working space available • Whether excavated material can be left on site.
As a general rule, for large pits and basements, where space will allow, the excavation should be achieved by 'battering' the sides of the dig. This allows a clear working area, free from obstruction or shoring (Fig 1.2). Figure 2.2 Excavate with battered sides (Source : Fig 2.2 Holmes, R.(1995), Introduction To Civil Engineering Construction, University of the West of England, Bristol)
Setting out for earthmoving plant Figure 2.3: Setting out for cuttings (Source : Fig 2.3 Holmes, R.(1995), Introduction To Civil Engineering Construction, University of the West of England, Bristol) • In Fig above, the batter stake shows the depth of cut (C = 2.6 m) and its distance from the centre line 12 m. On the edge of the stake the slope (11 in 2) is marked as a fraction, and on the back face of the stakes the distance along the centre line from the first station. After reducing the levels a series of final level pegs are positioned at the shoulder and centre line. This procedure can be used for almost any form of mass excavation.
Retaining Walls Stake out/remove sod - Begin by staking out the wall. For curved sections, use a garden hose to lay out the wall line. Dig a trench along this line. The width of the trench should be twice the depth (front to back) of the block used. If block is 8 inches deep, make trench 16 inches wide. When using one, two or three courses of block, make the trench deep enough to bury half of the first course plus 2 inches of compacted base material. When using four or five courses of block, make the trench deep enough to bury the full first course plus 2 inches of base material. When using six or more courses of block, bury the full first course plus 4 inches of base material.
2. Add base material • Remove loose soil and firmly compact the soil in the bottom of the trench with the tamper. Then place base material in the bottom of the trench. Base material can be paver base or an equivalent to ¾-inch minus (with fines) aggregate. Use the appropriate amount of base material for the number of courses you are building.
3. Level and compact base • Add a 2-inch layer of base material, rake out and firmly compact with tamper. Level the surface from front to back and side to side. Check with a carpenter’s level, checking level every few feet. The more level the base material, the easier it is to level the block. Add another 2 inches of base if needed for the height of the wall (see Step 1).
4. Lay and level block • Use a hammer and chisel to remove the rear lips from all blocks used for the base course. Use string to align the back edges of the first course. Position the wall units side by side on the prepared base so that front edges touch. Level block in both directions. Check individual units as installed and check units with each other as you install wall. Begin next course by laying a block with the rear lip down and pulling it forward until the lip is securely in contact with the units below. Assemble additional courses by placing units in a staggered relationship to the course beneath (running bond).
5. Backfill wall • Fill behind each course with drainage aggregate (such as ¾-inch free draining) that extends 6 inches behind the wall. Compact aggregate with tamper. Organic soil or clay-type soil is not recommended for backfill material.
6. Cut block • To make all blocks fit, you may need to cut wall blocks. Use a circular saw with a masonry blade to cut blocks and caps from the top. Read and understand the operating manual before using a saw.90° Corner: • For some products, you will need to use a circular saw with a masonry blade. Cut a 45-degree angle on two blocks. Cut from the front corner to the back of the block. Glue pieces together with construction adhesive so two block faces form the finished outside corner.
7. Mark and cut caps • For capping curves, trim caps to follow the wall radius. Place a cap at the beginning of the curve. Skip a space and place the next cap in the third position. Rest a cap on the top of the original two, aligning its face with the face of the wall. Mark the bottom of the cap along the edges. Use a circular saw with a masonry blade to cut the marked cap. Place the cap. On a 90-degree corner wall, the caps need to be saw-cut to achieve a 45-degree mitered corner. At the end of the wall, cut the cap so the manufactured edge is exposed and the cut edge is against the next cap.
8. Glue caps • Use an exterior concrete construction adhesive to secure the caps.
There are two main types of retaining; wall the gravity retaining wall and the cantilever retaining wall. The former is mainly used for the support of solids such as soil, fuel, chemical and waste materials. The latter may be used for both solids and liquids. Reservoir walls are often constructed in a cantilever form. In some cases the wall may be designed to support dead loads in addition to the normal lateral loads, but essentially these walls are designed to resist lateral movement. • Both types of retaining wall must be designed to resist the following factors:
Figure 2.4 Possible Failures in Retaining Wall (Source : Fig 2.4 Holmes, R.(1995), Introduction To Civil Engineering Construction, University of the West of England, Bristol)
These possible factors of failure are shown diagrammatically in Fig 7.4. Gravity retaining walls depend on their dead weight for strength and stability. They are limited in height to approximately 3 metres if inclined, or 2 metres if the wall is vertical. Over these heights the thickness of wall, to comply with the safe height/thickness ratio, would make the construction uneconomical. They are designed so that the width of wall is sufficient to distribute the resultant loads of the wall and the earth pressure to the soil below the base of the wall without under settlement. • High tensile stresses at the back of the wall can be offset by designing the width of the wall so that the resultant force is kept within the middle third of the base. A suitable width of base can be taken as between one quarter and one-half of the wall height. The width at the top of the wall can be taken as one-seventh of the wall height.
Cantilever Retaining Wall • Cantilever walls are used for retaining walls up to 7 metres in height without counterforts, and if counterforted can be designed for greater heights without being excessively thick. The wall shape may vary to suit the loading and the material to be supported. • The walling material is normally reinforced concrete, although pre-stressed concrete may be used for liquid-retaining structures.
Figure 2.4: Cantilever Retaining Wall (Source : Fig 2.5 Holmes, R.(1995), Introduction To Civil Engineering Construction, University of the West of England, Bristol)
Other forms and types of retaining wall can be used, such as: • Diaphragm walls • Steel sheet piling • Concrete crib walls • Contiguous piling • Anchored walls
Figure 2.5 Concrete Crib Wall Figure 2.6 Anchored walls
Turfing • The idea of turfing is to stabilize the slope. Turfing can help to prevent a landslide on rainy days. There are two types of turfing the first is sport turfing. Grass will be planted at every 150mm-300mm each. The second type is close turfing. Grass will be planted closely.
Figure 2.7: Turfing (Source : Fig 2.6 and fig.2.7 Hafidzah, A.(1995), Binaan Bangunan,Nota Panduan Politeknik Malaysia
Setting Out • Purpose : to build up the proposed building at the exact place/spot and also as a guide for excavation and building construction. • It will be fixed at least 1m from the building line to avoid any damage due the trench excavation works. • Wall thickness and base trench will be marked clearly on the setting out by using nail or saw cutting edge or painted.
Procedure of Setting Out 1. Usually one of the building corners will be set up as a bench mark by the planner. 2. Then set up any of the building corner and mark the spot with ‘A’. 3. . Measure the length of A to B and mark the spot with ‘B’. 4. The corner at ‘B’ can be exact by using the ‘elbow’ or 3:4:5 ratio. 5. Then continue the process to set up the ‘C’ and ‘D’ points. 6. After completing all the ABCD point, check the diagonal to establish whather the building is square.
Bonning rod is made up of 2 wooden sticks in T shape, measuring 100mm X 30mm. The length of the rod is standard, based on the depth of excavation. • Usage of Bonning Rod:- a. to control/monitor the quantities of excavated soil. b. to monitor the excavate slope. c. to monitor /checked the level of any excavation surfaces.
Bonning rod must be used in conjunction with straight reel in order to determine the slope of any excavation works. Straight rail is a wooden stick joinned to 2 wooden stump horizontally. The size is 150mm X 50mm.Stump height are based on the depth of excavation work.
Process • Straight reel will be fixed at every +30.00mm along the excavation lane. The top of the rods must be levelled using water level. • The bonning rod will be set up at the length of excavation based and the top of the right reel. • Threads line will be fixed on the top of the sight rails. This is to determine that the thread line is paralled to the excavation lane. • Any section of the excavation area can be examined using the bonning rod, by making sure that the bonning rod levelled the top of the rail on sight.
Rubber Hose • A transparent rubber hose filled with water is a useful tool to use as this will give a the some level for different places at the construction site. A transparent rubber hose anables water level to be seen clearly.
Process • Fill the rubber hose with water and mark ‘A’ at one end. (reference level) then put the second end to the place to be levelled as and mark ‘B’. Move the hose up and down till the water level at that end is stable. Make sure the, water level at ‘A’ is fixed. Now point B is levelled with point ‘A’.
Water Level • Usage of this tools is to test and determine the vertical and horizontal surfaces. Tools are made of wood and steel. • For the flat horizontal on vertical surface, the bubble in this water level will be centered/ in the middle.