Micropipette Technique
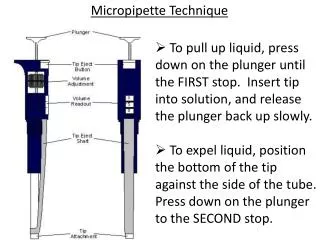
Micropipette Technique. To pull up liquid, press down on the plunger until the FIRST stop. Insert tip into solution, and release the plunger back up slowly. To expel liquid, position the bottom of the tip against the side of the tube. Press down on the plunger to the SECOND stop. . P20:

Micropipette Technique
E N D
Presentation Transcript
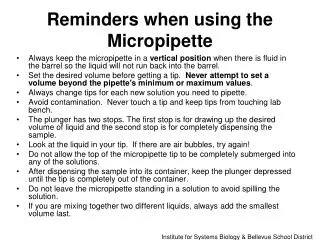
Micropipette Technique • To pull up liquid, press down on the plunger until the FIRST stop. Insert tip into solution, and release the plunger back up slowly. • To expel liquid, position the bottom of the tip against the side of the tube. Press down on the plunger to the SECOND stop.
P20: measures2-20 μL P200: measures 20-200 μL P1000: measures 200-1000 μL 1 0 1 7 7 7 3 3 3 Red = decimal 1000 μL = 1 mL ______ μL = _____ mL _____ μL _____ μL
PIPETTING TIPS • Never set the micropipette outside of its specified volume range. • Always put a tip on the micropipette before inserting it into a solution. • Always hold the micropipette upright and vertical if there is liquid in the tip. • Always close your box of tips when not in use.
DNA Technology Lab Day 1: Restriction digest of pGFP Day 2: Gel electrophoresis to confirm digest Day 2: Transformation of pGFP into E. coli Day 3: Isolation of transformed colony to grow on a plate Day 4: Preparation of bacterial lysate Day 5: Purification of GFP from lysate Day 6: SDS-Polyacrylamide gel electrophoresis to analyze purified GFP
Day 1: Restriction Digest of pGFP 5’GGATCC 3’ 3’CCTAGG 5’ 5’GAATTC 3’ 3’CTTAAG 5’ Bam HI recognizes the sequence: Hind III recognizes the sequence: If we use a mixture of Bam HI and Hind III to cut pGFP, how many fragments will be produced and how many base pairs will each fragment be? pGFP gfp g
Day 1: Restriction Digest of pGFP • Prepare samples: • P+= pGFP + Bam HI + Hind III = cut sample • P-= pGFP only = uncut sample (control) • Incubate at 37oC for 60 min; then freeze overnight
Day 2: Gel electrophoresis to confirm digest • Add loading dye to each sample • Set up the agarose gel (4 groups will share 1 gel) • Make sure to draw a picture of which wells your group will use • Load the DNA marker into the first well • Load each sample into the other wells • Loading Order: Marker P+P- Marker P+P-
The loading dye contains glycerol to help the sample sink into the wells. It also contains 2 different color dyes. The DNA will run between the dyes. Once the gel is done, it must be stained to see the DNA. Gels are usually stained with ethidium bromide, which intercalates between base pairs in the DNA. EtBr is a mutagen, so we’ll be using GelRed. It sticks to DNA in the same way, but it can’t cross cell membranes, so it’s unable to get into living cells, making it much safer.
GFP (Green Fluorescent Protein) • Naturally produced in Jellyfish– Aequoreavictoria • Discovered in the 1960s • Source of bioluminescence when exposed to UV light
Detecting Gene Activity • GFP gene is inserted intoDNA near a gene of interest • It acts as a reporter gene—it’s linked to another gene so glowing protein appears if it is expressed
Detecting Gene Activity • GFP can be expressed in entire animals, producing a glowing organism
Day 3: Transformation of pGFP into E. coli heat + + CaCl2 CaCl2 –neutralizes bacterial cell wall and membrane Temperature change stresses the bacteria so that they will be more likely to take up the plasmid
LB = Luria broth—contains bacterial nutrients Amp = ampicillin pGFP contains the gfp gene along with ampR, a gene coding for β-lactamase, an enzyme that destroys ampicillin, making the bacteria resistant. Add the untransformed bacteria to the first 2 plates and the transformed bacteria to the LB/Amp + plate. LB- LB/Amp - LB/Amp +
Incubate the bacteria overnight at 37oC. If the transformation was successful, the bacterial colonies on the LB/Amp + plate will glow green when observed under a UV light.
Day 4: Isolation of transformed colony to grow on a plate Pick a green colony from your transformed plate, and streak it on a new plate to grow overnight at 37oC.
Day 5: Preparation of bacterial lysate Lysate—fluid containing contents of lysed cells Lysozyme—breaks bacterial cell walls Wash colonies off of plate into a microfuge tube and add lysozyme to lyse the cells, and freeze overnight.
Day 6: Purification of GFP from lysate Spin the lysate, and separate the supernatant from the pellet. The pellet contains the cell wall, organelles, and other cell debris. It will be discarded. The supernatant contains the proteins including GFP. Do NOT discard the supernatant!
pGFP has a 6-his tag preceding the gfp gene. That means that, when expressed, our GFP protein has 6 extra amino acids (histadine) before the rest of the protein sequence. GFP 6-his tag Nickel beads We will add the lysate supernatant to a solution of nickel beads that will bind the 6-his tag.
After washing all of the other proteins away, we will be left with purified GFP. This affinity chromatography allows us to be able to separate the his-tagged GFP from the rest of the proteins in the lysate. The GFP will be eluted (released) from the beads by adding an excess of imidazole which binds to the nickel beads better than the 6-his tag.
Day 7: SDS-Polyacrylamide gel electrophoresis to analyze purified GFP Heat is used to denature proteins so that they can be separated by size. SDS is a detergent that disrupts hydrophobic interactions in proteins and adds negative ions so that they will move toward the positive electrode in a gel. DTT (in the loading dye) is a reducing agent used to break disulfide bridges.
Gel electrophoresis will separate the proteins in each sample, and they can be compared to a protein ladder to see where GFP is. 2 groups will share a gel, and each group will have 5 samples: Blank (loading dye) Protein ladder Lysate sample Wash sample Purified GFP sample
The gel will be stained with Coomassie blue and then destained with acetic acid. The Commassie blue will stick to the protein, and we will be able to see bands of protein.