Download
1 / 30
300 likes | 430 Vues
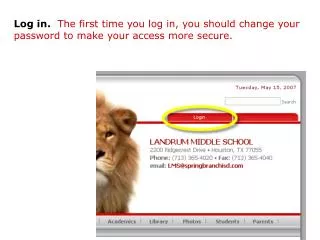
Log in. The first time you log in, you should change your password to make your access more secure. After you’ve logged in, you’ll see your name in the upper right corner of the website. Click on your name to change your password. Change your password at the bottom of this dialog box.

E N D
Log in. The first time you log in, you should change your password to make your access more secure.
After you’ve logged in, you’ll see your name in the upper right corner of the website. Click on your name to change your password.
Make certain you log in every morning. Just as you log into the network and open Outlook every morning, you should now get into the habit of logging into the school website portal. The Teachers menu is only visible to registered users who are logged on.
There are resources and information under the Teachers menu that is only available to teachers and staff of Landrum. If you don’t log on, you’ll miss it.
Weekly Bulletin: The content in the Teachers section might change once the new principal comes on board. But for now, the Weekly Bulletin is identical to the emailed version you receive in your mailbox each week. Its possible that next year, the online version will be only way it is delivered.
Staff News & Announcements: This section of the website will be for staff news, events and announcements. Reminders, important updates, personal events in the lives of the staff, etc. might be posted here. Its important to come here at least once per day.
Faculty & Staff Calendar: There are three calendars on the new site: the main public calendar, the athletics calendar and this one. All calendars feed into the Faculty & StaffCalendar. However, events posted on the Faculty & Staff Calendar do NOT appear on the public calendar. Now, administrators can post timely information for the staff that isn’t important or appropriate for public viewing.
Teacher Resources: There are three different types of resources found in this section: General Resources, Language Arts Resources, and Math Resources. This section is likely to grow. General Resources will hold information and links to document downloads that are important to ALL teachers.
Language Arts Resources: Donna Villegas will be maintaining this section of the website. It is primarily for ELA teachers, but all can benefit from its information. Again, you’ll have to login in order to see this content.
Math Resources: Like the Language Arts Resources, the Math Resources section is a way for the Math SIS to communicate with the math department by disseminating information, documents, links, and other resources.
Technology Section: The technology section of the Teacher pages will house much of the same information as the current site. This content will change as the new technology specialist comes on board.
Staff & Teacher Web Pages: Almost every member of the faculty will get their own website for their class. If you are a faculty or staff member who needs one but didn’t get one, just let me know. There are three ways to access your site. From the Academics main menu, click on the Staff Webpages submenu. From there, click on your name to be taken to your class website.
Faulty List [A-Z]: On these pages, you’ll notice an icon like this click on it to be taken to your site. In fact, to double-check for human error, you should click on your link now to make certain it in fact takes you to your site.
Academic Pages: Last but not least, when someone goes to your department’s webpage, a list of department members will appear at the bottom of that page. Clicking on the name will take you to that teacher’s class website. Again, you should test this out for your own name to make certain it was done correctly.
Most of you have the same layout on your page that consists of six modules. The main heading module, Homework, Documents, Class Announcements, Important Links,and Contact Me.
You can not change the heading titles, but you can change the content of each module. To do so, hover your mouse over the small blue arrow in the upper left corner of each module and click on the Edit Text menu.
It looks very similar to Microsoft Word: You are then taken to a text edit box that looks very similar to Microsoft Word. If you can work in Word, you can create the content for your website. Type in the area below, select a word or phrase and change its font, color, size, and style. I recommend staying in the “Rich Text Editor” mode unless you are adept at hand-coding HTML.
To add a picture: Click on Image Icon. A dialog box appears. Click on the Browse Server button.
Click on the staff folder A folder with your name appears.
If you have any files or photos already uploaded, they will appear in the window. If not, you can upload them now by clicking on the Browse… button. After you have selected the file you want to upload, click on the Upload New File link to upload it to your folder.
The file appears in your folder’s window. To insert the file in your module, click on the grey check box or the name of the file. It will insert the file in the Image Properties dialog box where you can resize or align the image to the text.
Width and Height changes the size of the image. Border puts a border around the image. HSpace and VSpace puts space around your image. Align determines how the text wraps around the image.
In this example, I have put a 1 pixel border around the image, given it an HSpace and VSpace of 5 pixels each and given it a Left alignment.
To create a link, first highlight the text you want hyperlinked and click on the Link icon. A Link dialog box appears. If you know the URL, you can type it in the box. However, if you want to link to a file on your server, click the Browse Server button.
To link to a file, select File (A File On Your Site). This will take a few moments, but select Staff and your name from the drop down menu. This takes you to your folder. If the file isn’t in your folder, choose Upload New File to upload it now.
Click the Browse… button and locate the file either on the server or your computer. Choose Upload Selected File once you have located it. The file will appear in the document window. Choose Use Selected link to place the file in your module.
From here, you can either tell the file (or hyperlink) to open in a new window by clicking on the Target tab, or you can just click OK. If you are creating a hyperlink to another site, and you want the link to open in a new window, click on the Target tab and choose New Window […blank] from the drop down menu.
The text you highlighted is now a hyperlink. However, don’t forget to click on the Update link at the bottom of the page to save your changes to this module.
Once you have hit the Update button in the module settings, your content is LIVE and viewable by anyone who visits your site.