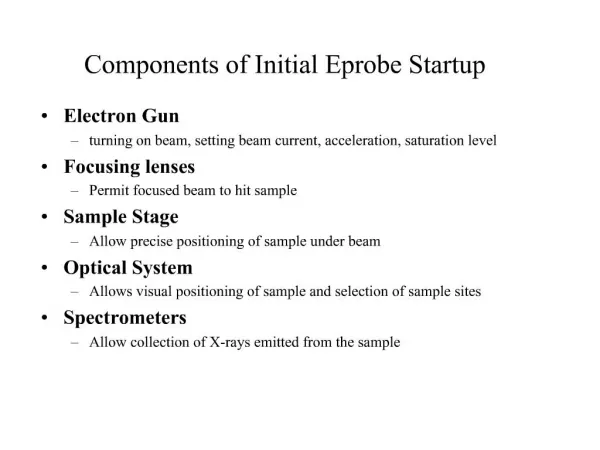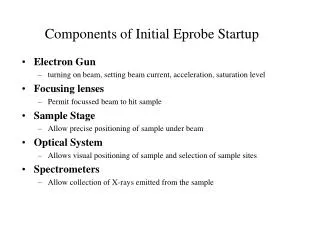
Components of Initial Eprobe Startup
280 likes | 437 Vues
Components of Initial Eprobe Startup. Electron Gun turning on beam, setting beam current, acceleration, saturation level Focusing lenses Permit focussed beam to hit sample Sample Stage Allow precise positioning of sample under beam Optical System

Components of Initial Eprobe Startup
E N D
Presentation Transcript
Components of Initial Eprobe Startup • Electron Gun • turning on beam, setting beam current, acceleration, saturation level • Focusing lenses • Permit focussed beam to hit sample • Sample Stage • Allow precise positioning of sample under beam • Optical System • Allows visual positioning of sample and selection of sample sites • Spectrometers • Allow collection of X-rays emitted from the sample
Electron Gun • Consists of a V-shaped filament made of tungsten or lanthanum borate (LaB6) • Current of 2-3 amps is passed through the filament, causing the filament to attain temperatures of between 2600-2700 K. Thermoionic emission of electrons occurs from the filament • “Triod” is formed between the filament, Wehnelt grid and anode. Wehnelt grid is held at a negative potential, only allowing electrons to be emitted from the very tip of the filament • The filament acts as the CATHODE, defined as the “electron emitting” electrode in the system • The ANODE, located below the filament, acts as the “electrode collecting” electrode in the system
Operating point probe current Filament current (amps) Saturation: After a certain point, increasing the current to the filament does not cause additional electrons to be emitted. This is referred to as “saturation”. The filament should be operated just above the saturation “knee” for maximum life
Distinguishing Electrical currents and voltages • Accelerating Voltage • The voltage used to accelerate the electrons towards the sample. For geological samples, typically 15 kV. The higher the accelerating voltage, the larger volume of sample will produce X-rays. Ranges from 0.2-50 kV on the SX-100. • Filament current • Current used to heat the filament and generate electrons • Beam Current • The total current emitted by the filaments. Shown as “I emission” on the SX-100. Units in microamps • Probe Current (often referred to as “beam current” • The current actually delivered to the sample after the beam has passed through apertures and lenses • For good analyses, this must be a very stable value. The SX-100 has a “beam stabilization” aperture with a feedback to the condenser lense in order to maintain a very stable probe current
Probe Current (often referred to as “beam current” • The current actually delivered to the sample after the beam has passed through apertures and lenses • For good analyses, this must be a very stable value. The SX-100 has a “beam stabilization” aperture with a feedback to the condenser lense in order to maintain a very stable probe current. • Beam sensitive samples should be analyzed with a lower probe current. Typical geological samples should be analyzed at 20 nanoamps. Glass can be analyzed at 10 nanoamps. Less counts will be obtained with lower probe current. • High resolution SEM work can be done with 0.1 nanoamps (100 picoamps) beam current 0.1 nA 1 nA 10 nA
Beam-controlling lenses The electron microprobe has a number of electromagnetic lenses that are used for: • Centering beam on column • Adjusting and regulating microprobe current • Focussing beam on sample surface Electromagnetic lenses are composed of coils of wire in a soft iron housing. These must be very symmetrical to avoid beam distortion. Current passed through coiled wire creates a magnetic field that deflects electrons and causes them to focus to a point. The stronger the current to the wires, the shorter the focal length.
The SX-100 has three main lense sets • Beam centering lense • Located high in the column. Centers the beam in the column and corrects for any non-alignment in the column • Condenser lenses • Centered in the column. Used for adjusting the probe current. The “beam regulation aperture” feeds back to the condenser lenses. • Objective lense • Used for focussing the beam on sample. Current is adjusted using the BEAM FOCUS knob.
Sample stage • The sample stage holds samples and standards, and is an important part of the system because it allows maneuvering of the sample and precise storage of locations. This allows unattended analysis of samples following programming of analysis points • Directions of movement • Sample stage provides motion in X, Y and Z directions. The Z movement allows optical focussing of the sample. This step is important for reliable quantitative analysis. Want beam crossover right at sample surface Crossover above sample surface Can move crossover down using FOCUS
Magnitude of movement • X 50mm • Y 85 mm • Z 1.5 mm • Reproducibility • +/- 1 micron for stored positions
Optical System: Optical focussing is done using the Z axis of the stage, NOT by changing beam focus
Spectrometers • Move from 0.22 to 0.83 sin theta • Spectrometers may be driven from limit to limit in 15 seconds • Optical encoders on spectrometer screw axes allow exact positioning • Positions for spectrometers can be selected easily
Order of reflection nλ = 2d sinθ n=1 n=2 n=3