Download
1 / 16
160 likes | 181 Vues
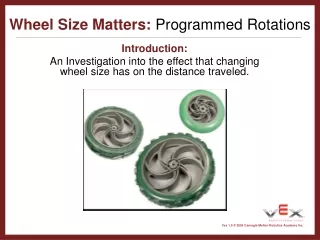
Wheel Size Matters: Programmed Rotations. Introduction: An Investigation into the effect that changing wheel size has on the distance traveled. The Investigation.

E N D
Wheel Size Matters: Programmed Rotations Introduction: An Investigation into the effect that changing wheel size has on the distance traveled.
The Investigation • Hypothesis: If the number of rotations of the motor axes is held constant, then a larger diameter wheel will move the vehicle a proportionately greater distance. • Variables: • Independent: Wheel size (3 diameters) • Dependent: Distance traveled.
Practical Applications • Prepares the student to understand gears and ratios • Helps in design of robots, especially where speed is an important factor.
Prepare Test Bed • Prepare the test bed (including a starting line taped to the board).
Modify the Squarebot • Modify the Squarebot as shown in the Helper Section at the end of Teacher’s Notes document.
Prepare the Program • 1. Open ROBOTC. Go to File/Open Sample Program. • 2. Open Encoder. • 3. Open vex_line_track_rotations.c • Download the program to the Squarebot
Step 1 Position the Squarebot • Place the rear frame of the modified Squarebot against the test bed boundary, with the small front wheels on the starting line.
Step 2 Run the Robot • Run the vehicle by turning the controller off, then on.
Step 3 Mark Stopping Point • When the MOTOR STOPS RUNNING mark the location of the front end of Squarebot as closely as possible. • This may be accomplished by dropping a ruler at the estimated spot (Fig. 1), then marking the board as shown in Figure 2.
Step 4 Measure Distances • Measure the distance from the starting line to the spot where the front of the Squarebot stopped.
Step 5 Record Data • Record this distance on a data table of Wheel Size vs. Distance Traveled
Step 6 Gather More Data • Repeat the procedure at least two more times to insure that your measurements are accurate
Step 7 Average Values • Find the average of the trials for the condition and record it on the table. Example:
Step 8 Medium Wheels • Switch to medium sized wheels and repeat the steps #1-7 with the new wheels.
Step 9 Largest Wheels • Switch to the large wheels and repeat in the same manner as the other sized wheels.
Step 10 Plot Diameter vs. Distance • The plot is a powerful visual demonstration leading to a clear conclusion • As wheel size increases, distance traveled increases proportionally.