Tutorial: Simplifying a 2D Design for Inventor with Step-by-Step Extrusion Techniques
This tutorial guides you through the process of transforming a 2D right side view drawing into a 3D object using Autodesk Inventor. Starting from importing your 2D sketch, the tutorial covers key steps such as extruding parts symmetrically, creating and sharing sketches, utilizing the Hole tool, and applying fillets for rounded edges. Each step is detailed with precise dimensions, ensuring an accurate representation of your design. Follow along to complete your 3D model efficiently!

Tutorial: Simplifying a 2D Design for Inventor with Step-by-Step Extrusion Techniques
E N D
Presentation Transcript
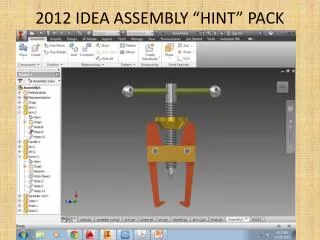
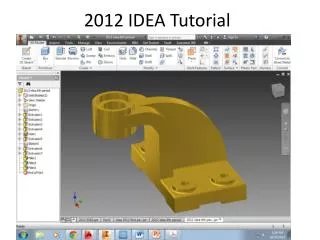
2012 IDEA Tutorial Simplify your 2D right side view to this object to be cut & pasted into Inventor. FYI I posted a 2D right side with dimensions to the “Answer Key” folder on my webpage.
Open a new Inventor Part • Create a sketch and paste in your 2d CAD drawing • Extrude the lower base 4.5” – be sure to use the “symmetrical” option in the extrusion tool palette
4. Click the “+” sign by Extrusion 1 in the browser bar to display the icon for “Sketch 1” 5. Right click on “Sketch 1” and select share sketch
6. Extrude the next part of the support web 1 - 9/16” Once more, use symmetrical
7. Right click on Sketch 1 and turn off the visibility • Create a 2D sketch on the top of the object • Use circle and sketch from the center point to the end point
10. Finish sketch 11. Extrude the circle using asymmetrical option First value is .25 Second is .875
12. Create a 2D sketch on top of the new cylinder and draw a “point” at the center 13. Finish sketch
14. Select the “Hole” tool and change the following in the pop up menu: Change to Counterbore SelectThrough All Change values to: 1 9/32 .25 15/16
15. Create a sketch on the top of the base 16. Draw a 5/16” circle / ballpark where to place the center 17. Draw a 15/16” circle that is concentric to the first circle 18. Use dimension to constraint the circle centers .625” in from each edge
*Still in the same sketch- 19. Use “copy” (in the Modify tool bar palette) to “select” the two circles, and then choose the center of the circles as the “base point” and drag duplicates down Use dimension to constraint the new circle to be .625” from the front edge *Note: you can always just draw the additional circles / do not have to use copy
*Still in the same sketch- 20. Use copy to duplicate from one side of the base to the other Use dimension to constraint the centers to the left edge
22. Share Extrusion 5 sketch 23. Extrude the inside circles as a “cut” and through all 24. Turn the visibility of the sketch off
25. Fillet Party Use the Fillet tool and swap to .0625” radius and then select all the edges that get rounded (look at problem packet) Click Apply
26. Sketch on front of object: Draw three lines and dimension them 15/16” in from each corner and .125” tall Use fillet in sketch mode (set to .0625”) to round the upper corners 27. Extrude that sketch as a cut through all