Chapter 6 Memory
The Complete A+ Guide to PC Repair 5/e Update. Chapter 6 Memory. Chapter Objectives. After completing this chapter you will be able to: Differentiate between different memory technologies Plan for a memory installation or upgrade Install and remove memory chips


Chapter 6 Memory
E N D
Presentation Transcript
The Complete A+ Guideto PC Repair 5/e Update Chapter 6Memory
Chapter Objectives After completing this chapter you will be able to: • Differentiate between different memory technologies • Plan for a memory installation or upgrade • Install and remove memory chips • Describe how memory works with the operating system • Optimize memory for Windows-based platforms • Troubleshoot memory problems • Understand the benefits of teamwork
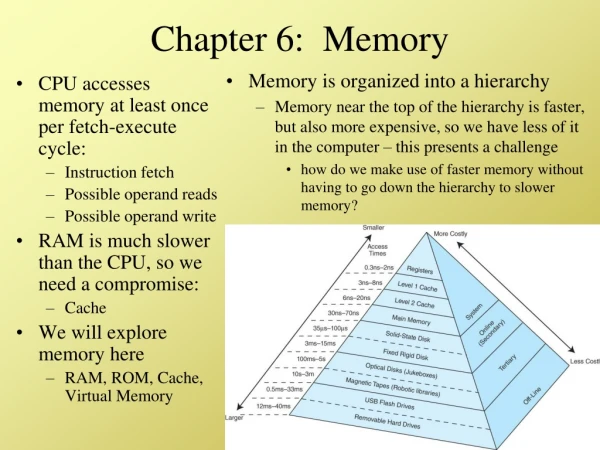
Memory Overview Types of Memory: • RAM (Random Access Memory) is volatile memory found on the motherboard and stores the operating system, the software applications, and the data being used by software. • ROM (Read Only Memory) is a non-volatile type of memory that keeps data in chips even when the computer is shut off. Types of RAM: • DRAM (Dynamic RAM) is cheaper than SRAM, but slower. It requires periodic refreshing of the electrical charges holding the 1s and 0s. • SRAM (Static RAM) is faster, but more expensive than DRAM. It is also known as cache memory or L2 cache.
Tech Tips • The CPU should never have to wait to receive an instruction • Using pipelined burst cache speeds up processing for software applications.
Memory Terms • Refreshing – Rewriting the information inside memory chips. • Nanosecond – A billionth of a second. • Pipeline – Separate internal data buses that operate simultaneously inside the processor. • Cache Memory – Designed to increase processor efficiency. • Can be found on the motherboard, but normally is found inside the CPU or CPU housing. • Cache memory holds the most frequently used data so the CPU does not return to the slower motherboard DRAM chips to obtain the data.
Memory Physical Packaging • DIP (Dual In-line Package) – A chip that has a row of legs running down each side. • SIMM (Single In-line Memory Module)– Available in 30-pin and 72-pin configurations. • DIMM (Dual In-line Memory Module)– 168-pin, 184-pin and 240-pin configurations.
Planning the Memory Installation Key points for planning a memory installation - Refer to the system or motherboard documentation to see what type of memory is supported - Determine what features are supported - Determine how much memory is needed - Determine how many of each memory module is needed - Research prices and purchase memory module(s)
Tech Tips • Use the type of memory chips recommended by the motherboard manufacturer. • It is best to use the manufacturer-specified type of memory chips. • The chipset and motherboard design are very specific as to what type, and features the memory chips can have.
Memory Technologies • Technology has provided faster DRAM speeds without increasing the cost too greatly.
Memory Features • Parity – A method for checking the accuracy of data in or out of the memory chips • Non-parity – Memory chips that do not use any error checking • ECC (Error Correcting Code) – An alternative to parity checking that uses a mathematical algorithm to verify data accuracy
Memory Limitations • Specific operating systems have a memory limitation. • 32-bit Windows has a 4GB memory limitation. • Do not install over 4GB on a computer with a 32-bit operating system such as XP, Vista, or 7. • Even with 4GB, the 32-bit operating system shows less than 4GB because some of that memory space is used for things attached to the PCI bus. • The motherboard has a memory maximum
Amount of Memory to Install • Memory is one of the easiest upgrades to do to a computer to improve performance. • Amount of memory needed depends on • Maximum allowed by the operating system • Types of applications used • How many applications the user wishes to have open at the same time • Type of computer • Maximum allowed by motherboard
Planning the Memory Installation Common Memory Capacities: • DIMM Modules • 256MB, 512MB, 1GB, 2GB, 4GB, 8GB • RIMM Modules • RIMM is not an acronym and is a trademark of Rambus incorporated for the Direct Rambus or DRAM (RDRAM) modules • 64MB, 128 MB, 256MB, 512MB
Planning the Memory Installation The Amount of Memory to Install
Planning for Memory • Single-sided memory - A memory module that the CPU accesses at one time. • The module has one “bank” of memory and 64 bits are transferred out of the memory module to the CPU. • More appropriately called single-banked memory. • Note: that the memory module may or may not have all of its “chips” on one side
Planning for Memory • Double-sided memory - A single memory module that contains two memory modules in one container. • Data is still sent to the CPU 64 bits at a time. • Some use the terms single-sided and double-sided to describe memory modules that have chips on one side (single-sided) or both sides (double-sided). • Another name is double-ranked memory.
Planning for Memory Dual-channel - The motherboard memory controller chip handles processing of memory request more efficiently by handling two memory paths simultaneously.
Tech Tip • Dual-channel should use exact memory module pairs. • Channel A and Channel B (sometimes labeled Channel 0 and Channel 1) should have matching memory modules. • Buy a kit to ensure that the two modules are exact.
Planning for Memory • The researching and buying step of planning for your memory installation/upgrade is most likely the step that can make your head spin. • Different Web sites list memory differently. • Some give you too much information, some too little.
Planning for Memory • A confusing aspect of buying memory is memory speed. • Memory speed can be represented as ns (nanoseconds), MHz, or the DDR PC rating. • Access Time - The amount of time it takes to retrieve data from memory or a device. • CL rating (CAS latency rating)- The amount of time in clock cycled that passes before the CPU moves on to the next memory address. • A CL2 rating is faster than a CL4 rating.
Nanoseconds and the Race Track • The lower the number of nanoseconds, the faster the access time of the memory chips. • Think of access time like a track race - the person with the lowest time wins the race and is considered to be the fastest. • Chips with lower access times (lower amount of nanoseconds) are faster than those with higher access times (larger numbers).
Laptop Memory • SO-DIMM (small outline-DIMM)- Special, smaller DIMM used in laptop computers. • microDIMM- A type of DIMM used in portable computers such as a laptop. • SO-RIMM (small outline-RIMM)- Special, smaller RIMM used in laptop computers.
Installing Memory Overview • Determine which chip capacities can be used for the system. Look in the documentation included with the motherboard or the computer for this information. • Determine how much memory is needed. • Determine what capacity chips go in each bank referring to the documentation of the system or motherboard. • Think ahead
Memory Safety Reminder • Before installing a memory module, power off the computer, disconnect the power cord from the back of the computer, and use proper antistatic procedures. • Memory modules are most susceptible to ESD. If ESD damages a memory module, a problem may not appear immediately and could be intermittent and hard to diagnose.
Removing a DIMM/RIMM • To remove a DIMM or a RIMM, push down on the outside edges of the DIMM’s retaining tabs. The DIMM/RIMM lifts slightly out of the socket.
Installing a DIMM/RIMM • To install a DIMM/RIMM, align the notches with the socket and press down until the tabs close. • DIMM/RIMM is inserted straight down into a socket. • If the DIMM/RIMM does not insert easily, check the notch for proper alignment.
Windows Disk Caching • Virtual Memory - A method of simulating extra memory by using the hard disk space as if it were RAM. • Swap file - A temporary file in hard disk space used by Windows that varies in size depending on the amount of RAM installed, available hard drive space, and the amount of memory needed to run the application.
Windows Disk Caching • Pages – In Windows disk caching, memory space is divided into 4KB blocks called pages. • The operating system swaps or pages the application to and from the temporary swap file on the hard drive as needed if the amount of RAM is not large enough to handle the application. • PAE (physical address extension) - A feature provided by Intel that allows up to 64GB of physical memory to be used for motherboards that support it.
Hard Drive Swap File Tip • If multiple hard drives are available, a technician might want to move the swap file to a different drive. • Always put the swap file on the fastest hard drive unless that hard drive lacks space. • It is best to keep the swap files on a hard drive that does not contain the operating system. • You can configure the computer to place the swap file on multiple hard dives.
Monitoring Memory Usage Under Windows • Performance utility - Windows utility accessed through Task Manager that monitors memory and other hardware parameters usage aspects.
Old Applications Under Windows • NTVDM (NT Virtual DOS Machine)- Simulates a DOS environment inside NT Workstation and higher when an 8- or 16-bit application is being run. • Many dated applications do not operate in the NT/2000/XP environment because these applications frequently make direct calls to hardware, which NT, 2000, XP, Vista, and 7 do not allow.
Troubleshooting Memory Problems • The following tips help with memory management • Add more RAM • Check installation • Empty Recycle Bin • Adjust virtual memory size • Change the virtual memory settings • Do not put the swap file on multiple partitions that reside on the same hard drive. • Put the swap file on a hard disk partition that does not contain the operating systems. • Put the swap file on the fastest hard drive. • Remove the desktop wallpaper scheme or use a plain one. • Adjust your Temporary Internet Files setting • Defragment the hard drive.
Flash Memory • Flash memory- A type of non-volatile memory that holds data when the power is off. • CompactFlash • SD, miniSD, microSD • USB flash drives - Sometimes called a flash drive or a memory stick, USB flash drives allow storage via a USB port, • Formatting – use the device
Tech Tip • No.1 cause of Flash Drive failure is improper removal • When finished using the Flash drive, double-click the Remove Hardware icon located in the System Tray. • The icon has a green arrow. • You may have to click on the left arrow or up arrow to see this icon. • Click Safely Remove Hardware. • Select the appropriate Flash drive, then click Stop and OK. • When a message appears that you can safely remove the drive, pull the Flash drive from the USB port.
Soft Skills - Teamwork - Much of a technician’s work is completed alone. • Technician’s have one or more peers, a supervisor, and a network of partners such as suppliers, subcontractors, and part-time help. • Do not lose sight of the business-first mentality- remember technicians play a support role. • As a technician, you are an EXPENSE on the spreadsheet. - Technicians should be good team players and have good sportsmanship.