SkyDrive for SJA Students
SkyDrive for SJA Students.

SkyDrive for SJA Students
E N D
Presentation Transcript
To access your SkyDrive in the cloud you login through the SJA website>Student Life>Email Log In>. If you are already logged in to the network it will open your school email in web based Outlook. If you are not already logged in to the school network you will have to login using your usual user name and password.
Once you have logged in to your school email through the webpage you will also be logged into SkyDrive. Click on the SkyDrive tab in the top navigation bar.
Everyone has a Shared with Everyone folder in their SkyDrive. This is where you will post materials that you share with anyone in the SJA network.
Once you are in your SkyDrive, click on the Windows button at lower left of your screen and type SkyDrive in the search box. Click on SkyDrive Pro 2013. Wait until it is finished.
Click the blue Change link and open Computer in the list that pops up and then select D drive.
The first time you do this the Sync Now button will probably be grayed out. If this is the case just click the red x and repeat the process starting with click the blue Change button. This time the Sync Now button should be active so click it and wait while it syncs to your computer.
If you want to watch them “fly in” you can click the Show my files button.
Once the Shared with Everyone folder is synced you should add a New Folder and name it Personal (do not use anything other than Personal for the name of this folder.) This is where you keep your files and can share them with only the people you want to give access to. You can share individual files or folders any time you wish.
Next go to Windows button and click on Computer>D and find the link to SkyDrive@St. Joseph’s Academy and right click on it and Send to Desktop to create a shortcut on you desktop. If you ALWAYS work through this shortcut when creating or saving materials, it will automatically back up to your cloud based SkyDrive without having to do it manually.
Ready to Migrate Everything to SkyDrive • Now is a good time to clean out the clutter on your computer and copy all the materials you want to keep to your Personal folder on SkyDrive. • I would start by moving one folder to SkyDrive by copying it from its present location and then click on desktop short cut to SkyDrive Pro and paste it in your Personal folder. • Then go to your cloud SkyDrive by logging in to Faculty Staff Email through SJA webpage. You should see your folder being synced within your Personal folder there.
OneNote is different from all other Office Applications in that it has its own system of saving your work. Have you ever thought about the fact that with Word, Excel etc you must save your work before closing it in order to retain what you have done, but with OneNote you just work in OneNote and it is “magically” saved for you without your having to do anything to make that happen? • This is why we will have to work a bit harder to get your OneNote notebooks syncing with your SkyDrive Pro 2013. • Just follow the steps on the next few slides to set it up. • Once you have set it up, your notebooks will automatically sync to the SkyDrive Pro 2013.
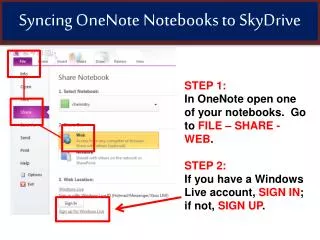
Login to your web based SkyDrive through the sjabr.org website and go to your SkyDrive on the web. Within your Personal folder Create a folder (click on New Document and select New Folder from the list) and name it OneNote Notebooks then minimize that window. 2. Open one of your OneNote notebook from Computer>D Drive>My Documents>OneNote Notebooks. 3. Click on File then select Share then select Network and you will see something like this
The address in the Network Location box should be: https://sjabr-my.sharepoint.com/personal/?????_sjabr_org/Documents/Personal/OneNote notebooks/ but with your username in place of the ????? in the one above. Copy and paste that into the box . Click the Share button at lower right and very patiently wait for it to upload to your web based Skydrive. You will need to repeat this process for each notebook you want to sync to SkyDrive. 7. Once you have done this, if you open your notebooks directly on your computer you will be updating the one on SkyDrive and vice versa.