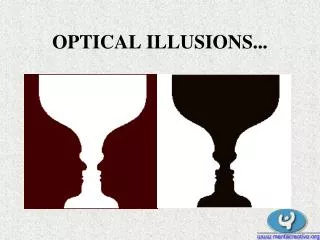
Optical Illusions
Optical Illusions. Vanderbilt Student Volunteers for Science Summer, 2005 Training Presentation. Important!!!. Please use this resource to reinforce your understanding of the lesson! Make sure you have read and understand the entire lesson prior to picking up the kit!

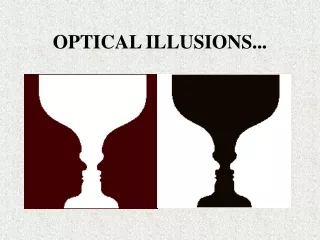
Optical Illusions
E N D
Presentation Transcript
Optical Illusions Vanderbilt Student Volunteers for Science Summer, 2005 Training Presentation
Important!!! • Please use this resource to reinforce your understanding of the lesson! Make sure you have read and understand the entire lesson prior to picking up the kit! • We recommend that you work through the kit with your team prior to going into the classroom. • This presentation does not contain the entire lesson—only selected experiments that may be difficult to visualize and/or understand.
I. Introduction (p.1) • Parts of the eye • External eye muscles - Voluntary muscles that are used to move the eye around. This is how you look from side to side and up and down. • Cornea - The clear structure the center of the outer eye is the cornea. This protects the iris and other internal structures.
I. Introduction (cont.) • Iris • The muscle that controls the size of the pupil (and therefore how much light enters the eye); the colored part of the eye. • Alters the diameter of the pupil to adjust for varying light conditions. • Pupil - The small black hole in the middle of the blue iris (labeled #3) • Where light enters the eye. • Can change size depending on how much light is present (large for dim conditions, small for bright conditions • Lens • The special shape of the lens is what causes light to focus properly. • Shape can be changed by the eye muscles • Depends on whether you are looking at something nearby or far away. • The muscles are in red on the inside of the brown sphere. • DON’T LOSE THE LENS!!
I. Introduction (cont.) • Vitreous humor – (labeled #9) • Clear jelly substance that holds the shape of the eye (i.e. the eyeball). • Retina – (labeled #16) • The back part of the eye where there are special cells called rods and cones that sense light and send signals to the brain via nerves. • Rods - Special cells on the retina that are sensitive to light. Rods detect if there is or is not light (black or white) • Cones - Special cells also on the retina that are sensitive to colored light. There are 3 types of cones, those that respond to red, green, and blue light. Cones require more light to work so they don’t function as well at night - this is why you tend to see things in black and white at night • Blind Spot – • The point where the optic nerve leaves the back of the retina. It is labeled on the inside of the brown sphere with the number 14
II. Persistence of vision (p.3) • What it is • Light reacts with chemicals in the retina and causes them to form new compounds that trigger a message to the brain, allowing you to “see” the object. • The new compounds made in this process linger briefly - about 1/15 of a second. As a result, your brain continues to think it sees the object for 1/15 second after it is removed. • Because the image of the object seems to persist, the phenomenon is called persistence of vision. • A. Slit camera • Pass out one tube to each group. • Have students: Close one eye. Put the other eye to the open end of the tube. Cup your hand around the tube to make a cushion between the tube and your eye. • Hold the tube so that the slit is vertical. • When the slit is stationary you can’t see much. • Keep your head and body still and sweep the far end of the tube back and forth slowly while you look through it. • Increase the scanning speed and compare the views. Notice that when you sweep the tube quickly from side to side, you can obtain a rather clear view of your surroundings.
III. Hole in your hand…(p.4) • Hole in Your hand • Give each student a round paper tube and a sheet of white paper. • Each student should close his/her right eye. • Hold the round tubeup to the open left eye. • Place the edge of the right hand, about 2/3rds down the tube, open palm towards the face. • Open your right eye. You should see a "hole” right through your hand. • Overlapping spots • Students need to get into pairs • One partner should look through both tubes while the other holds up a sheet of white paper. • Put the tubes up to both eyes and look through them like binoculars at the white sheet of paper. Hold the tubes far enough apart so that you see two separate circles. • First close one eye, and then open it and close the other. Does the brightness of the spot appear the same for each eye? (Yes) • Move the tubes to overlap the two spots. Notice that there is a brighter area where the two spots overlap. • Overlap the spots completely. Does the combined spot look brighter than either spot alone? (Yes) • Circles or Ovals • This activity shows how there is a dominant eye just like there is a dominant hand (the dominant hand is usually the hand you write, throw, and eat with). • Hold one of the round tubes up to one eye and the oval one up to the other eye. Look through the tubes at the white screen, wall, or paper. Overlap the spots. Do you see the circle of the oval? • Switch the round and oval tubes and repeat. If you saw only the circle before, you may see the oval now.
III. Thaumatrope (p.5) • Grasp the rubber bands of the thaumatrope between the thumb and forefinger of each hand, about 1/4 inch away from the edge . Roll the rubber bands back and forth quickly so the disk spins over and over. • Watch the image. What do you see? • Select a different Thaumatrope. This time predict what you will see before you spin it. • See if your prediction was correct. • What’s going on? • When you spun the disk, it twirled past your eye so quickly that the image on one side persisted into the time the image of the second side appeared. • Your brain perceived this motion as a blending of the images. This is the same process that we saw with the slit camera.