Fat Max VEX Organizing System
Discover how to effectively organize a complete VEX robotics kit using the Fat Max organizing system. This comprehensive guide illustrates the storage strategy with three trays designed to categorize components by size and function. The top tray is perfect for tools, longer axles, and plastic pieces, while deeper storage accommodates larger components like wheels and batteries. Maintain order with labeled sections to prevent smaller parts from mixing, ensuring easy access and efficient transport of your VEX kit for robotics projects.

Fat Max VEX Organizing System
E N D
Presentation Transcript
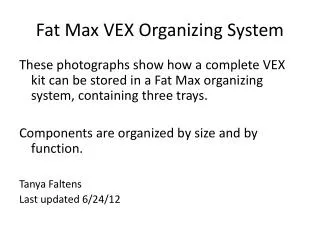
Fat Max VEX Organizing System These photographs show how a complete VEX kit can be stored in a Fat Max organizing system, containing three trays. Components are organized by size and by function. Tanya Faltens Last updated 6/24/12
Top Tray with Handle Tools and longer axles Short plates and brackets Plastic pieces for slider Long slider pieces
Deep Space under the Top Tray All of the long “L” shaped pieces stack together along 2 edges All of the plates and long “C” shaped pieces fit along the bottom 4 largest wheels
Other charger. batteries could go here. 4 Medium wheels 2 VEX Cortexes 2 Smart chargers and power cables. Claw. Motor can remain attached. Batteries and A-A USB cables. Pull-out drawer
Threaded standoffs washers Delrin bearing flats Delrin bearing blocks Shaft collars Square shafts KEPS nuts nylock nuts Pop rivets spacers ties 8-32 ½” 6-32 ¼” 8-32 ¾” 8-32 ¼” 8-32 5/8” 8-32 1” 6-32 ¾”
Extension wires Bump Switches 2 wire motor adapters Various small Gears Limit Switches LEDs Line followers Potentio- meters 269 Motors 269 Motors
Rack pieces Treads Larger Gears Smaller Wheels Chain Intake rollers and pulleys rollers
Place the larger parts that are least likely to slip through near the top of the case. Put copious small parts near the bottom of the case
When the case is lifted by the handle, all of the parts slide towards the new “bottoms” of their containers. Smaller parts can slip through to neighboring sections.