Download
1 / 5
50 likes | 150 Vues
Now on Notes, you can not just type out text, but draw sketches, add photos/videos/documents, embed links and more. Star to take notes on iPhone or iPad and make your life more organized and easy.

E N D
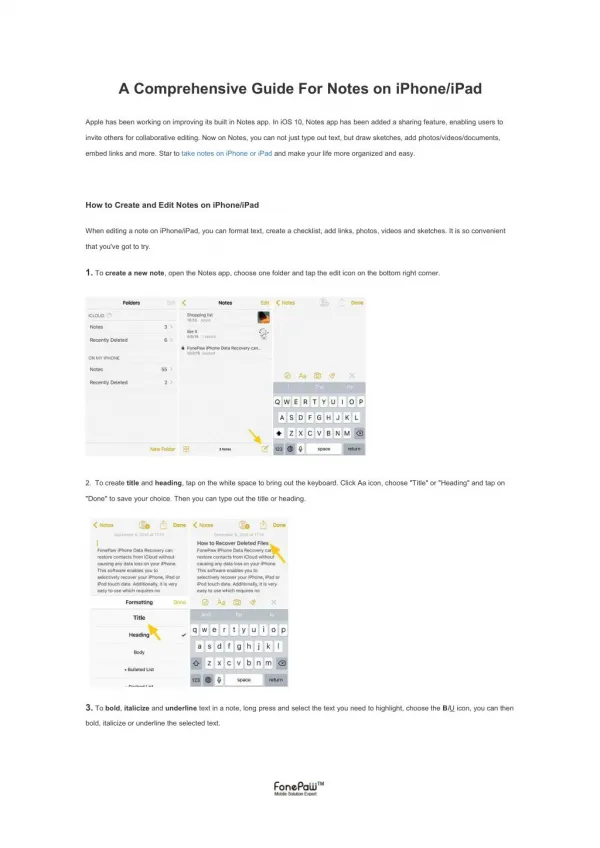
A Comprehensive Guide For Notes on iPhone/iPad Apple has been working on improving its built in Notes app. In iOS 10, Notes app has been added a sharing feature, enabling users to invite others for collaborative editing. Now on Notes, you can not just type out text, but draw sketches, add photos/videos/documents, embed links and more. Star to take notes on iPhone or iPad and make your life more organized and easy. How to Create and Edit Notes on iPhone/iPad When editing a note on iPhone/iPad, you can format text, create a checklist, add links, photos, videos and sketches. It is so convenient that you've got to try. 1. To create a new note, open the Notes app, choose one folder and tap the edit icon on the bottom right corner. 2. To create title and heading, tap on the white space to bring out the keyboard. Click Aa icon, choose "Title" or "Heading" and tap on "Done" to save your choice. Then you can type out the title or heading. 3. To bold, italicize and underline text in a note, long press and select the text you need to highlight, choose the BIU icon, you can then bold, italicize or underline the selected text.
Tip: You can choose to start a new note with heading or title on "Settings" > "Notes" > "New Notes Start With". 4. To add list or checklist to a note, tap on the space you want to add list or checklist, then choose either the Aa icon(add list) or the checklist icon(add checklist). After that, you can feel free to edit each entry. Tip: You can create a bulleted list, dashed list, numbered List on Notes; on a checklist, you can check or uncheck the items, whick make you to be more clear about the done or to-do items. 5. To add photos, draw sketch or sends link to a note: Tap the place you want to add photos, choose the camera icon, and choose to add photos from photo library or take a new photo or video. To draw sketch, choose the sketch icon and on the drawing space, swipe the screen to draw what you want. You may have rule, change the color and weight of the lines with tools on the bottom. You can sends link from Safari, Apple music and locations from Map. For example, when sending a link from Safari, tap on the share icon, and on the pop-up window, you should choose to add the link to a existing note or a new note, and finally tap on "Save".
How to Take Notes with Siri When you have your hands full, how can you take a note on iOS device without typing? Or if you just don't feel like typing, how to note down a great idea or important item? Now you can ask Siri to take a note for you. Step 1. Launch Siri by pressing and holding the Home button or simply say "Hey, Siri" on the iPhone or iPad. Step 2. Say something like"Take a note." Step 3. Then speak out the content of the note. Siri will transform what you say into text and save it on Notes. Tip: You can also ask Siri to show you the note or update the note. To view the note, ask Siri to "Show me my notes about XX" and from the notes presented, tap on the one you want to view. To update the note, tell Siri to ""Update my note". When Siri pull out all your notes, tap on the one you want make change and then dictate what you want to add to the note. How to Sync Notes to iCloud/Gmail/Exchange iPhone/iPad allows you to sync notes to iCloud, Gmail or Exchange so that you can edit, view or finish you notes on other iOS device. 1. To sync notes to iCloud, on "Settings", choose "iCloud" (If you have not logged in on the device, sign in with you iCloud account and password), and turn on Notes in the list.
2. To sync notes to Gmail, Exchange or mail account, again navigate to "Settings", choose "Mail", and select Gmail, Exchange or others. Sign in with your account information, and toggle on Notes under your account. How to Lock Notes with Password and Touch ID Your notes may contain personal or sensitive information, therefore, iPhone and iPad are equipped with lock feature to protect users' privacy. Step 1. Set up password in "Settings" > "Notes"; Step 2. Open the notes you want to lock; Step 3. Tap on the Share button; Step 4. Choose "Lock Note"; Step 5. Enter the password and click the lock icon on the top. The note will be locked. To unlock the note, enter your password or use Touch ID to unlock. How to Recover Deleted Notes From iPhone/iCloud You may record important information on Notes with your iPhone/iPad. But things happen when you accidentally delete the notes or miss some notes after iOS upate or software crash. When losing important notes, you can use FonePaw iPhone Data Recovery to recover the deleted notes directly from iPhone without backup. If have backed up notes to iTunes or iCloud, you can also extract the deleted notes selectively from iCloud or iTunes backup. The program is very easy-to-use. 1. Download the program on computer; 2. Connect your iPhone/iPad to the computer or choose iTunes/iCloud backup; 3. The program will scan your iPhone, iTunes backup, or iCloud backup; 4. View and recover the deleted notes to your computer.
If you have more questions regarding to Notes on iPhone or iPad, leave a message below.