Narrative Behind Faces: The Art of Creating Noh Masks
Delve into the intricate process of crafting Noh masks, shedding light on the spiritual preparation and traditional techniques used in bringing these captivating faces to life.

Narrative Behind Faces: The Art of Creating Noh Masks
E N D
Presentation Transcript
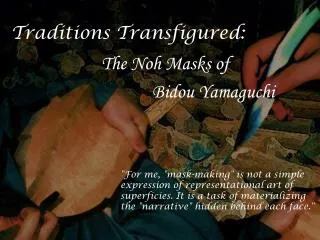
Traditions Transfigured: The Noh Masks of Bidou Yamaguchi "For me, "mask-making" is not a simple expression of representational art of superficies. It is a task of materializing the "narrative" hidden behind each face."
Introduction to Noh Mask Noh, Nō, literally “talent,” is a Japanese dance-drama on the origins of which can be traced to popular entertainment preformed during religious festivals of the 12th and 13th centuries.
Now I will outline the process of making masks, explaining the basic steps in their creation. Process: Usually I know what type of mask I will make before I choose the wood, but sometimes it is only after looking at the character of the wood that I feel what type of mask is appropriate for it.
The first step is called choosing the wood (kidori). To begin I cut off a piece if wood. We use cypress wood (hinoki), typically aged or dried for 80-90 years by the timber suppliers who have been supplying the Noh schools for generations.
I next outline the silhouette of the mask on the wood. These chisels are made with the same technique used to make Japanese swords. Here is a chisel. The blades are fired and pounded repeatedly for sharpness and strength.
This stage also requires spiritual preparation and mental focus before beginning. We measure the wood. Then at last begin the actual carving.
We carve out the back of the mask at the same time that we carve out the front. This stage is called modelling (nakabori) in which we rough out the features of the face. For the rear, we use a gouge and curved chisels.
The next step is the delicate carving to bring out the facial expression. The step is called shiagebori (carving the finishing touches). The detail of the eyes, mouth and nose are carved with a fine chisels. The surface of the entire mask is made smooth a with chisels.
The carving in the back of the mask is the only place where the carver can deviate from tradition and express himself freely. On the left is a completely carved mask, without any color applied.
The next step, uranuri, is to put lacquer on the back of the mask and to sign it. We put in the metal eyes for the mask, usually of demons, that require them. They are attached with glue or sometimes with small metal tacks.
The next stage is applying the first coat of undercoat using pigment, shitanuri. After each coat dries thoroughly, it is polished smooth with chisels, a scouring brush(tokusa), and ground leaves of the mukunoha, aphanatheaspera. The mask is given 4 or 5 coatings, nakanuri, then polished thoroughly
In the final coat, shiagenuri, mineral and vegetable pigments are used. Pigments are made from various minerals including malachite for the green.
Kegaki: hair painting We use fine brushes to make the lines of the beard. Each line has to be painted with single stroke. Several hundred are required to suggest the hair of a beard.